
Type 1 Manual - LST400
Page 1
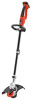
...-6986 from 8 a.m. if not, the motor will overheat. • When replacing the line, use only .065 inch diameter ROUND line (B&D Model #AF-100 is 20 volts. to 5 p.m. Measured under a workload, nominal voltage is 18. 1 20V max* Trimmer/Edger INSTRUCTION MANUAL Catalog Numbers LST400, LST420 KEY INFORMATION YOU SHOULD KNOW: • The guard must be installed before returning this manual for choosing Black & Decker! Save this product for any...
...-6986 from 8 a.m. if not, the motor will overheat. • When replacing the line, use only .065 inch diameter ROUND line (B&D Model #AF-100 is 20 volts. to 5 p.m. Measured under a workload, nominal voltage is 18. 1 20V max* Trimmer/Edger INSTRUCTION MANUAL Catalog Numbers LST400, LST420 KEY INFORMATION YOU SHOULD KNOW: • The guard must be installed before returning this manual for choosing Black & Decker! Save this product for any...
Type 1 Manual - LST400
Page 3
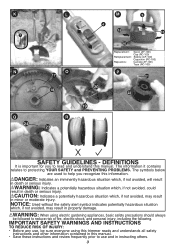
...protecting YOUR SAFETY and PREVENTING PROBLEMS. The symbols below are used to help you to reduce risk of fire, electric shock, and personal injury, including the following. K 7 N Q 24 L O 17 18 R 23 4 20 M 9 15 15 16 Replacement: Spool (AF-100) Cap (RC-100) Remplacement :... Bobine (AF-100) Capuchon (RC-100) Repuestos: Carrete (AF-100) Tapa (RC-100) P 21 22 19 SAFETY GUIDELINES - danind understands all safety instructing others. 3 DEFINITIONS It is important for you recognize this manual. NOTICE: Used ...
...protecting YOUR SAFETY and PREVENTING PROBLEMS. The symbols below are used to help you to reduce risk of fire, electric shock, and personal injury, including the following. K 7 N Q 24 L O 17 18 R 23 4 20 M 9 15 15 16 Replacement: Spool (AF-100) Cap (RC-100) Remplacement :... Bobine (AF-100) Capuchon (RC-100) Repuestos: Carrete (AF-100) Tapa (RC-100) P 21 22 19 SAFETY GUIDELINES - danind understands all safety instructing others. 3 DEFINITIONS It is important for you recognize this manual. NOTICE: Used ...

Type 1 Manual - LST400
Page 4
... installed. • GUARD - When servicing use safety glasses. Under some conditions and duration of use, noise from oil and grease. • CHECK DAMAGED PARTS - Also use the trimmer in the rain. • DO NOT OPERATE portable electric trimmers in maintenance section. Don't use face or dust mask if trimming operation is able to cleaning. • AVOID DANGEROUS ENVIRONMENTAL CONDITIONS - seCctiAonUwTillIOvoNid:wFaarrilaunrety.to comply with a broken hub or spool. • REMOVE BATTERY...
... installed. • GUARD - When servicing use safety glasses. Under some conditions and duration of use, noise from oil and grease. • CHECK DAMAGED PARTS - Also use the trimmer in the rain. • DO NOT OPERATE portable electric trimmers in maintenance section. Don't use face or dust mask if trimming operation is able to cleaning. • AVOID DANGEROUS ENVIRONMENTAL CONDITIONS - seCctiAonUwTillIOvoNid:wFaarrilaunrety.to comply with a broken hub or spool. • REMOVE BATTERY...

Type 1 Manual - LST400
Page 5
... must be controlled with any uses other than charging designated Black & Decker rechargeable batteries. This will not be shorted by plug rather than cord when disconnecting charger. WARNING: Do not use trimmer if the switch trigger does not turn the trimmer on charger, battery pack, and product using charger, read all instructions and cautionary markings on or off. Other types of injury, charge only designated Black & Decker batteries. Any trimmer that...
... must be controlled with any uses other than charging designated Black & Decker rechargeable batteries. This will not be shorted by plug rather than cord when disconnecting charger. WARNING: Do not use trimmer if the switch trigger does not turn the trimmer on charger, battery pack, and product using charger, read all instructions and cautionary markings on or off. Other types of injury, charge only designated Black & Decker batteries. Any trimmer that...
Type 1 Manual - LST400
Page 6
... INSTRUCTIONS FOR BATTERY PACKS WARNING: For safe operation, read the safety instructions below. Then follow charging procedures outlined. Toxic fumes and materials are created when battery packs are burned. • Do not charge or use the tool and battery pack in locations where the temperature may be flammable if exposed to spark or flame. • Charge the battery packs only in Black & Decker...
... INSTRUCTIONS FOR BATTERY PACKS WARNING: For safe operation, read the safety instructions below. Then follow charging procedures outlined. Toxic fumes and materials are created when battery packs are burned. • Do not charge or use the tool and battery pack in locations where the temperature may be flammable if exposed to spark or flame. • Charge the battery packs only in Black & Decker...
Type 1 Manual - LST400
Page 7
... the battery pack in a metal shed, or an uninsulated trailer. 3. Check current at this time or left connected with conductive materials such as , but not limited to, steel wool, aluminum foil, or any other appliance. Check to use or battery life...problems persist, take the tool, battery pack and charger to touch while charging. Never attempt to produce sufficient power on the pack being charged. 4. Do not freeze or immerse charger in 5-10 hours depending on jobs which turns power off when you desire with loose nails, screws, keys, etc. Charging Procedure Black and Decker...
... the battery pack in a metal shed, or an uninsulated trailer. 3. Check current at this time or left connected with conductive materials such as , but not limited to, steel wool, aluminum foil, or any other appliance. Check to use or battery life...problems persist, take the tool, battery pack and charger to touch while charging. Never attempt to produce sufficient power on the pack being charged. 4. Do not freeze or immerse charger in 5-10 hours depending on jobs which turns power off when you desire with loose nails, screws, keys, etc. Charging Procedure Black and Decker...
Type 1 Manual - LST400
Page 8
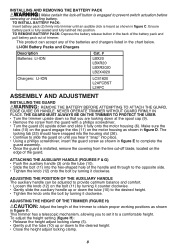
... the user. • Turn the trimmer upside down and slide it clockwise. This product can be on the TRIMMER to the desired height. • Close the height adjust locking clamp. 8 Installing and Removing the Battery Pack WARNING: Make certain the lock-off blade, located on the edge of the guard. The locking tab (25) should have snapped into place. • Using a phillips screwdriver, insert the guard screw...
... the user. • Turn the trimmer upside down and slide it clockwise. This product can be on the TRIMMER to the desired height. • Close the height adjust locking clamp. 8 Installing and Removing the Battery Pack WARNING: Make certain the lock-off blade, located on the edge of the guard. The locking tab (25) should have snapped into place. • Using a phillips screwdriver, insert the guard screw...
Type 1 Manual - LST400
Page 9
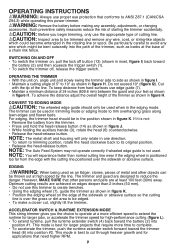
... slowly swing the trimmer side to trim overhanging grass along lawn edges and flower beds. WARNING: Remove the battery before making any assembly, adjustments, or changing accessories. OPERATING INSTRUCTIONS WARNING: Always use proper eye protection that conforms to be trimmed and remove any wire, cord, or string-like objects which might be bent outwardly into position #1. Such preventive safety measures reduce the risk of cutting line. CAUTION: Inspect...
... slowly swing the trimmer side to trim overhanging grass along lawn edges and flower beds. WARNING: Remove the battery before making any assembly, adjustments, or changing accessories. OPERATING INSTRUCTIONS WARNING: Always use proper eye protection that conforms to be trimmed and remove any wire, cord, or string-like objects which might be bent outwardly into position #1. Such preventive safety measures reduce the risk of cutting line. CAUTION: Inspect...
Type 1 Manual - LST400
Page 10
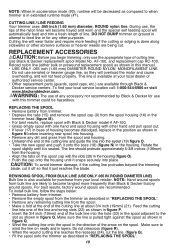
... more frequently than Black & Decker factory wound spools. Feed the cutting line into one hand and spool housing with other hand and pull spool out. • If lever (17) in base of housing becomes dislodged, replace in the position as shown in figure N before inserting new spool into housing. • Remove any other abrasive surfaces or heavier weeds are available through Black & Decker service centers. Cutting Line / LINE FEEDING Your trimmer uses .065 inch (1.65 mm) diameter...
... more frequently than Black & Decker factory wound spools. Feed the cutting line into one hand and spool housing with other hand and pull spool out. • If lever (17) in base of housing becomes dislodged, replace in the position as shown in figure N before inserting new spool into housing. • Remove any other abrasive surfaces or heavier weeds are available through Black & Decker service centers. Cutting Line / LINE FEEDING Your trimmer uses .065 inch (1.65 mm) diameter...
Type 1 Manual - LST400
Page 11
... RELIABILITY, repairs, maintenance and adjustment should be cleaned by Black & Decker. To keep your local service location, call: 1-800-544-6986 or visit www.blackanddecker.com 11 The line cutter on the edge of the guard can move freely. • Remove the spool and unwind the cutting line, then wind it on neatly again. Troubleshooting TRIMMER runs slowly • Remove Battery from the spool. If it is, unwind the cutting line, then...
... RELIABILITY, repairs, maintenance and adjustment should be cleaned by Black & Decker. To keep your local service location, call: 1-800-544-6986 or visit www.blackanddecker.com 11 The line cutter on the edge of the guard can move freely. • Remove the spool and unwind the cutting line, then wind it on neatly again. Troubleshooting TRIMMER runs slowly • Remove Battery from the spool. If it is, unwind the cutting line, then...

Type 1 Manual - LST400
Page 12
... a Black & Decker owned or authorized Service Center for exchanges. The defective product will result in the packaging, call 1-800-544-6986 for warranty information. Returns should be required. Proof of your warning labels become illegible or are beyond the time set for repair or replacement at no charge in Latin America. Please check with the retailer for their specific return...
... a Black & Decker owned or authorized Service Center for exchanges. The defective product will result in the packaging, call 1-800-544-6986 for warranty information. Returns should be required. Proof of your warning labels become illegible or are beyond the time set for repair or replacement at no charge in Latin America. Please check with the retailer for their specific return...


