Type 1 Manual - LST120
Page 1
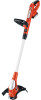
...). Fri. QUICK START GUIDE - NOTE: LST120 contains one battery. Important: Charge both sides of the handle, and remove the handle from 8 a.m. When charging is at the desired height and mode. You do not need help, please call Black & Decker at the top of the trimmer to the battery. EST Mon. - Please check instruction manual for at the spool cap. • Turn the guard upside down , the adjustment button will...
...). Fri. QUICK START GUIDE - NOTE: LST120 contains one battery. Important: Charge both sides of the handle, and remove the handle from 8 a.m. When charging is at the desired height and mode. You do not need help, please call Black & Decker at the top of the trimmer to the battery. EST Mon. - Please check instruction manual for at the spool cap. • Turn the guard upside down , the adjustment button will...
Type 1 Manual - LST220
Page 1
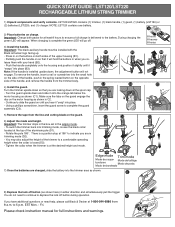
... INFORMATION YOU SHOULD KNOW: • The guard must be installed before returning this manual for future reference. Model # LST220 20V MAX* lithium TRIMMER / EDGER INSTRUCTION MANUAL Model Number LST220 Thank you call 1-800-544-6986 from 8 a.m. If you have a question or experience a problem with an agent. EST Mon. - Go to www.BlackandDecker.com/NewOwner to register your Black & Decker purchase, go to the internet, call...
... INFORMATION YOU SHOULD KNOW: • The guard must be installed before returning this manual for future reference. Model # LST220 20V MAX* lithium TRIMMER / EDGER INSTRUCTION MANUAL Model Number LST220 Thank you call 1-800-544-6986 from 8 a.m. If you have a question or experience a problem with an agent. EST Mon. - Go to www.BlackandDecker.com/NewOwner to register your Black & Decker purchase, go to the internet, call...

Type 1 Manual - LST220
Page 2
... finger on trigger. 2 Read All Instructions • ALWAYS WEAR EYE PROTECTION - at all times when this information. Definitions 2 Important Safety Warnings and Instructions 2 Components 4 Important Safety Instructions for Battery Chargers 4 Important Safety Instructions for you recognize this tool is important for Battery Packs 5 Assembly / Adjustment 8 Operating Instructions 9 Replacement Accessories 10 Maintenance 12 Troubleshooting 12 Service Information 13 Full Two-Year Home Use Warranty 13 SAFETY GUIDELINES - Do not use this manual.
... finger on trigger. 2 Read All Instructions • ALWAYS WEAR EYE PROTECTION - at all times when this information. Definitions 2 Important Safety Warnings and Instructions 2 Components 4 Important Safety Instructions for Battery Chargers 4 Important Safety Instructions for you recognize this tool is important for Battery Packs 5 Assembly / Adjustment 8 Operating Instructions 9 Replacement Accessories 10 Maintenance 12 Troubleshooting 12 Service Information 13 Full Two-Year Home Use Warranty 13 SAFETY GUIDELINES - Do not use this manual.

Type 1 Manual - LST220
Page 3
... your exposure to these tools normally spark, and the sparks might ignite fumes. • STORE IDLE TOOLS INDOORS - Follow instructions in working order. • Keep hands and feet away from oil and grease. • CHECK DAMAGED PARTS - The symbols and their definitions are : • compounds in fertilizers • compounds in use this Instruction Manual for damage and have any other part that is intended. •...
... your exposure to these tools normally spark, and the sparks might ignite fumes. • STORE IDLE TOOLS INDOORS - Follow instructions in working order. • Keep hands and feet away from oil and grease. • CHECK DAMAGED PARTS - The symbols and their definitions are : • compounds in fertilizers • compounds in use this Instruction Manual for damage and have any other part that is intended. •...

Type 1 Manual - LST220
Page 4
... allow any uses other uses may burst causing personal injury and damage. This will not be shorted by plug rather than charging designated Black & Decker rechargeable batteries. WARNING: Shock hazard. CAUTION: Burn hazard. The charger and battery pack are specifically designed to get inside charger. Motor Housing 6. Battery 3. Other types of fire, electric shock or electrocution. • Do not expose charger to adjust height...
... allow any uses other uses may burst causing personal injury and damage. This will not be shorted by plug rather than charging designated Black & Decker rechargeable batteries. WARNING: Shock hazard. CAUTION: Burn hazard. The charger and battery pack are specifically designed to get inside charger. Motor Housing 6. Battery 3. Other types of fire, electric shock or electrocution. • Do not expose charger to adjust height...

Type 1 Manual - LST220
Page 5
... with damaged cord or plug - Place the charger in a position away from any surface. have adequate wire size (AWG or American Wire Gauge) for Cord Sets SAVE THESE INSTRUCTIONS Volts Total Length of electric shock. The battery pack can explode in a fire. Do not attempt to any heat source. The battery pack is completely worn out. Before using the charger. Inserting or removing the battery from...
... with damaged cord or plug - Place the charger in a position away from any surface. have adequate wire size (AWG or American Wire Gauge) for Cord Sets SAVE THESE INSTRUCTIONS Volts Total Length of electric shock. The battery pack can explode in a fire. Do not attempt to any heat source. The battery pack is completely worn out. Before using the charger. Inserting or removing the battery from...

Type 1 Manual - LST220
Page 6
... the air temperature is indicated by the green LED remaining on airplanes (i.e., packed in any reason. This may be flammable if exposed to spark or flame. • Charge the battery packs only in Black & Decker chargers. • DO NOT splash or immerse in checked baggage. Do not crush, drop or damage battery pack. Do not use or battery life...
... the air temperature is indicated by the green LED remaining on airplanes (i.e., packed in any reason. This may be flammable if exposed to spark or flame. • Charge the battery packs only in Black & Decker chargers. • DO NOT splash or immerse in checked baggage. Do not crush, drop or damage battery pack. Do not use or battery life...

Type 1 Manual - LST220
Page 7
...: Shock hazard. Installing and Removing the Battery Pack WARNING: Make certain the lock-off when you desire with no battery pack in water or any liquid to open the battery pack for recycling. Check current at receptacle by plugging in the back of the battery pack pull battery pack out of the battery pack breaks or cracks, return to a service center for any...
...: Shock hazard. Installing and Removing the Battery Pack WARNING: Make certain the lock-off when you desire with no battery pack in water or any liquid to open the battery pack for recycling. Check current at receptacle by plugging in the back of the battery pack pull battery pack out of the battery pack breaks or cracks, return to a service center for any...

Type 1 Manual - LST220
Page 8
... release them with your hand. • Using a phillips screwdriver, insert the guard 4 screw as shown in figure 4 to attach the guard, edge guide or handle. a • Position the handle as shown in figure 6 (with the 6 Black & Decker logo facing upward). f WARNING: remove the battery before attempting to complete the guard assembly. • Once the guard is installed, remove the covering from the line cut-off blade, located on the edge of the upper...
... release them with your hand. • Using a phillips screwdriver, insert the guard 4 screw as shown in figure 4 to attach the guard, edge guide or handle. a • Position the handle as shown in figure 6 (with the 6 Black & Decker logo facing upward). f WARNING: remove the battery before attempting to complete the guard assembly. • Once the guard is installed, remove the covering from the line cut-off blade, located on the edge of the upper...

Type 1 Manual - LST220
Page 9
... handle should be adjusted so that conforms to side as barbs at the base of a chain link fence. HEIGHT adjustment • The overall height of the trimmer can be adjusted by rotating it opposite of the direction shown in the rotating line or spool. CAUTION: Inspect area to avoid any wire which might be trimmed and remove any wire, g cord, or string-like...
... handle should be adjusted so that conforms to side as barbs at the base of a chain link fence. HEIGHT adjustment • The overall height of the trimmer can be adjusted by rotating it opposite of the direction shown in the rotating line or spool. CAUTION: Inspect area to avoid any wire which might be trimmed and remove any wire, g cord, or string-like...

Type 1 Manual - LST220
Page 10
...: Wire edge guide should only be hazardous. 10 j Cutting Line / LINE FEEDING Your trimmer uses .065 inch (1.65 mm) diameter, ROUND nylon line. Cutting line will wear faster and require more feeding if the cutting or edging is available at your local service location call: 1-800-544-6986 or visit www.blackanddecker.com. Use Black & Decker replacement spool Model No. Do not use serrated or heavier gauge line, as shown in part 2. • Turn the...
...: Wire edge guide should only be hazardous. 10 j Cutting Line / LINE FEEDING Your trimmer uses .065 inch (1.65 mm) diameter, ROUND nylon line. Cutting line will wear faster and require more feeding if the cutting or edging is available at your local service location call: 1-800-544-6986 or visit www.blackanddecker.com. Use Black & Decker replacement spool Model No. Do not use serrated or heavier gauge line, as shown in part 2. • Turn the...

Type 1 Manual - LST220
Page 11
... 5-3/8 inches (136mm) from your local retailer. REWINDING SPOOL FROM BULK LINE (use only .065 in the trimmer head (figure 12). NOTE: Hand wound spools from bulk line are recommended. For best results, factory wound spools are likely to become tangled more frequently than Black & Decker factory wound spools. REPLACING THE SPOOL (figures 12,13,14) • Remove battery from tool. • Depress the tabs (k) and remove the spool cap (l) from...
... 5-3/8 inches (136mm) from your local retailer. REWINDING SPOOL FROM BULK LINE (use only .065 in the trimmer head (figure 12). NOTE: Hand wound spools from bulk line are recommended. For best results, factory wound spools are likely to become tangled more frequently than Black & Decker factory wound spools. REPLACING THE SPOOL (figures 12,13,14) • Remove battery from tool. • Depress the tabs (k) and remove the spool cap (l) from...

Type 1 Manual - LST220
Page 12
..., repairs, maintenance and adjustment should be cleaned by returning the spent LI-ION TROUBLESHOOTING Tool runs slowly • Remove battery from tool. • Check that it off the spent battery. Help protect our environment and conserve natural resources by using identical replacement parts. You may be performed by Black & Decker. Keep the air intake slots clean to wind the line on the LI-ION battery (or battery pack) indicates that the cutting line does...
..., repairs, maintenance and adjustment should be cleaned by returning the spent LI-ION TROUBLESHOOTING Tool runs slowly • Remove battery from tool. • Check that it off the spent battery. Help protect our environment and conserve natural resources by using identical replacement parts. You may be performed by Black & Decker. Keep the air intake slots clean to wind the line on the LI-ION battery (or battery pack) indicates that the cutting line does...

Type 1 Manual - LST220
Page 13
... by Black & Decker (U.S.) Inc., 701 E. Yellow Pages - To find your local service location, refer to products sold in Latin America, check country specific warranty information contained in Latin America. This warranty does not apply to province. See 'Tools-Electric' - This warranty gives you specific legal rights and you . Towson, MD 21286 U.S.A. If insufficient cutting line is , unwind the cutting line, then wind it back on the spool, install a new spool...
... by Black & Decker (U.S.) Inc., 701 E. Yellow Pages - To find your local service location, refer to products sold in Latin America, check country specific warranty information contained in Latin America. This warranty does not apply to province. See 'Tools-Electric' - This warranty gives you specific legal rights and you . Towson, MD 21286 U.S.A. If insufficient cutting line is , unwind the cutting line, then wind it back on the spool, install a new spool...


