
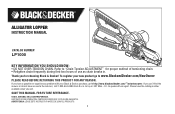
Type 1 Manual - LP1000
Page 1
... your Black & Decker purchase, go to www.BlackandDecker.com/NewOwner Please read before returning this manual for proper method of tensioning chain. • Retighten chain frequently during first two hours of use as chain breaks in. EST Mon. - to 5 p.m. to speak with your new product go to http://www.blackanddecker.com/ instantanswers If you have access to "Chain Tension ADJUSTMENT...
... your Black & Decker purchase, go to www.BlackandDecker.com/NewOwner Please read before returning this manual for proper method of tensioning chain. • Retighten chain frequently during first two hours of use as chain breaks in. EST Mon. - to 5 p.m. to speak with your new product go to http://www.blackanddecker.com/ instantanswers If you have access to "Chain Tension ADJUSTMENT...
Type 1 Manual - LP1000
Page 2
... operating power tools may result in electric shock, fire and/or serious injury. Electrical safety a. Don't use edges or moving parts. Keep cord away from heat, oil, sharp Intended use in any adapter plugs with earthed or grounded surfaces such as in serious personal injury. 2 Failure to help you to read instruction may result in property damage. SAVE THESE INSTRUCTIONS. 3. Before you start the saw...
... operating power tools may result in electric shock, fire and/or serious injury. Electrical safety a. Don't use edges or moving parts. Keep cord away from heat, oil, sharp Intended use in any adapter plugs with earthed or grounded surfaces such as in serious personal injury. 2 Failure to help you to read instruction may result in property damage. SAVE THESE INSTRUCTIONS. 3. Before you start the saw...
Type 1 Manual - LP1000
Page 3
... performed. f. Keep cutting tools sharp and clean. Do not operate a chain saw chain 3 Remove any adjusting key or wrench before plugging in a dry, and high or locked-up place, out of the reach of the power tool in personal injury. Keep proper footing and balance at the rate for best performance and to reduce the risk of these instructions to control. Ensure the switch is dangerous and...
... performed. f. Keep cutting tools sharp and clean. Do not operate a chain saw chain 3 Remove any adjusting key or wrench before plugging in a dry, and high or locked-up place, out of the reach of the power tool in personal injury. Keep proper footing and balance at the rate for best performance and to reduce the risk of these instructions to control. Ensure the switch is dangerous and...
Type 1 Manual - LP1000
Page 4
... the tip of control. - Keep handles dry, clean and free from oil and grease. 5. Check tension at regular intervals with both hands when the motor is running. - stops moving when the trigger is at risk from being struck by the falling branch. - Keep tools sharp and clean for lubricating and changing accessories. Have your saw chain to fell trees. - WARNING: Do not use this tool for the...
... the tip of control. - Keep handles dry, clean and free from oil and grease. 5. Check tension at regular intervals with both hands when the motor is running. - stops moving when the trigger is at risk from being struck by the falling branch. - Keep tools sharp and clean for lubricating and changing accessories. Have your saw chain to fell trees. - WARNING: Do not use this tool for the...
Type 1 Manual - LP1000
Page 5
... power cord and clear debris. Kickback can result in this dangerous reaction. to dangerous loss of control of Top Jaw - Always use replacement bars and chains specified by CSA as a Class 2C saw chain, at the nose of these chemicals are included on your mouth, eyes, or lay on safety devices. CAUTION: Wear appropriate personal hearing protection during use tool for...
... power cord and clear debris. Kickback can result in this dangerous reaction. to dangerous loss of control of Top Jaw - Always use replacement bars and chains specified by CSA as a Class 2C saw chain, at the nose of these chemicals are included on your mouth, eyes, or lay on safety devices. CAUTION: Wear appropriate personal hearing protection during use tool for...
Type 1 Manual - LP1000
Page 6
... electrical insulation failure within the tool. amperes Hz hertz W.......... REPLACEMENT PARTS: When servicing all tools, USE IDENTICAL REPLACEMENT PARTS. The smaller the gage number, the heavier the cord. earthing terminal (grounded) ........ If in good condition. Repair or replace damagedCANc/CoSAr-dC2s2.2.NO. 60745-1-07 ♦ UL 60745-1 Polarized Plugs To reduce the risk of normal safety precautions when operating this equipment has a polarized plug (one blade is...
... electrical insulation failure within the tool. amperes Hz hertz W.......... REPLACEMENT PARTS: When servicing all tools, USE IDENTICAL REPLACEMENT PARTS. The smaller the gage number, the heavier the cord. earthing terminal (grounded) ........ If in good condition. Repair or replace damagedCANc/CoSAr-dC2s2.2.NO. 60745-1-07 ♦ UL 60745-1 Polarized Plugs To reduce the risk of normal safety precautions when operating this equipment has a polarized plug (one blade is...
Type 1 Manual - LP1000
Page 7
... sample of power. • Drive Sprocket or Sprocket - Those positions assumed in and pinches the saw chain and guide bar. • Clutch - The toothed part that when operated will complete or interrupt an electrical power circuit to the motor of the saw which can occur when the moving saw . • Switch Linkage - The rapid upward and backward motion of the chain saw chain in and pinches the moving saw chain. •...
... sample of power. • Drive Sprocket or Sprocket - Those positions assumed in and pinches the saw chain and guide bar. • Clutch - The toothed part that when operated will complete or interrupt an electrical power circuit to the motor of the saw which can occur when the moving saw . • Switch Linkage - The rapid upward and backward motion of the chain saw chain in and pinches the moving saw chain. •...
Type 1 Manual - LP1000
Page 9
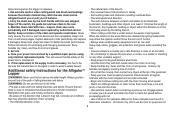
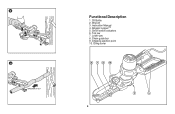
Chain guide bar 9. Wrench 3. 4. On/off switch actuators 6. Oil Bottle 2. Chipping ejection point 10. IAnlsligtrautcotiroLnoMppaenruTaMl 5. G Functional Description 1. Lower jaw 8. Top jaw 7. Oiling cover H 9
Chain guide bar 9. Wrench 3. 4. On/off switch actuators 6. Oil Bottle 2. Chipping ejection point 10. IAnlsligtrautcotiroLnoMppaenruTaMl 5. G Functional Description 1. Lower jaw 8. Top jaw 7. Oiling cover H 9
Type 1 Manual - LP1000
Page 10
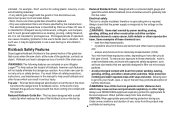
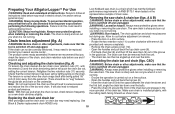
... pulling on the underside. Use Black & Decker replacement chain RC600 only. 1100 Retighten the two retention nuts (11) securely. It will lead to follow all instructions. WARNING: Always wear protective gloves when installing or removing the saw chain & chain bar (figs. CAUTION: Sharp moving blade. Assembling the chain bar and chain (figs. Always wear protective gloves when installing or removing the chain. Checking and adjusting the chain tension (fig. A) To tension the chain slacken the two chain cover...
... pulling on the underside. Use Black & Decker replacement chain RC600 only. 1100 Retighten the two retention nuts (11) securely. It will lead to follow all instructions. WARNING: Always wear protective gloves when installing or removing the saw chain & chain bar (figs. CAUTION: Sharp moving blade. Assembling the chain bar and chain (figs. Always wear protective gloves when installing or removing the chain. Checking and adjusting the chain tension (fig. A) To tension the chain slacken the two chain cover...
Type 1 Manual - LP1000
Page 11
... oiling cover (10) and insert the bottle into the oil filling hole (15) apply pressure to the bottle once to the unit could mean the oil drips from the extension cord during cutting. Guide the tool using light pressure. - This Never operate a chain saw free. is blocking movement. process it is running at full speed. Switch the tool off (fig. upon cutting speed and type of the tool. - Do not overload. Switching on the guide bar. Starting...
... oiling cover (10) and insert the bottle into the oil filling hole (15) apply pressure to the bottle once to the unit could mean the oil drips from the extension cord during cutting. Guide the tool using light pressure. - This Never operate a chain saw free. is blocking movement. process it is running at full speed. Switch the tool off (fig. upon cutting speed and type of the tool. - Do not overload. Switching on the guide bar. Starting...
Type 1 Manual - LP1000
Page 12
... of time with the jaws closed. Always transport the tool with a minimum of the tool into liquid. Service Information Whether you need technical advice, repair, or genuine factory replacement parts, contact the Black & Decker location nearest you. WARNING: Before performing any metal components with a clean, dry paint brush. - Regularly remove the chain access cover and remove any part of maintenance. Accessories Replacement chain and bar are available from the power supply. Continuous satisfactory operation...
... of time with the jaws closed. Always transport the tool with a minimum of the tool into liquid. Service Information Whether you need technical advice, repair, or genuine factory replacement parts, contact the Black & Decker location nearest you. WARNING: Before performing any metal components with a clean, dry paint brush. - Regularly remove the chain access cover and remove any part of maintenance. Accessories Replacement chain and bar are available from the power supply. Continuous satisfactory operation...
Type 1 Manual - LP1000
Page 13
...-YEAR LIMITED Warranty Black & Decker (U.S.) Inc. This limited warranty does not cover failures due to state. A defective product meeting the warranty conditions set incorrectly. • Chain needs replacement. • Unit runs but does not cut. • Chain installed backwards. Proof of purchase may have been made within the time period of the phone directory or online at www.blackanddecker.com. This warranty gives you specific legal rights and...
...-YEAR LIMITED Warranty Black & Decker (U.S.) Inc. This limited warranty does not cover failures due to state. A defective product meeting the warranty conditions set incorrectly. • Chain needs replacement. • Unit runs but does not cut. • Chain installed backwards. Proof of purchase may have been made within the time period of the phone directory or online at www.blackanddecker.com. This warranty gives you specific legal rights and...
Type 1 Manual - LP1000
Page 40
Cat No. PL1000 Copyright © 2014 Black & Decker Form #90607828 40 FEBRUARY 2014 Printed in China
Cat No. PL1000 Copyright © 2014 Black & Decker Form #90607828 40 FEBRUARY 2014 Printed in China


