Instruction Manual
Page 1
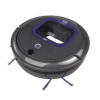
...number available when you for choosing BLACK+DECKER! ADVERTENCIA: LÉASE ESTE INSTRUCTIVO ANTES DE USAR EL PRODUCTO. EST Mon. - VEA EL ESPANOL EN LA CONTRAPORTADA. PLEASE READ BEFORE RETURNING THIS PRODUCT FOR ANY REASON. If you can't find the answer or do not have a question or experience a problem with an agent. To register your BLACK+DECKER... with your new product, call 1-800-544-6986 or visit www.BlackandDecker.com/NewOwner Fri. SAVE THIS MANUAL FOR FUTURE REFERENCE. ROBOTIC VACUUM INSTRUCTION MANUAL CATALOG NUMBER HRV425BL HRV425BLP HRV420BP07 Thank you call....
...number available when you for choosing BLACK+DECKER! ADVERTENCIA: LÉASE ESTE INSTRUCTIVO ANTES DE USAR EL PRODUCTO. EST Mon. - VEA EL ESPANOL EN LA CONTRAPORTADA. PLEASE READ BEFORE RETURNING THIS PRODUCT FOR ANY REASON. If you can't find the answer or do not have a question or experience a problem with an agent. To register your BLACK+DECKER... with your new product, call 1-800-544-6986 or visit www.BlackandDecker.com/NewOwner Fri. SAVE THIS MANUAL FOR FUTURE REFERENCE. ROBOTIC VACUUM INSTRUCTION MANUAL CATALOG NUMBER HRV425BL HRV425BLP HRV420BP07 Thank you call....

Instruction Manual
Page 2
Side brushes (2) b. English Fig. HEPA filter Side brush screws (2) c. A 9 6 10 15 28 16 8 17 3 18 5 7 4 11 19 4 7 12 11 4 13 4 2 1 14 A B C 1 Power switch 2 Charging socket 3 Start/Stop button 4 Ground detection sensor 5 Front wheel 6 Infrared receiver 7 Charging plate 8 Front lens 9 Dust bin 10 Dust bin release button 11 Side brushes 12 Main brush 2 13 Main brush frame 14 Main brush frame tabs 15 Charging dock 16 Charging dock infrared window 17 Charging electrodes 18 Battery charger 19 Maintenance tool 28 Charging dock pairing button Additional Accessories a.
Side brushes (2) b. English Fig. HEPA filter Side brush screws (2) c. A 9 6 10 15 28 16 8 17 3 18 5 7 4 11 19 4 7 12 11 4 13 4 2 1 14 A B C 1 Power switch 2 Charging socket 3 Start/Stop button 4 Ground detection sensor 5 Front wheel 6 Infrared receiver 7 Charging plate 8 Front lens 9 Dust bin 10 Dust bin release button 11 Side brushes 12 Main brush 2 13 Main brush frame 14 Main brush frame tabs 15 Charging dock 16 Charging dock infrared window 17 Charging electrodes 18 Battery charger 19 Maintenance tool 28 Charging dock pairing button Additional Accessories a.
Instruction Manual
Page 3
... is necessary when used for commercial or industrial use to repair the vacuum cleaner except as described in this product. • Turn off -position before any routine cleaning or maintenance. • Do not look into openings. avoid contact. Liquid ejected from the floor that become compromised if more than 3 Test the appliance on robot. • Do not handle charger, including charger plug, and charger...
... is necessary when used for commercial or industrial use to repair the vacuum cleaner except as described in this product. • Turn off -position before any routine cleaning or maintenance. • Do not look into openings. avoid contact. Liquid ejected from the floor that become compromised if more than 3 Test the appliance on robot. • Do not handle charger, including charger plug, and charger...
Instruction Manual
Page 4
... not use the vacuum in the ON position (I ) for the vacuum to charge. 1. This is not recommended) NOTE: Vacuum may not work on a flat surface. 3. Fig. D) IMPORTANT: The power switch ( 1 ) MUST be in the following floor surfaces: • Hardwood/Laminate • Ceramic/Stone tile • Low and medium pile carpets (plush carpeting is normal and does not indicate a problem. The Start/Stop button ( 3 ) will turn off...
... not use the vacuum in the ON position (I ) for the vacuum to charge. 1. This is not recommended) NOTE: Vacuum may not work on a flat surface. 3. Fig. D) IMPORTANT: The power switch ( 1 ) MUST be in the following floor surfaces: • Hardwood/Laminate • Ceramic/Stone tile • Low and medium pile carpets (plush carpeting is normal and does not indicate a problem. The Start/Stop button ( 3 ) will turn off...
Instruction Manual
Page 5
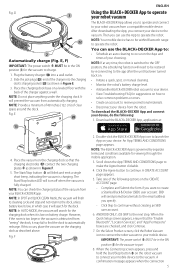
... power switch ( 1 ) MUST be restored by separate terms and conditions available for the dock. Then you to operate and connect to continue. Download the BLACK+DECKER App, application at any time, the robot is low, in the ON position (I ) for the vacuum to create a Stanley Black & Decker (SBD) user account. Place the vacuum on the robot vacuum to connect your device. • View Troubleshooting FAQ...
... power switch ( 1 ) MUST be restored by separate terms and conditions available for the dock. Then you to operate and connect to continue. Download the BLACK+DECKER App, application at any time, the robot is low, in the ON position (I ) for the vacuum to create a Stanley Black & Decker (SBD) user account. Place the vacuum on the robot vacuum to connect your device. • View Troubleshooting FAQ...
Instruction Manual
Page 6
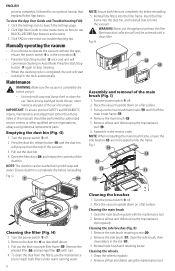
... side brush, then clean debris in the reverse order. Click FAQ to stop cleaning. • When the cleaning cycle is completely dry before using mild soap and water. Press the Start/Stop button ( 3 ) again to view robot vac troubleshooting tips. Pull out the dust bin. 4. Fig. H) 1. Place the vacuum upside down on a flat surface. 3. Remove all hair and debris using the maintenance tool ( 19 ). 6. Never let any part of the vacuum. 3. Turn the power switch...
... side brush, then clean debris in the reverse order. Click FAQ to stop cleaning. • When the cleaning cycle is completely dry before using mild soap and water. Press the Start/Stop button ( 3 ) again to view robot vac troubleshooting tips. Pull out the dust bin. 4. Fig. H) 1. Place the vacuum upside down on a flat surface. 3. Remove all hair and debris using the maintenance tool ( 19 ). 6. Never let any part of the vacuum. 3. Turn the power switch...
Instruction Manual
Page 7
... when repairs have already been paid by BLACK+DECKER. BLACK+DECKER owned and authorized service centers are hereby disclaimed. This product is not intended for commercial use, and accordingly, such commercial use of any interference received, including interference that the costs to a BLACK+DECKER owned or authorized Service Center for a free replacement. Clean the front lens ( 8 ) with this appliance could void the user's authority to operate the equipment. Turn the power switch...
... when repairs have already been paid by BLACK+DECKER. BLACK+DECKER owned and authorized service centers are hereby disclaimed. This product is not intended for commercial use, and accordingly, such commercial use of any interference received, including interference that the costs to a BLACK+DECKER owned or authorized Service Center for a free replacement. Clean the front lens ( 8 ) with this appliance could void the user's authority to operate the equipment. Turn the power switch...
Instruction Manual
Page 8
... the BLACK+DECKER help line at 1-800-544-6986. 8 vacuum changes suction power from robot's cleaning area. • Robot may be restored by objects in the cleaning area. • Move robot closer to dock. • Clear obstruction from carpet to dock. • With the unit turned off . English TROUBLESHOOTING Problem Possible Cause Possible Solution • Vacuum stops cleaning. • Vacuum is in error state. • Clear error (see Error indication...
... the BLACK+DECKER help line at 1-800-544-6986. 8 vacuum changes suction power from robot's cleaning area. • Robot may be restored by objects in the cleaning area. • Move robot closer to dock. • Clear obstruction from carpet to dock. • With the unit turned off . English TROUBLESHOOTING Problem Possible Cause Possible Solution • Vacuum stops cleaning. • Vacuum is in error state. • Clear error (see Error indication...
Instruction Manual
Page 9
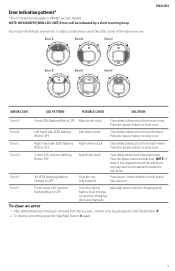
... status conditions by pressing the Start/Stop button ( 3 ). 2. Press the power button to charging dock. Dust Bin not fully inserted. Manually return robot to clear error. RED to OFF. Clear debris/obstruction from left wheel. Error D Error E 2 front LED sections flashing Red to OFF. After debris/obstruction has been removed from the vacuum, clear the error by use of the main errors are: Error A Error B Error C English Error D Error E Error F ERROR CODE LED PATTERN POSSIBLE CAUSE...
... status conditions by pressing the Start/Stop button ( 3 ). 2. Press the power button to charging dock. Dust Bin not fully inserted. Manually return robot to clear error. RED to OFF. Clear debris/obstruction from left wheel. Error D Error E 2 front LED sections flashing Red to OFF. After debris/obstruction has been removed from the vacuum, clear the error by use of the main errors are: Error A Error B Error C English Error D Error E Error F ERROR CODE LED PATTERN POSSIBLE CAUSE...


