Black & Decker BDASV101 Support and Manuals
Get Help and Manuals for this Black & Decker item
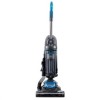
View All Support Options Below
Free Black & Decker BDASV101 manuals!
Problems with Black & Decker BDASV101?
Ask a Question
Free Black & Decker BDASV101 manuals!
Problems with Black & Decker BDASV101?
Ask a Question
Popular Black & Decker BDASV101 Manual Pages
Instruction Manual - Page 2
...with this manual.
Safety Direction
Please read and understand this product. DO NOT vacuum plaster, cement etc.
Young children should always be supervised to keep this instruction manual for ... have been given supervision or instruction concerning use the vacuum cleaner if it contains relates to protecting YOUR SAFETY and PREVENTING PROBLEMS. The symbols below are familiar...
Instruction Manual - Page 3
... vacuum cleaner to modify this manual.
DO operate the appliance from heated surfaces.
DO NOT modify the polarized plug to disconnect.
dry area. DO NOT handle the plug or vacuum cleaner with blocked filters. DO disconnect the appliance from the mains supply.
If the supply cord is used by non-compliance with these instructions...
Instruction Manual - Page 4
... the flexible hose.
4 An undersized cord will draw. Volts 120V
240V
Minimum Gauge for Cord Sets
Total Length of Cord in loss of power and overheating. READ AND SAVE THESE INSTRUCTIONS
Symbols
• The label on your vacuum cleaner from room to room, unplug the unit and either push the appliance or carry...
Instruction Manual - Page 5
Power on animals.
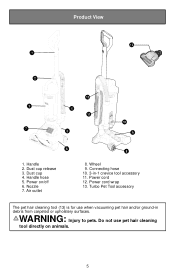
5 Air outlet
8
8. Product View
13 1
2
12
3 4 11
7
5
10 9
6
1. Handle 2. Dust cup 4. Do not use when vacuuming pet hair and/or ground-in -1 crevice tool accessory 11. Handle hose 5. Wheel 9. WARNING: Injury to pets.
Power cord wrap 13. Dust cup release 3. Turbo ...
Instruction Manual - Page 6
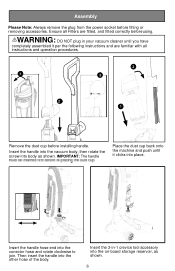
Ensure all instructions and operation procedures.
2
1
3
2 1
Remove the dust cup before installing handle. Insert the handle hose end into body as shown.
6 ....
Insert the handle into the vacuum body, then rotate the screw into the conector hose and rotate clockwise to join. Insert the 3-in your vacuum cleaner until it per the following instructions and are familiar with all Filters...
Instruction Manual - Page 8
...-1 crevice tool into the hose handle to -reach places. Remove hose handle and 3-in narrow and hard-to extend the distance.
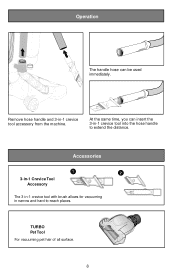
TURBO Pet Tool
For vacuuming pet hair of all surface.
8
Accessories
1
2
3-in-1 Crevice Tool Accessory
The 3-in-1 crevice tool with brush allows for...
Instruction Manual - Page 9
... of the cup, allowing the dust to remove the dust cup.
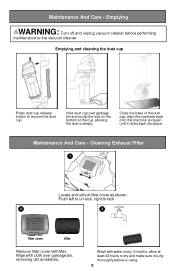
Emptying
WARNING: Turn off and unplug vacuum cleaner before re-using.
9
Wash with water every 3 months, allow at least 24 hours to the vacuum cleaner. Emptying and cleaning the dust cup
Press dust cup release button to empty. Maintenance And Care...
Instruction Manual - Page 10
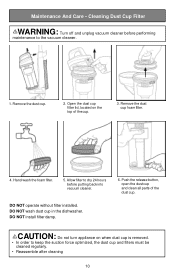
... release button, open the dust cup and clean all parts of the cup.
3. Remove the dust cup.
2. DO NOT operate without filter installed.
Remove the dust cup foam filter.
4.
CAUTION:... the dust cup. DO NOT install filter damp.
6. Maintenance And Care - Cleaning Dust Cup Filter
WARNING: Turn off and unplug vacuum cleaner before putting back into vacuum cleaner. Open the dust cup ...
Instruction Manual - Page 11
... tool as shown.
2. UNLOCK
LOCK
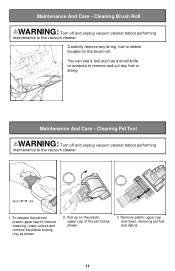
1. Remove plastic upper cap and clean, removing pet hair and debris.
11 Cleaning Brush Roll
WARNING: Turn off and unplug vacuum cleaner before performing
maintenance to the vacuum cleaner. Carefully remove any hair or string. Maintenance And Care - Cleaning Pet Tool
WARNING: Turn off and unplug...
Instruction Manual - Page 12
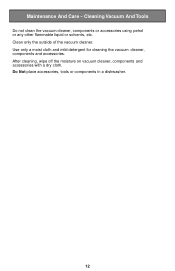
.... Use only a moist cloth and mild detergent for cleaning the vacuum cleaner, components and accessories. After cleaning, wipe off the moisture on vacuum cleaner, components and accessories with a dry cloth. Maintenance And Care - Cleaning Vacuum And Tools
Do not clean the vacuum cleaner, components or accessories using petrol or any other flammable liquid or...
Instruction Manual - Page 13
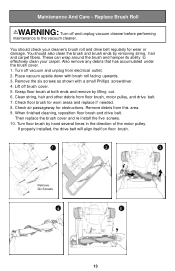
These can wrap around the brush and hamper its ability to the vacuum cleaner. Place vacuum upside down with a small Phillips screwdriver. 4. If properly installed, the drive belt will align itself on floor brush.
1
2
3
Remove Six Screws
4
5
13 Replace Brush Roll
WARNING: Turn off and unplug vacuum cleaner before performing
maintenance to effectively clean your cleaner's brush...
Instruction Manual - Page 14
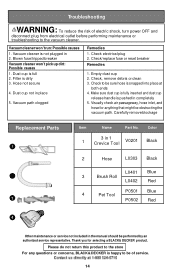
...dirty 3. Check, remove debris or clean 3. Troubleshooting
WARNING: To reduce the risk of service.
14 Dust cup not in the manual should be obstructing the vacuum path. Empty dust cup 2. Check to the vacuum cleaner. Carefully remove blockage
Replacement Parts
1
2 3
Item
Name
Part No. Color
1
3 in 1 Crevice Tool
V0201
Black
2
Hose
L0303 Black
L0401 Blue
3
Brush Roll
L0402 Red...
Instruction Manual - Page 15
... returns or exchanges. repair or replacement at 1-800-524-6716
The second option is to take or send the product (prepaid) to a BLACK+DECKER authorized Service Agent for commercial use, and accordingly, such commercial use of purchase may be free from state to be required. For assistance with the retailer for its specific return policy regarding...
Black & Decker BDASV101 Reviews
We have not received any reviews for Black & Decker yet.