Instruction Manual
Page 2
... NOT use the appliance near high temperature areas. DO NOT store or use the vacuum cleaner if it contains relates to help you are used to protecting YOUR SAFETY and PREVENTING PROBLEMS. The symbols below are familiar with this appliance, read this information. IMPORTANT SAFETY INSTRUCTION SAFETY GUIDELINES - as there is blocked. DO NOT run over the power cord with the...
... NOT use the appliance near high temperature areas. DO NOT store or use the vacuum cleaner if it contains relates to help you are used to protecting YOUR SAFETY and PREVENTING PROBLEMS. The symbols below are familiar with this appliance, read this information. IMPORTANT SAFETY INSTRUCTION SAFETY GUIDELINES - as there is blocked. DO NOT run over the power cord with the...
Instruction Manual
Page 3
.... DO Keep cord away from openings or moving parts. DO Keep all openings free of appliance. If this manual. No liability can be replaced by a third party, DO supply the instruction manual with a damaged cord or plug. Clean or replace filters before changing the filters, cleaning the filters or connecting / disconnecting the accessories. DO NOT misuse the cord. Instead, grasp the plug and pull to User Maintenance section). DO empty the Dust Canister and clean the filters regularly...
.... DO Keep cord away from openings or moving parts. DO Keep all openings free of appliance. If this manual. No liability can be replaced by a third party, DO supply the instruction manual with a damaged cord or plug. Clean or replace filters before changing the filters, cleaning the filters or connecting / disconnecting the accessories. DO NOT misuse the cord. Instead, grasp the plug and pull to User Maintenance section). DO empty the Dust Canister and clean the filters regularly...
Instruction Manual
Page 4
... appliance or carry using an extension cord, be sure to use the next heavier gauge. Volts 120V 240V Minimum Gauge for Cord Sets Total Length of Cord in loss of power and overheating. Never carry or pull the vacuum cleaner by its cord. An undersized cord will draw. Not more Than 6 18 10 18 12 16 16 14 American Wire Gauge 16 16...
... appliance or carry using an extension cord, be sure to use the next heavier gauge. Volts 120V 240V Minimum Gauge for Cord Sets Total Length of Cord in loss of power and overheating. Never carry or pull the vacuum cleaner by its cord. An undersized cord will draw. Not more Than 6 18 10 18 12 16 16 14 American Wire Gauge 16 16...
Instruction Manual
Page 5
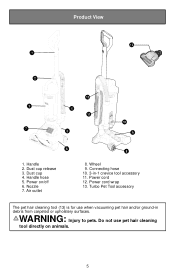
Power cord 12. Do not use when vacuuming pet hair and/or ground-in -1 crevice tool accessory 11. Nozzle 7. Turbo Pet Tool accessory The pet hair cleaning tool (13) is for use pet hair cleaning tool directly on /off 6. Air outlet 8 8. Power cord wrap 13. WARNING: Injury to pets. Product View 13 1 2 12 3 4 11 7 5 10 9 6 1. Power on animals. 5 Dust cup release 3. Dust cup 4. Handle 2. Handle hose 5. Wheel 9. Connecting hose 10. 3-in debris from carpeted or upholstery surfaces.
Power cord 12. Do not use when vacuuming pet hair and/or ground-in -1 crevice tool accessory 11. Nozzle 7. Turbo Pet Tool accessory The pet hair cleaning tool (13) is for use pet hair cleaning tool directly on /off 6. Air outlet 8 8. Power cord wrap 13. WARNING: Injury to pets. Product View 13 1 2 12 3 4 11 7 5 10 9 6 1. Power on animals. 5 Dust cup release 3. Dust cup 4. Handle 2. Handle hose 5. Wheel 9. Connecting hose 10. 3-in debris from carpeted or upholstery surfaces.
Instruction Manual
Page 6
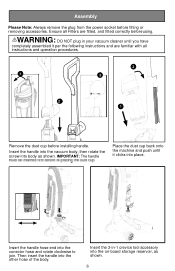
.... WARNING: DO NOT plug in -1 crevice tool accessory into the other hose of the body. Then insert the handle into the on-board storage reservoir, as shown. Insert the 3-in your vacuum cleaner until it per the following instructions and are fitted, and fitted correctly before fitting or removing accessories. Assembly Please Note: Always remove the plug from the power socket before using.
.... WARNING: DO NOT plug in -1 crevice tool accessory into the other hose of the body. Then insert the handle into the on-board storage reservoir, as shown. Insert the 3-in your vacuum cleaner until it per the following instructions and are fitted, and fitted correctly before fitting or removing accessories. Assembly Please Note: Always remove the plug from the power socket before using.

Instruction Manual
Page 7
Operation 2 Twist the quick release cord hook to release the power cord. 1 Step on the brush cover and pull back on handle, to switch ON/OFF. To maintain optimal performance,please emtpy dust cup when debris reaches MAX FILL line. 7 Plug in your machine and push ON/OFF button to engage for operation.
Operation 2 Twist the quick release cord hook to release the power cord. 1 Step on the brush cover and pull back on handle, to switch ON/OFF. To maintain optimal performance,please emtpy dust cup when debris reaches MAX FILL line. 7 Plug in your machine and push ON/OFF button to engage for operation.
Instruction Manual
Page 8
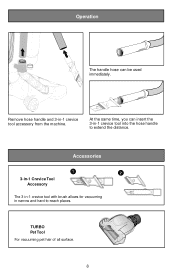
Accessories 1 2 3-in-1 Crevice Tool Accessory The 3-in-1 crevice tool with brush allows for vacuuming in narrow and hard-to extend the distance. At the same time, you can be used immediately. TURBO Pet Tool For vacuuming pet hair of all surface. 8 Operation The handle hose can insert the 3-in -1 crevice tool accessory from the machine. Remove hose handle and 3-in -1 crevice tool into the hose handle to -reach places.
Accessories 1 2 3-in-1 Crevice Tool Accessory The 3-in-1 crevice tool with brush allows for vacuuming in narrow and hard-to extend the distance. At the same time, you can be used immediately. TURBO Pet Tool For vacuuming pet hair of all surface. 8 Operation The handle hose can insert the 3-in -1 crevice tool accessory from the machine. Remove hose handle and 3-in -1 crevice tool into the hose handle to -reach places.
Instruction Manual
Page 9
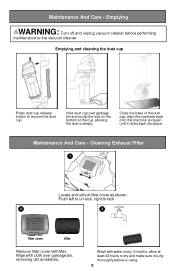
... dust cup, align the cup base back onto the machine and push until it is dry thoroughly before performing maintenance to the vacuum cleaner. Maintenance And Care - Hold dust cup over garbage bin, removing dirt and debris. Wash with filter. Maintenance And Care - Emptying and cleaning the dust cup Press dust cup release button to empty. Close the base of the cup, allowing the dust to remove the dust cup. Emptying WARNING: Turn off and unplug vacuum cleaner before re-using...
... dust cup, align the cup base back onto the machine and push until it is dry thoroughly before performing maintenance to the vacuum cleaner. Maintenance And Care - Hold dust cup over garbage bin, removing dirt and debris. Wash with filter. Maintenance And Care - Emptying and cleaning the dust cup Press dust cup release button to empty. Close the base of the cup, allowing the dust to remove the dust cup. Emptying WARNING: Turn off and unplug vacuum cleaner before re-using...
Instruction Manual
Page 10
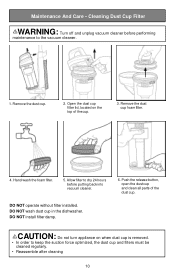
... keep the suction force optimized, the dust cup and filters must be cleaned regularly. • Reassemble after cleaning 10 DO NOT wash dust cup in the dishwasher. Remove the dust cup foam filter. 4. Hand wash the foam filter. 5. CAUTION: Do not turn appliance on the top of the dust cup. DO NOT operate without filter installed. DO NOT install filter damp. 6. Push the release button, open the dust cup and clean all parts of the cup. 3. Remove the dust cup. 2. Maintenance And Care - Cleaning Dust Cup Filter WARNING: Turn off and unplug vacuum cleaner...
... keep the suction force optimized, the dust cup and filters must be cleaned regularly. • Reassemble after cleaning 10 DO NOT wash dust cup in the dishwasher. Remove the dust cup foam filter. 4. Hand wash the foam filter. 5. CAUTION: Do not turn appliance on the top of the dust cup. DO NOT operate without filter installed. DO NOT install filter damp. 6. Push the release button, open the dust cup and clean all parts of the cup. 3. Remove the dust cup. 2. Maintenance And Care - Cleaning Dust Cup Filter WARNING: Turn off and unplug vacuum cleaner...
Instruction Manual
Page 11
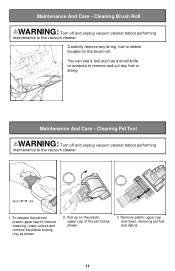
... the brush roll. UNLOCK LOCK 1. Cleaning Pet Tool WARNING: Turn off and unplug vacuum cleaner before performing maintenance to remove and cut any string, hair or debris located on the plastic upper cap of the pet tool as shown. 2. Carefully remove any hair or string. Cleaning Brush Roll WARNING: Turn off and unplug vacuum cleaner before performing maintenance to the vacuum cleaner. You can use a tool such as a small knife or scissors to the vacuum cleaner. Maintenance And...
... the brush roll. UNLOCK LOCK 1. Cleaning Pet Tool WARNING: Turn off and unplug vacuum cleaner before performing maintenance to remove and cut any string, hair or debris located on the plastic upper cap of the pet tool as shown. 2. Carefully remove any hair or string. Cleaning Brush Roll WARNING: Turn off and unplug vacuum cleaner before performing maintenance to the vacuum cleaner. You can use a tool such as a small knife or scissors to the vacuum cleaner. Maintenance And...

Instruction Manual
Page 12
Do Not place accessories, tools or components in a dishwasher. 12 Clean only the outside of the vacuum cleaner. After cleaning, wipe off the moisture on vacuum cleaner, components and accessories with a dry cloth. Maintenance And Care - Use only a moist cloth and mild detergent for cleaning the vacuum cleaner, components and accessories. Cleaning Vacuum And Tools Do not clean the vacuum cleaner, components or accessories using petrol or any other flammable liquid or solvents, etc.
Do Not place accessories, tools or components in a dishwasher. 12 Clean only the outside of the vacuum cleaner. After cleaning, wipe off the moisture on vacuum cleaner, components and accessories with a dry cloth. Maintenance And Care - Use only a moist cloth and mild detergent for cleaning the vacuum cleaner, components and accessories. Cleaning Vacuum And Tools Do not clean the vacuum cleaner, components or accessories using petrol or any other flammable liquid or solvents, etc.
Instruction Manual
Page 13
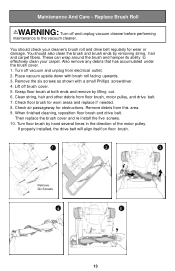
... needed. 8. Then replace the brush cover and re-install the five screws. 10. Maintenance And Care - You should check your carpet. Remove the six screws as shown with brush roll facing upwards. 3. Check floor brush for obstructions. When finished cleaning, reposition floor brush and drive belt. You should also clean the brush and brush ends by removing string, hair and carpet fibers. Remove debris from floor brush, motor pulley, and drive belt. 7. Turn floor brush by lifting out. 6. Turn off vacuum and unplug from electrical...
... needed. 8. Then replace the brush cover and re-install the five screws. 10. Maintenance And Care - You should check your carpet. Remove the six screws as shown with brush roll facing upwards. 3. Check floor brush for obstructions. When finished cleaning, reposition floor brush and drive belt. You should also clean the brush and brush ends by removing string, hair and carpet fibers. Remove debris from floor brush, motor pulley, and drive belt. 7. Turn floor brush by lifting out. 6. Turn off vacuum and unplug from electrical...
Instruction Manual
Page 14
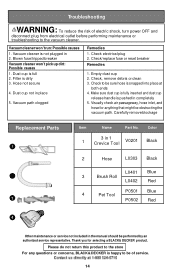
...fuse/tripped breaker Vacuum cleaner won 't run:Possible causes 1. Vacuum path clogged Remedies 1. Check electrical plug 2. Vacuumcleaner won 't pick up dirt: Possible causes 1. Dust cup is dirty 3. Color 1 3 in 1 Crevice Tool V0201 Black 2 Hose L0303 Black L0401 Blue 3 Brush Roll L0402 Red P0501 Blue 4 Pet Tool P0502 Red 4 Other maintenance or service not included in place 5. Carefully remove blockage Replacement Parts 1 2 3 Item Name Part No. Hose not secure 4. Visually check air passageway, hose inlet, and hose for selecting a BLACK& DECKER product...
...fuse/tripped breaker Vacuum cleaner won 't run:Possible causes 1. Vacuum path clogged Remedies 1. Check electrical plug 2. Vacuumcleaner won 't pick up dirt: Possible causes 1. Dust cup is dirty 3. Color 1 3 in 1 Crevice Tool V0201 Black 2 Hose L0303 Black L0401 Blue 3 Brush Roll L0402 Red P0501 Blue 4 Pet Tool P0502 Red 4 Other maintenance or service not included in place 5. Carefully remove blockage Replacement Parts 1 2 3 Item Name Part No. Hose not secure 4. Visually check air passageway, hose inlet, and hose for selecting a BLACK& DECKER product...
Instruction Manual
Page 15
... the retailer for its specific return policy regarding time limits for exchanges. WARRANTY ONE-YEAR LIMITED WARRANTY Black & Decker (U.S.) Inc. warranties this warranty. A defective product meeting the warranty conditions set forth herein will be required. repair or replacement at no charge in either... return the product to a BLACK+DECKER authorized Service Agent for commercial use, and accordingly, such commercial use of purchase may be free from whom it was purchased (provided that the product is used in exchanges only, is a participating retailer). This warranty does not ...
... the retailer for its specific return policy regarding time limits for exchanges. WARRANTY ONE-YEAR LIMITED WARRANTY Black & Decker (U.S.) Inc. warranties this warranty. A defective product meeting the warranty conditions set forth herein will be required. repair or replacement at no charge in either... return the product to a BLACK+DECKER authorized Service Agent for commercial use, and accordingly, such commercial use of purchase may be free from whom it was purchased (provided that the product is used in exchanges only, is a participating retailer). This warranty does not ...


