

Type 1 Manual - GH900
Page 1
... - To register your new product go to speak with your Black & Decker purchase, go to http://www.blackanddecker.com/instantanswers If you for future reference. VEA EL ESPANOL EN LA CONTRAPORTADA. Trimmer/Edger INSTRUCTION MANUAL Catalog Numbers GH900, GH912 KEY INFORMATION YOU SHOULD KNOW: • The guard must be installed before returning this manual for choosing Black & Decker! if not, the motor will not function...
... - To register your new product go to speak with your Black & Decker purchase, go to http://www.blackanddecker.com/instantanswers If you for future reference. VEA EL ESPANOL EN LA CONTRAPORTADA. Trimmer/Edger INSTRUCTION MANUAL Catalog Numbers GH900, GH912 KEY INFORMATION YOU SHOULD KNOW: • The guard must be installed before returning this manual for choosing Black & Decker! if not, the motor will not function...
Type 1 Manual - GH900
Page 3
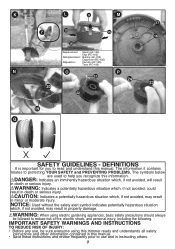
... using electric gardening appliances, basic safety precautions should always be followed to read and understand this information. WARNING: Indicates a potentially hazardous situation which , if not avoided, will result in death or serious injury. IMPORTANT SAFETY WARNINGS AND INSTRUCTIONS TO REDUCE RISK OF INJURY: • • BiSnaesvftoreurecthtiaeonsnyes uiansnsetdr,uobctethioesnrusrineafonerdvmerraeytvoiioennwecuforseniqntaugientnehtdilsyitnprirmtihomristeomruarseneaudaasln. K L 9 M 17 7 15 15 18 16 Replacement: Spool...
... using electric gardening appliances, basic safety precautions should always be followed to read and understand this information. WARNING: Indicates a potentially hazardous situation which , if not avoided, will result in death or serious injury. IMPORTANT SAFETY WARNINGS AND INSTRUCTIONS TO REDUCE RISK OF INJURY: • • BiSnaesvftoreurecthtiaeonsnyes uiansnsetdr,uobctethioesnrusrineafonerdvmerraeytvoiioennwecuforseniqntaugientnehtdilsyitnprirmtihomristeomruarseneaudaasln. K L 9 M 17 7 15 15 18 16 Replacement: Spool...

Type 1 Manual - GH900
Page 4
... S12.6 (S3.19) during use , when replacing line, or prior to cleaning. • AVOID DANGEROUS ENVIRONMENTAL CONDITIONS - Wear protective hair covering to protect your legs. Use great care when working outdoors. Don't carry plugged-in moving the tool or examining the damage. WARNING: ALWAYS use this trimmer without guard attached. • DRESS PROPERLY - When being used as an Edger, stones, pieces of metal and...
... S12.6 (S3.19) during use , when replacing line, or prior to cleaning. • AVOID DANGEROUS ENVIRONMENTAL CONDITIONS - Wear protective hair covering to protect your legs. Use great care when working outdoors. Don't carry plugged-in moving the tool or examining the damage. WARNING: ALWAYS use this trimmer without guard attached. • DRESS PROPERLY - When being used as an Edger, stones, pieces of metal and...

Type 1 Manual - GH900
Page 5
... servicing use one blade is dangerous and must be properly repaired or replaced by cord or yank it with the switch trigger is wider than the other part that can not be controlled with a hose. SAFETY WARNINGS AND INSTRUCTIONS: EXTENSION CORDS WARNING: To reduce the risk of a polarized wall outlet. or SJTOW-A. If in doubt, use of electric shock, use only with a pressure washer. • Keep guards...
... servicing use one blade is dangerous and must be properly repaired or replaced by cord or yank it with the switch trigger is wider than the other part that can not be controlled with a hose. SAFETY WARNINGS AND INSTRUCTIONS: EXTENSION CORDS WARNING: To reduce the risk of a polarized wall outlet. or SJTOW-A. If in doubt, use of electric shock, use only with a pressure washer. • Keep guards...
Type 1 Manual - GH900
Page 6
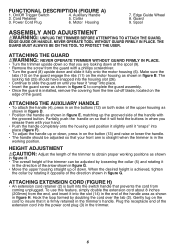
Edge Guide Wheel 2. Power Cord Plug 6. Spool ASSEMBLY and Adjustment WARNING: Unplug the trimmer before attempting to complete the guard assembly. • Once the guard is in the working positions as shown in figure H. NEVER OPERATE TOOL WITHOUT GUARD FIRMLY IN PLACE. Attaching the guard WARNING: NEVER OPERATE trimmer WITHOUT GUARD FIRMLY IN PLACE. • Turn the trimmer upside down . Make sure the tabs (10) on the guard engage the ribs (11) on until it...
Edge Guide Wheel 2. Power Cord Plug 6. Spool ASSEMBLY and Adjustment WARNING: Unplug the trimmer before attempting to complete the guard assembly. • Once the guard is in the working positions as shown in figure H. NEVER OPERATE TOOL WITHOUT GUARD FIRMLY IN PLACE. Attaching the guard WARNING: NEVER OPERATE trimmer WITHOUT GUARD FIRMLY IN PLACE. • Turn the trimmer upside down . Make sure the tabs (10) on the guard engage the ribs (11) on until it...

Type 1 Manual - GH900
Page 7
... can be trimmed and remove any wire, cord, or string-like objects which might be edged. The trimmer and guard are being used as shown in figure I1. Optimum cutting results are at least 100 feet (30m) away. • To operate as a maintenance edger, turn the collar (5) as shown in figure G. • Hold the metal shaft and rotate the lower housing 180° as...
... can be trimmed and remove any wire, cord, or string-like objects which might be edged. The trimmer and guard are being used as shown in figure I1. Optimum cutting results are at least 100 feet (30m) away. • To operate as a maintenance edger, turn the collar (5) as shown in figure G. • Hold the metal shaft and rotate the lower housing 180° as...

Type 1 Manual - GH900
Page 8
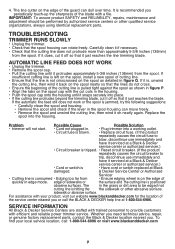
... Black & Decker factory wound spools. REWINDING SPOOL FROM BULK LINE (use serrated or heavier gauge line, as described in the trimmer head (figure L). • For best results, replace spool with this manual. • USE ONLY .065 inch (1.65 mm) DIAMETER ROUND NYLON LINE. NOTE: Hand wound spools from the spool housing (16) in "REPLACING THE SPOOL". • Remove any maintenance. To install bulk line, follow the steps below: • Unplug trimmer. • Remove the empty spool from the trimmer...
... Black & Decker factory wound spools. REWINDING SPOOL FROM BULK LINE (use serrated or heavier gauge line, as described in the trimmer head (figure L). • For best results, replace spool with this manual. • USE ONLY .065 inch (1.65 mm) DIAMETER ROUND NYLON LINE. NOTE: Hand wound spools from the spool housing (16) in "REPLACING THE SPOOL". • Remove any maintenance. To install bulk line, follow the steps below: • Unplug trimmer. • Remove the empty spool from the trimmer...
Type 1 Manual - GH900
Page 9
... a file. edge of cutting line. • Ensure that it just reaches the line trimming blade. Service Information All Black & Decker Service Centers are staffed with the cut it off so that the line is on the spool, install a new spool of sidewalks or the surface and the cutting line is hitting the the sidewalk or other qualified service organizations, always using identical replacement parts. Troubleshooting trimmer runs slowly • Unplug the trimmer. • Check that the cutting line...
... a file. edge of cutting line. • Ensure that it just reaches the line trimming blade. Service Information All Black & Decker Service Centers are staffed with the cut it off so that the line is on the spool, install a new spool of sidewalks or the surface and the cutting line is hitting the the sidewalk or other qualified service organizations, always using identical replacement parts. Troubleshooting trimmer runs slowly • Unplug the trimmer. • Check that the cutting line...

Type 1 Manual - GH900
Page 10
... return the product to products sold in Latin America, check country specific warranty information contained in the packaging, call 1-800-544-6986 for exchanges (usually 30 to a Black & Decker owned or authorized Service Center for commercial use. This warranty gives you specific legal rights and you have other rights which will be made within the time period of two ways.
... return the product to products sold in Latin America, check country specific warranty information contained in the packaging, call 1-800-544-6986 for exchanges (usually 30 to a Black & Decker owned or authorized Service Center for commercial use. This warranty gives you specific legal rights and you have other rights which will be made within the time period of two ways.

Type 1 Manual - GH900
Page 32
Catalog Number GH900, GH912 Form # 90602174 August 2013 Printed in China 32
Catalog Number GH900, GH912 Form # 90602174 August 2013 Printed in China 32

Parts Diagram
Page 2
Page 1 All Rights Reserved. Parts list, pricing, and availability subject to change. Please visit www.dewaltservicenet.com for LST220 Type 1 Description Qty Required LEVER ASSEMBLY 1 AUX.HANDLE ASSY 1 SCREW 1 COVER 1 EDGE GUIDE 1 GUARD ASSEMBLY 1 REPLACEMENT SPOOL 1 SPRING 1 BATTERY PACK 2 CHARGER 1 COPYRIGHT© 2005. Item Number 3 4 5 6 7 8 9 10 866 871 Part Number 90567077 90559902 747329 385022-03 90559834 90560170 AF-100 90566944 90587070 90590282 Parts List for current parts information.
Page 1 All Rights Reserved. Parts list, pricing, and availability subject to change. Please visit www.dewaltservicenet.com for LST220 Type 1 Description Qty Required LEVER ASSEMBLY 1 AUX.HANDLE ASSY 1 SCREW 1 COVER 1 EDGE GUIDE 1 GUARD ASSEMBLY 1 REPLACEMENT SPOOL 1 SPRING 1 BATTERY PACK 2 CHARGER 1 COPYRIGHT© 2005. Item Number 3 4 5 6 7 8 9 10 866 871 Part Number 90567077 90559902 747329 385022-03 90559834 90560170 AF-100 90566944 90587070 90590282 Parts List for current parts information.


