

Type 1 Manual - GH710
Page 1
...your Black & Decker purchase, go to 5 p.m. INSTRUCTIVO DE OPERACIÓN, CENTROS DE SERVICIO Y PÓLIZA DE GARANTÍA. if not, the motor will not function properly (page 8). • Do not bump the feed head against the ground - SAVE THIS MANUAL FOR FUTURE REFERENCE. Model No. GH710 TRIMMER .../ EDGER INSTRUCTION MANUAL Model Number GH710 Thank you canʼt find the answer or do not have a question or experience a problem with an agent. DF...
...your Black & Decker purchase, go to 5 p.m. INSTRUCTIVO DE OPERACIÓN, CENTROS DE SERVICIO Y PÓLIZA DE GARANTÍA. if not, the motor will not function properly (page 8). • Do not bump the feed head against the ground - SAVE THIS MANUAL FOR FUTURE REFERENCE. Model No. GH710 TRIMMER .../ EDGER INSTRUCTION MANUAL Model Number GH710 Thank you canʼt find the answer or do not have a question or experience a problem with an agent. DF...
Type 1 Manual - GH710
Page 5
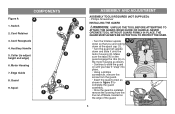
... the guard on the edge of the guard. 5 Edge Guide 8. THE GUARD MUST ALWAYS BE ON THE TOOL TO PROTECT THE USER. • Turn the trimmer upside B 2 down and slide it "snap" into place. • Using a phillips screwdriver, remove the screw from the guard. 1 • Insert the guard screw as shown...
... the guard on the edge of the guard. 5 Edge Guide 8. THE GUARD MUST ALWAYS BE ON THE TOOL TO PROTECT THE USER. • Turn the trimmer upside B 2 down and slide it "snap" into place. • Using a phillips screwdriver, remove the screw from the guard. 1 • Insert the guard screw as shown...
Type 1 Manual - GH710
Page 6
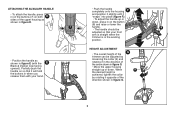
HEIGHT ADJUSTMENT G • The overall height of the trimmer can be adjusted so that it will hold the buttons in on the buttons (7) on the button (8) and raise or lower the 7 handle. 8 • The ... arm is straight when the trimmer is achieved, tighten the collar by loosening the collar (9) and rotating it "snaps" into place (figure F). ATTACHING THE AUXILIARY HANDLE • Push the handle completely onto the housing F • To attach the handle, press in when you release them with the E Black & Decker logo facing upward). When...
HEIGHT ADJUSTMENT G • The overall height of the trimmer can be adjusted so that it will hold the buttons in on the buttons (7) on the button (8) and raise or lower the 7 handle. 8 • The ... arm is straight when the trimmer is achieved, tighten the collar by loosening the collar (9) and rotating it "snaps" into place (figure F). ATTACHING THE AUXILIARY HANDLE • Push the handle completely onto the housing F • To attach the handle, press in when you release them with the E Black & Decker logo facing upward). When...
Type 1 Manual - GH710
Page 7
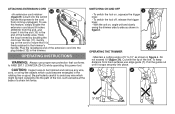
...the cord over the tab (11). Plug the receptacle end of 5° to insure that prevents the cord from coming unplugged. OPERATING THE TRIMMER • Maintain a cutting angle of the extension cord into the switch handle that it snaps securely into the slot (10) in the end... of the handle area. ATTACHING EXTENSION CORD H 10 • An extension cord retainer (figure H) is firmly retained in the trimmerʼs handle. Be particularly careful to ANSI Z87.1 (CAN/CSA Z94.3) while operating this feature, simply double the 11 extension cord about 8 inches (...
...the cord over the tab (11). Plug the receptacle end of 5° to insure that prevents the cord from coming unplugged. OPERATING THE TRIMMER • Maintain a cutting angle of the extension cord into the switch handle that it snaps securely into the slot (10) in the end... of the handle area. ATTACHING EXTENSION CORD H 10 • An extension cord retainer (figure H) is firmly retained in the trimmerʼs handle. Be particularly careful to ANSI Z87.1 (CAN/CSA Z94.3) while operating this feature, simply double the 11 extension cord about 8 inches (...
Type 1 Manual - GH710
Page 8
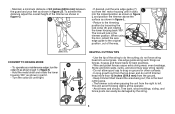
...desired, pull the wire edge guide (7) out from the right to left. do the cutting; To acheive this is the best cutting area. • The trimmer cuts when passing the unit from the motor housing until tight. 9 HELPFUL CUTTING TIPS • Use the tip of the string to the trimming position... breakage. Stone and brick walls, curbs, and wood may wear string rapidly. • Do not allow spool cap to the original position, out of the trimmer as shown in figure G. CONVERT TO EDGING MODE K • To operate as a maintenance edger, turn the collar (9) as shown in part 1 of 24 inches (...
...desired, pull the wire edge guide (7) out from the right to left. do the cutting; To acheive this is the best cutting area. • The trimmer cuts when passing the unit from the motor housing until tight. 9 HELPFUL CUTTING TIPS • Use the tip of the string to the trimming position... breakage. Stone and brick walls, curbs, and wood may wear string rapidly. • Do not allow spool cap to the original position, out of the trimmer as shown in figure G. CONVERT TO EDGING MODE K • To operate as a maintenance edger, turn the collar (9) as shown in part 1 of 24 inches (...
Type 1 Manual - GH710
Page 9
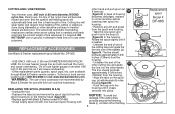
... the tabs (a) and remove the spool cap (b) from the housing. • Align the tabs on ground in the Black & Decker for any dirt and grass weeds are available through Black & Decker service centers. CUTTING LINE / LINE FEEDING other cutting line and guide N the line into wear faster and require more... spool Model No. Rotate the spool slightly until it snaps securely into one of line whenever it will in the trimmer head (figure M). • Replace spool with Black & Decker model # DF-065. • Grasp empty spool (d) with one hand and spool housing with this tool could ...
... the tabs (a) and remove the spool cap (b) from the housing. • Align the tabs on ground in the Black & Decker for any dirt and grass weeds are available through Black & Decker service centers. CUTTING LINE / LINE FEEDING other cutting line and guide N the line into wear faster and require more... spool Model No. Rotate the spool slightly until it snaps securely into one of line whenever it will in the trimmer head (figure M). • Replace spool with Black & Decker model # DF-065. • Grasp empty spool (d) with one hand and spool housing with this tool could ...
Type 1 Manual - GH710
Page 10
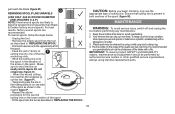
... in a plastic, sealable bag with a file. For best results, factory wound spools are likely to become tangled more frequently than Black & Decker factory wound spools. MAINTENANCE WARNING: To avoid serious injury, switch off and unplug the tool before performing any maintenance. 1. IMPORTANT: ... be cleaned by authorized service centers or other qualified service organizations, always using a mild soap and a damp rag. 4. Your trimmer line can dull over time. It is present in the direction of cutting line. CAUTION: Before you periodically touch-up the sharpness...
... in a plastic, sealable bag with a file. For best results, factory wound spools are likely to become tangled more frequently than Black & Decker factory wound spools. MAINTENANCE WARNING: To avoid serious injury, switch off and unplug the tool before performing any maintenance. 1. IMPORTANT: ... be cleaned by authorized service centers or other qualified service organizations, always using a mild soap and a damp rag. 4. Your trimmer line can dull over time. It is present in the direction of cutting line. CAUTION: Before you periodically touch-up the sharpness...
Type 1 Manual - GH710
Page 11
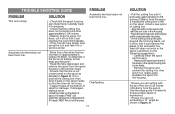
... beyond the trimming blade, cut it reads "ABS" this point. • Keep the tabs depressed and remove the spool from the spool housing in the trimmer head. • Ensure that the cutting line does not protrude more than approximately 5-3/8 inches (136mm) from the spool. SOLUTION • Check that it on the...
... beyond the trimming blade, cut it reads "ABS" this point. • Keep the tabs depressed and remove the spool from the spool housing in the trimmer head. • Ensure that the cutting line does not protrude more than approximately 5-3/8 inches (136mm) from the spool. SOLUTION • Check that it on the...


