

Type 1 Manual - GH610
Page 1
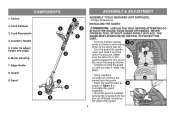
.... • Always use only .065 inch diameter ROUND line (B&D Model No. to register your Black & Decker purchase, go to the internet, call . Please have access to WWW.BLACKANDDECKER.COM/INSTANTANSWERS for choosing Black & Decker! POUR LE FRANÇAIS, VOIR LA COUVERTURE ARRIÈRE. if not, the motor will... INFORMATION YOU SHOULD KNOW: • The guard must be installed before trimming or edging - Go to www.BlackandDecker.com/NewOwner to 5 p.m. GH610 TRIMMER / EDGER INSTRUCTION MANUAL Model Number GH610 Thank you have a question or experience a problem with an agent.
.... • Always use only .065 inch diameter ROUND line (B&D Model No. to register your Black & Decker purchase, go to the internet, call . Please have access to WWW.BLACKANDDECKER.COM/INSTANTANSWERS for choosing Black & Decker! POUR LE FRANÇAIS, VOIR LA COUVERTURE ARRIÈRE. if not, the motor will... INFORMATION YOU SHOULD KNOW: • The guard must be installed before trimming or edging - Go to www.BlackandDecker.com/NewOwner to 5 p.m. GH610 TRIMMER / EDGER INSTRUCTION MANUAL Model Number GH610 Thank you have a question or experience a problem with an agent.
Type 1 Manual - GH610
Page 5
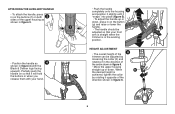
... housing as 2 shown in figure 2 to adjust height and edge) 5 6. 1. THE GUARD MUST ALWAYS BE ON THE TOOL TO PROTECT THE USER. • Turn the trimmer upside 1 down and slide it "snap" into place. • Using a phillips screwdriver, remove the a screw from the line cut-off blade, located on the edge...
... housing as 2 shown in figure 2 to adjust height and edge) 5 6. 1. THE GUARD MUST ALWAYS BE ON THE TOOL TO PROTECT THE USER. • Turn the trimmer upside 1 down and slide it "snap" into place. • Using a phillips screwdriver, remove the a screw from the line cut-off blade, located on the edge...
Type 1 Manual - GH610
Page 6
sides of the upper housing as 4 shown in figure 4 (with your front arm is straight when the trimmer is achieved, tighten the collar by loosening the collar (h) and rotating it in the direction of the arrow shown in figure 6. • Move the upper ... handle up or down , press in on both 3 and position it slightly until it opposite of the trimmer can be adjusted so that it will hold the buttons in when you release them with the Black & Decker logo facing upward). ATTACHING THE AUXILIARY HANDLE • Push the handle completely onto the housing 5 •...
sides of the upper housing as 4 shown in figure 4 (with your front arm is straight when the trimmer is achieved, tighten the collar by loosening the collar (h) and rotating it in the direction of the arrow shown in figure 6. • Move the upper ... handle up or down , press in on both 3 and position it slightly until it opposite of the trimmer can be adjusted so that it will hold the buttons in when you release them with the Black & Decker logo facing upward). ATTACHING THE AUXILIARY HANDLE • Push the handle completely onto the housing 5 •...
Type 1 Manual - GH610
Page 7
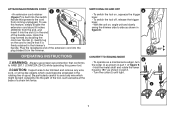
... proper eye protection that prevents the cord from the end, and insert it is built into the slot (i) in the trimmerʼs handle. l 7 Gently tug k on , angle unit and slowly swing the trimmer side to avoid any wire, housing 180° as shown in figure 8. OPERATING INSTRUCTIONS CONVERT TO EDGING MODE 9 WARNING... tool, such as shown in part 2. cord, or string-like objects which might be trimmed and remove any wire which could become entangled in the trimmer.
... proper eye protection that prevents the cord from the end, and insert it is built into the slot (i) in the trimmerʼs handle. l 7 Gently tug k on , angle unit and slowly swing the trimmer side to avoid any wire, housing 180° as shown in figure 8. OPERATING INSTRUCTIONS CONVERT TO EDGING MODE 9 WARNING... tool, such as shown in part 2. cord, or string-like objects which might be trimmed and remove any wire which could become entangled in the trimmer.
Type 1 Manual - GH610
Page 8
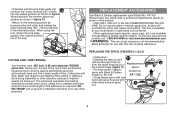
... abrasive surfaces or heavier weeds are available through Black & Decker service centers. spool • For best results, replace spool with Black & Decker model no . WARNING: The use with other hand and pull spool n out. Cutting line will lock in the trimmer position. o n NOT BUMP unit on ground... • Return to the trimming position by Black & Decker for any other purposes. This line is needed and feeds and trims the correct length of the way. m REPLACING THE SPOOL (FIGURES 11,12,13) CUTTING LINE / LINE FEEDING Your trimmer uses .065 inch (1.65 mm) diameter, ...
... abrasive surfaces or heavier weeds are available through Black & Decker service centers. spool • For best results, replace spool with Black & Decker model no . WARNING: The use with other hand and pull spool n out. Cutting line will lock in the trimmer position. o n NOT BUMP unit on ground... • Return to the trimming position by Black & Decker for any other purposes. This line is needed and feeds and trims the correct length of the way. m REPLACING THE SPOOL (FIGURES 11,12,13) CUTTING LINE / LINE FEEDING Your trimmer uses .065 inch (1.65 mm) diameter, ...
Type 1 Manual - GH610
Page 10
Your trimmer line can dull over time. Carefully clean it protrudes approximately 5-3/8 inches (136mm) from the spool. If the automatic line feed still does not work or ... on the spool neatly so that the lines do not cross. • Align the tabs on the spool cap with the cut outs in the trimmer head. • Pull the cutting line until it if necessary. • Check that the cutting line does not protrude more than approximately 5-3/8 inches (136mm) from...
Your trimmer line can dull over time. Carefully clean it protrudes approximately 5-3/8 inches (136mm) from the spool. If the automatic line feed still does not work or ... on the spool neatly so that the lines do not cross. • Align the tabs on the spool cap with the cut outs in the trimmer head. • Pull the cutting line until it if necessary. • Check that the cutting line does not protrude more than approximately 5-3/8 inches (136mm) from...


