
Type 1 Manual - GH610
Page 3
.... • DO NOT OPERATE portable electric tools in use only with finger on your tool. If you strike or become entangled with a broken hub or spool. • DAMAGE TO CORD - Keep power cord away from power supply. Inspect extension cords periodically and replace if damaged. Replace or repair damaged cords. •...
.... • DO NOT OPERATE portable electric tools in use only with finger on your tool. If you strike or become entangled with a broken hub or spool. • DAMAGE TO CORD - Keep power cord away from power supply. Inspect extension cords periodically and replace if damaged. Replace or repair damaged cords. •...
Type 1 Manual - GH610
Page 5
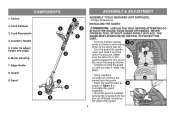
... • Once the guard is installed, remove the covering from the line cut-off blade, located on until you are looking b down at the spool cap (a). • Turn the guard (b) upside down so that you hear it onto the c motor housing (c). THE GUARD MUST ALWAYS BE ON ...Edge Guide 8. Phillips Screwdriver INSTALLING THE GUARD WARNING: UNPLUG THE TOOL BEFORE ATTEMPTING TO ATTACH THE GUARD, EDGE GUIDE OR HANDLE. Cord Retainer 4 3. Spool 6 8 7 9 1 2 3 ASSEMBLY & ADJUSTMENT ASSEMBLY TOOLS REQUIRED (NOT SUPPLIED): - Auxillary Handle 5. 1. Cord Receptacle 4. Guard 9.
... • Once the guard is installed, remove the covering from the line cut-off blade, located on until you are looking b down at the spool cap (a). • Turn the guard (b) upside down so that you hear it onto the c motor housing (c). THE GUARD MUST ALWAYS BE ON ...Edge Guide 8. Phillips Screwdriver INSTALLING THE GUARD WARNING: UNPLUG THE TOOL BEFORE ATTEMPTING TO ATTACH THE GUARD, EDGE GUIDE OR HANDLE. Cord Retainer 4 3. Spool 6 8 7 9 1 2 3 ASSEMBLY & ADJUSTMENT ASSEMBLY TOOLS REQUIRED (NOT SUPPLIED): - Auxillary Handle 5. 1. Cord Receptacle 4. Guard 9.
Type 1 Manual - GH610
Page 7
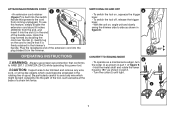
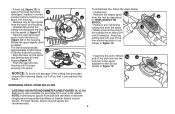
... lever. • With the unit on the cord to insure that it into the slot (i) in the end of the handle area. rotating line or spool. Gently tug k on , angle unit and slowly swing the trimmer side to side as shown in figure 8. Plug the receptacle end of the extension cord...
... lever. • With the unit on the cord to insure that it into the slot (i) in the end of the handle area. rotating line or spool. Gently tug k on , angle unit and slowly swing the trimmer side to side as shown in figure 8. Plug the receptacle end of the extension cord...
Type 1 Manual - GH610
Page 8
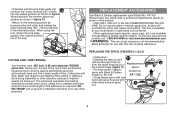
... loosening the lock collar and rotating the lower housing back 180°. During use with Black & Decker model no . DO • Unplug tool. • Depress the tabs (n) and 11 remove the spool cap (o) from the motor housing until it ʼs required. When using the tool,... feed line or for use , the tips of line. AF-100 • Grasp empty spool with one hand and spool housing with other abrasive surfaces or heavier weeds are available through Black & Decker service centers. p 8 Cutting line will overload the motor and cause overheating. Reload nylon line...
... loosening the lock collar and rotating the lower housing back 180°. During use with Black & Decker model no . DO • Unplug tool. • Depress the tabs (n) and 11 remove the spool cap (o) from the motor housing until it ʼs required. When using the tool,... feed line or for use , the tips of line. AF-100 • Grasp empty spool with one hand and spool housing with other abrasive surfaces or heavier weeds are available through Black & Decker service centers. p 8 Cutting line will overload the motor and cause overheating. Reload nylon line...
Type 1 Manual - GH610
Page 9
... 3/4 inch (19mm) end of the cutting line at the end of the bulk line into the 15 x w hole (w) in the spool r adjacent to become tangled more frequently than Black & Decker factory wound spools. REWINDING SPOOL FROM BULK LINE (USE ONLY .065 IN. NOTICE: To avoid tool damage, if the cutting line protrudes beyond the trimming...
... 3/4 inch (19mm) end of the cutting line at the end of the bulk line into the 15 x w hole (w) in the spool r adjacent to become tangled more frequently than Black & Decker factory wound spools. REWINDING SPOOL FROM BULK LINE (USE ONLY .065 IN. NOTICE: To avoid tool damage, if the cutting line protrudes beyond the trimming...
Type 1 Manual - GH610
Page 10
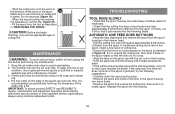
...identical replacement parts. TROUBLESHOOTING TOOL RUNS SLOWLY • Check that the cutting line does not protrude more than approximately 5-3/8 inches (136mm) from the spool housing in a plastic, sealable bag with the cut it off so that it does, cut outs in figure 16. If the automatic line ...it just reaches the blade. AUTOMATIC LINE FEED DOES NOT WORK • Keep the tabs depressed and remove the spool from the spool. If insufficient cutting line is left on the spool, install a new spool of cutting line. • Ensure that the lines do not cross. • Align the tabs on the...
...identical replacement parts. TROUBLESHOOTING TOOL RUNS SLOWLY • Check that the cutting line does not protrude more than approximately 5-3/8 inches (136mm) from the spool housing in a plastic, sealable bag with the cut it off so that it does, cut outs in figure 16. If the automatic line ...it just reaches the blade. AUTOMATIC LINE FEED DOES NOT WORK • Keep the tabs depressed and remove the spool from the spool. If insufficient cutting line is left on the spool, install a new spool of cutting line. • Ensure that the lines do not cross. • Align the tabs on the...


