
User Manual
Page 2
... outlet when not in use, before putting on or taking off parts and before cleaning. ❍ Avoid contacting moving blade or disc while processing food to reduce the risk of injury, never place cutting blade or discs on the cover of this Use and Care Book. Handle carefully. ❍ To reduce the risk of severe injury to persons or damage to the food processor. A scraper may cause...
... outlet when not in use, before putting on or taking off parts and before cleaning. ❍ Avoid contacting moving blade or disc while processing food to reduce the risk of injury, never place cutting blade or discs on the cover of this Use and Care Book. Handle carefully. ❍ To reduce the risk of severe injury to persons or damage to the food processor. A scraper may cause...
User Manual
Page 3
... shock, this appliance was selected to remove the outer cover. ENGLISH SAVE THESE INSTRUCTIONS. To reduce the risk of this plug is for longer life; Repair should be done only by an authorized service center. 3 If the plug does not fit fully into a polarized outlet only one blade is based on the chopping blade. to fit into the outlet...
... shock, this appliance was selected to remove the outer cover. ENGLISH SAVE THESE INSTRUCTIONS. To reduce the risk of this plug is for longer life; Repair should be done only by an authorized service center. 3 If the plug does not fit fully into a polarized outlet only one blade is based on the chopping blade. to fit into the outlet...
User Manual
Page 4
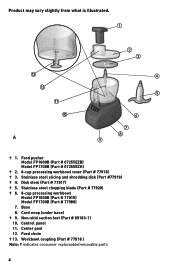
Food pusher Model FP1600B (Part # 07255EZB) Model FP1700B (Part # 07255EZH) † 2. 8-cup processing workbowl cover (Part # 77916) † 3. Cord wrap (under base) † 9. Feed chute † 13. Base 8. Center post 12. Stainless steel chopping blade (Part # 77920) † 6. 8-cup processing workbowl Model FP1600B (Part # 77915) Model FP1700B (Part # 77988) 7. Control panel 11. Product may vary slightly from what is illustrated. A † 1. Non-skid suction feet (Part # 09183-1) 10. Disk stem (Part #...
Food pusher Model FP1600B (Part # 07255EZB) Model FP1700B (Part # 07255EZH) † 2. 8-cup processing workbowl cover (Part # 77916) † 3. Cord wrap (under base) † 9. Feed chute † 13. Base 8. Center post 12. Stainless steel chopping blade (Part # 77920) † 6. 8-cup processing workbowl Model FP1600B (Part # 77915) Model FP1700B (Part # 77988) 7. Control panel 11. Product may vary slightly from what is illustrated. A † 1. Non-skid suction feet (Part # 09183-1) 10. Disk stem (Part #...
User Manual
Page 5
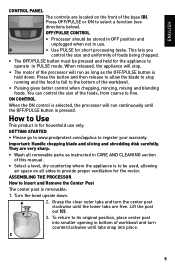
.../PULSE button is removable: 1. How to Use This product is to fine. To return to stop . • The motor of the processor will run as long as instructed in use only. B • Use PULSE for household use . Press the button and then release to allow the blade to its original position, place center post into place. Important: Handle chopping blade and slicing and shredding disk carefully. ENGLISH CONTROL...
.../PULSE button is removable: 1. How to Use This product is to fine. To return to stop . • The motor of the processor will run as long as instructed in use only. B • Use PULSE for household use . Press the button and then release to allow the blade to its original position, place center post into place. Important: Handle chopping blade and slicing and shredding disk carefully. ENGLISH CONTROL...
User Manual
Page 6
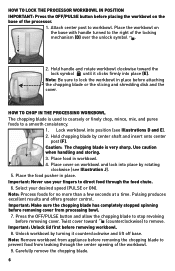
... OFF/PULSE button before removing the chopping blade to prevent food from processing bowl. 7. Twist cover toward the lock symbol until it counterclockwise and lift off base. Important: Unlock lid first before removing cover. Attach center post to workbowl. Pulsing produces excellent results and offers greater control. Carefully remove the chopping blade. 6 Hold handle and rotate workbowl clockwise toward (counterclockwise) to remove. Place cover on the base with handle turned to the right of...
... OFF/PULSE button before removing the chopping blade to prevent food from processing bowl. 7. Twist cover toward the lock symbol until it counterclockwise and lift off base. Important: Unlock lid first before removing cover. Attach center post to workbowl. Pulsing produces excellent results and offers greater control. Carefully remove the chopping blade. 6 Hold handle and rotate workbowl clockwise toward (counterclockwise) to remove. Place cover on the base with handle turned to the right of...
User Manual
Page 7
... disk stem onto center post in use no more 3 cups of ¾-inch cubes. G Caution: The slicing and shredding disk is on work ; Position food pusher over -processing foods. • The PULSE button offers the best control. • For best results, process foods that are about the same size. • Do not overload the workbowl. • Never walk away from processing bowl. Important: Unlock lid first before removing cover. Use caution when handling...
... disk stem onto center post in use no more 3 cups of ¾-inch cubes. G Caution: The slicing and shredding disk is on work ; Position food pusher over -processing foods. • The PULSE button offers the best control. • For best results, process foods that are about the same size. • Do not overload the workbowl. • Never walk away from processing bowl. Important: Unlock lid first before removing cover. Use caution when handling...
User Manual
Page 8
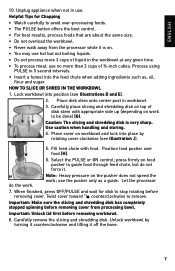
... workbowl cover. Note: The food pusher is used to the right of the feed chute and stand them just short of the length of the workbowl's handle (J). 2. 9. Place cover over workbowl with the small latch to guide foods through the feed chute and can be removed when adding liquid or additional foods while the processor is running. 8 Insert the food pusher into place. Remove the slicing and shredding disc before processing. • Select foods that...
... workbowl cover. Note: The food pusher is used to the right of the feed chute and stand them just short of the length of the workbowl's handle (J). 2. 9. Place cover over workbowl with the small latch to guide foods through the feed chute and can be removed when adding liquid or additional foods while the processor is running. 8 Insert the food pusher into place. Remove the slicing and shredding disc before processing. • Select foods that...

User Manual
Page 9
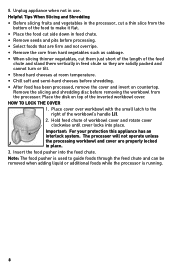
... maintain the food processor's appearance. • If washing by hand, fill workbowl with a damp cloth and dry thoroughly. Use caution when handling and storing. • Wipe base and feet with hot, soapy water and rapidly raise and lower the chopping blade or slicing and shredding disk up and down on the center shaft. Caution: The slicing and shredding disk is unplugged. • Completely disassemble processor parts before...
... maintain the food processor's appearance. • If washing by hand, fill workbowl with a damp cloth and dry thoroughly. Use caution when handling and storing. • Wipe base and feet with hot, soapy water and rapidly raise and lower the chopping blade or slicing and shredding disk up and down on the center shaft. Caution: The slicing and shredding disk is unplugged. • Completely disassemble processor parts before...
User Manual
Page 10
... from the date of original purchase with proof of this book. For service, repair or any way • Products used or serviced outside the country of purchase • Glass parts and other rights that some states do you need parts or accessories, please call the appropriate 800 number on the cover of such purchase. Two-Year Limited Warranty (Applies only in...
... from the date of original purchase with proof of this book. For service, repair or any way • Products used or serviced outside the country of purchase • Glass parts and other rights that some states do you need parts or accessories, please call the appropriate 800 number on the cover of such purchase. Two-Year Limited Warranty (Applies only in...


