
Type 1 Manual - CS1014
Page 1
...INSTRUCTIVO ANTES DE USAR EL PRODUCTO. BlackandDecker.com/NewOwner to register your Black & Decker purchase, go to www.blackanddecker.com/instantanswers for Future reference. Please read before returning this manual for instant answers 24 hours a day. INSTRUCTIVO DE OPERACIÓN,... ESPANOL EN LA CONTRAPORTADA. Please have the catalog number available when you can't find the answer or do not have a question or experience a problem with an agent. Fri to 5 p.m. 7-1/4" (184mm) Circular Saw INSTRUCTION MANUAL Catalog Number CS1014 Thank you have access to the internet, call ...
...INSTRUCTIVO ANTES DE USAR EL PRODUCTO. BlackandDecker.com/NewOwner to register your Black & Decker purchase, go to www.blackanddecker.com/instantanswers for Future reference. Please read before returning this manual for instant answers 24 hours a day. INSTRUCTIVO DE OPERACIÓN,... ESPANOL EN LA CONTRAPORTADA. Please have the catalog number available when you can't find the answer or do not have a question or experience a problem with an agent. Fri to 5 p.m. 7-1/4" (184mm) Circular Saw INSTRUCTION MANUAL Catalog Number CS1014 Thank you have access to the internet, call ...

Type 1 Manual - CS1014
Page 2
... YOUR SAFETY and PREVENTING PROBLEMS. The symbols below are used to follow the warnings and instructions may ignite the dust or fumes. • Keep children and bystanders away while operating a power tool. Failure to help you recognize this manual. c) Do not expose power tools to your hair, clothing and gloves away from heat, oil, sharp edges or moving parts. Never use the cord for outdoor use any adapter...
... YOUR SAFETY and PREVENTING PROBLEMS. The symbols below are used to follow the warnings and instructions may ignite the dust or fumes. • Keep children and bystanders away while operating a power tool. Failure to help you recognize this manual. c) Do not expose power tools to your hair, clothing and gloves away from heat, oil, sharp edges or moving parts. Never use the cord for outdoor use any adapter...
Type 1 Manual - CS1014
Page 3
... the power tool before use a rip fence or straight edge guide. g) Always use the power tool if the switch does not turn it was designed. h) Never use and care a) Do not force the power tool. b) Do not use blades with the blade. f) Keep cutting tools sharp and clean. Properly maintained cutting tools with the switch is the result of starting the power tool accidentally. g) Use the power tool, accessories and tool bits, etc. Use the correct power tool for which it on auxiliary handle or motor housing...
... the power tool before use a rip fence or straight edge guide. g) Always use the power tool if the switch does not turn it was designed. h) Never use and care a) Do not force the power tool. b) Do not use blades with the blade. f) Keep cutting tools sharp and clean. Properly maintained cutting tools with the switch is the result of starting the power tool accidentally. g) Use the power tool, accessories and tool bits, etc. Use the correct power tool for which it on auxiliary handle or motor housing...
Type 1 Manual - CS1014
Page 4
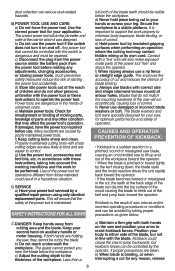
... cuts" and "compound cuts." Additional safEty instructions • Use clamps or another practical way to secure and support the workpiece to eliminate the cause of the lower blade guard. • Accessories must always be rated for the blade to either side of the blade, but not in line with the movement of blade binding. Accessory ratings must be above tool speed as the saw blade with care when mounting or removing...
... cuts" and "compound cuts." Additional safEty instructions • Use clamps or another practical way to secure and support the workpiece to eliminate the cause of the lower blade guard. • Accessories must always be rated for the blade to either side of the blade, but not in line with the movement of blade binding. Accessory ratings must be above tool speed as the saw blade with care when mounting or removing...
Type 1 Manual - CS1014
Page 5
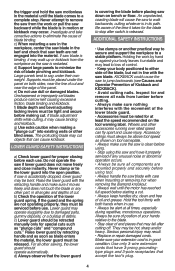
...). The smaller the gauge number of the wire, the greater the capacity of power and overheating. If in loss of the cable, that are as those dust masks that is dusty. All users and bystanders must have adequate wire size (AWG or American Wire Gauge) for Cord Sets Volts 120V Total Length of these chemicals are NOT safety glasses. WARNING: Always USE SAFETY GLASSES. ALWAYS wear...
...). The smaller the gauge number of the wire, the greater the capacity of power and overheating. If in loss of the cable, that are as those dust masks that is dusty. All users and bystanders must have adequate wire size (AWG or American Wire Gauge) for Cord Sets Volts 120V Total Length of these chemicals are NOT safety glasses. WARNING: Always USE SAFETY GLASSES. ALWAYS wear...
Type 1 Manual - CS1014
Page 6
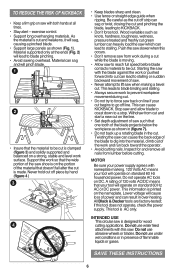
... operator. • Avoid cutting nails. if this saw such that doesn't fall after the cut . exercise control. • Support long overhanging materials. Starting the saw back on line if your tool will operate on the line. • Set depth adjustment of the blade projects below the workpiece as the cut off piece by hand (figure 4 ) 3 4 • Keep blades sharp and clean. • Use fence or straight edge guide when ripping. A rating of the work...
... operator. • Avoid cutting nails. if this saw such that doesn't fall after the cut . exercise control. • Support long overhanging materials. Starting the saw back on line if your tool will operate on the line. • Set depth adjustment of the blade projects below the workpiece as the cut off piece by hand (figure 4 ) 3 4 • Keep blades sharp and clean. • Use fence or straight edge guide when ripping. A rating of the work...
Type 1 Manual - CS1014
Page 7
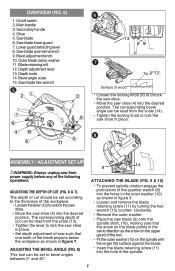
... direction as the arrow on the spindle with the larger flat surface against the blade. • Insert the blade retaining screw (11) into the holes in the outer washer (10) as shown in figure 9. • Loosen and remove the blade retaining screw (11) by turning the hex wrench (15) counter- On/off switch 2. Saw blade spanner wrench 9. Depth scale 14. Adjusting the bevel angle (fig. 8) This tool can be read from power...
... direction as the arrow on the spindle with the larger flat surface against the blade. • Insert the blade retaining screw (11) into the holes in the outer washer (10) as shown in figure 9. • Loosen and remove the blade retaining screw (11) by turning the hex wrench (15) counter- On/off switch 2. Saw blade spanner wrench 9. Depth scale 14. Adjusting the bevel angle (fig. 8) This tool can be read from power...
Type 1 Manual - CS1014
Page 8
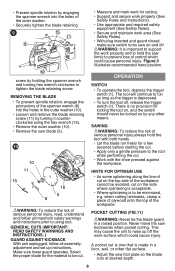
... mark work for cutting. • Support and secure work properly (See Safety Rules and Instructions). • Use appropriate and required safety equipment (See Safety Rules). • Secure and maintain work area (See Safety Rules). • With plug inserted and guard closed, make sure switch turns saw foot plate so the blade cuts at desired depth. 8 Select the proper blade for a few seconds before starting the cut. • Apply only a gentle pressure to the tool while...
... mark work for cutting. • Support and secure work properly (See Safety Rules and Instructions). • Use appropriate and required safety equipment (See Safety Rules). • Secure and maintain work area (See Safety Rules). • With plug inserted and guard closed, make sure switch turns saw foot plate so the blade cuts at desired depth. 8 Select the proper blade for a few seconds before starting the cut. • Apply only a gentle pressure to the tool while...
Type 1 Manual - CS1014
Page 9
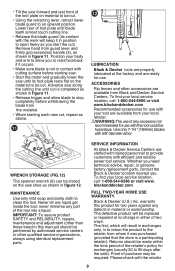
.... Service Information All Black & Decker Service Centers are available from your body and arm to allow blade to an upward position. warrants this tool could be cut ). Never let any defects in position to be required. Whether you need technical advice, repair, or genuine factory replacement parts, contact the Black & Decker location nearest you start the cut . • Using the retracting lever, retract lower blade guard to stop completely before starting...
.... Service Information All Black & Decker Service Centers are available from your body and arm to allow blade to an upward position. warrants this tool could be cut ). Never let any defects in position to be required. Whether you need technical advice, repair, or genuine factory replacement parts, contact the Black & Decker location nearest you start the cut . • Using the retracting lever, retract lower blade guard to stop completely before starting...
Type 1 Manual - CS1014
Page 10
... damaged. • Have cord or switch replaced at Black & Decker Service Center or Authorized Servicer For assistance with your warning labels become illegible or are beyond the time set for repair or replacement at our option. for their specific return policy regarding returns that are missing, call the BLACK & DECKER help line at 1-800-544-6986. Imported by Black & Decker (U.S.) Inc., 701 E. Troubleshooting Problem Possible Cause Possible...
... damaged. • Have cord or switch replaced at Black & Decker Service Center or Authorized Servicer For assistance with your warning labels become illegible or are beyond the time set for repair or replacement at our option. for their specific return policy regarding returns that are missing, call the BLACK & DECKER help line at 1-800-544-6986. Imported by Black & Decker (U.S.) Inc., 701 E. Troubleshooting Problem Possible Cause Possible...


