User Guide
Page 3
... the single serve POD adapter during the brewing process. IMPORTANT SAFEGUARDS. Contact consumer support at the number listed in this manual. • The use of accessory attachments that they have not been recommended by the appliance manufacturer may occur if either the carafe or single-serve filter basket lid is removed or unit cover is opened during the brewing cycle. • The unit's carafe is used on a range top. • Do not set a hot carafe...
... the single serve POD adapter during the brewing process. IMPORTANT SAFEGUARDS. Contact consumer support at the number listed in this manual. • The use of accessory attachments that they have not been recommended by the appliance manufacturer may occur if either the carafe or single-serve filter basket lid is removed or unit cover is opened during the brewing cycle. • The unit's carafe is used on a range top. • Do not set a hot carafe...

User Guide
Page 4
... shock, this plug is intended to prevent removal of the grounded type, the extension cord should be arranged so that it will not drape over . A short power-supply cord is damaged, please contact the warranty department listed in any way. There are no user-serviceable parts inside. SAVE THESE INSTRUCTIONS. POLARIZED PLUG (120V models only) This appliance has a polarized plug (one...
... shock, this plug is intended to prevent removal of the grounded type, the extension cord should be arranged so that it will not drape over . A short power-supply cord is damaged, please contact the warranty department listed in any way. There are no user-serviceable parts inside. SAVE THESE INSTRUCTIONS. POLARIZED PLUG (120V models only) This appliance has a polarized plug (one...
User Guide
Page 5
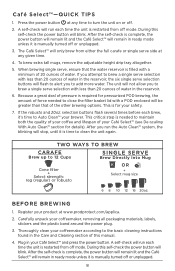
... 8 Before Brewing 8 Brewing a Carafe 9 Brewing Single Ser ve - See below. Warning: To reduce the risk of fire or electric shock, do not remove the cover of the Black + Decker Café Select™! There are no user-serviceable parts inside. SAV E THE SE IN STR UC T I ONS. CONTENTS Important Safeguards 3 Table of Contents 5 Getting to ensure optimal product performance for household use and care manual and...
... 8 Before Brewing 8 Brewing a Carafe 9 Brewing Single Ser ve - See below. Warning: To reduce the risk of fire or electric shock, do not remove the cover of the Black + Decker Café Select™! There are no user-serviceable parts inside. SAV E THE SE IN STR UC T I ONS. CONTENTS Important Safeguards 3 Table of Contents 5 Getting to ensure optimal product performance for household use and care manual and...

User Guide
Page 6
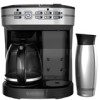
... keep hot carafe plate 8. Removable water reservoir (Part #CM6000-06) 12. Single serve filter basket lid 13. LED lit control panel 5. Travel mug (select models) (Part #CM6000-07) 14. Removable stainless steel drip tray cover (Part #CM6000-03) 9. Single serve ground coffee adapter (Part #CM6000-09) 16. Water reservoir lid (Part #CM6000-05) 11. 60 oz. Reusable single serve ground coffee filter (Part #CM6000-08) 15. Single serve POD adapter (Part #CM6000-10) 6 GETTING TO KNOW YOUR Café Select™* 1 10 2 3 11 4 12 5 6 13 7 14 8 9 *Product...
... keep hot carafe plate 8. Removable water reservoir (Part #CM6000-06) 12. Single serve filter basket lid 13. LED lit control panel 5. Travel mug (select models) (Part #CM6000-07) 14. Removable stainless steel drip tray cover (Part #CM6000-03) 9. Single serve ground coffee adapter (Part #CM6000-09) 16. Water reservoir lid (Part #CM6000-05) 11. 60 oz. Reusable single serve ground coffee filter (Part #CM6000-08) 15. Single serve POD adapter (Part #CM6000-10) 6 GETTING TO KNOW YOUR Café Select™* 1 10 2 3 11 4 12 5 6 13 7 14 8 9 *Product...
User Guide
Page 7
... used to the perfect cup. Cone Style Filter Basket This filter's funnel shape ensures all coffee grounds for large capacity travel mugs. Auto Clean™ System To ensure a quality brew and long lifespan of your favorite ground coffee, scoop coffee grounds directly into this adapter to brew up at any time. Removable Water Reservoir It's easy fill and easy clean. The removable reservoir holds 60 oz. FULL CARAFE Evenstream™ Showerhead This custom...
... used to the perfect cup. Cone Style Filter Basket This filter's funnel shape ensures all coffee grounds for large capacity travel mugs. Auto Clean™ System To ensure a quality brew and long lifespan of your favorite ground coffee, scoop coffee grounds directly into this adapter to brew up at any time. Removable Water Reservoir It's easy fill and easy clean. The removable reservoir holds 60 oz. FULL CARAFE Evenstream™ Showerhead This custom...
User Guide
Page 8
... your coffeemaker according to Auto Clean™ your coffeemaker, removing all packaging materials, labels, stickers and the plastic band around the power plug. 3. selection buttons flash several times before each time the unit is needed to turn the unit on or off or unplugged. 8 If the robusto and 20oz. This critical step is restarted from either the full carafe or single serve side at any time to close the filter basket lid...
... your coffeemaker according to Auto Clean™ your coffeemaker, removing all packaging materials, labels, stickers and the plastic band around the power plug. 3. selection buttons flash several times before each time the unit is needed to turn the unit on or off or unplugged. 8 If the robusto and 20oz. This critical step is restarted from either the full carafe or single serve side at any time to close the filter basket lid...
User Guide
Page 9
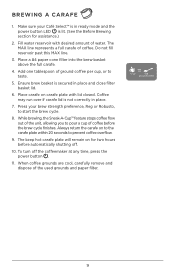
... water reservoir with lid closed. Place a #4 paper cone filter into the brew basket above the full carafe. 4. While brewing, the Sneak-A-Cup™ feature stops coffee flow out of the unit, allowing you to pour a cup of ground coffee per cup, or to taste. 5. Place carafe on to the carafe plate within 20 seconds to start the brew cycle. 8. BREWING A CARAFE 1. Add one tablespoon of coffee before automatically shutting off the coffeemaker at any time, press the power button...
... water reservoir with lid closed. Place a #4 paper cone filter into the brew basket above the full carafe. 4. While brewing, the Sneak-A-Cup™ feature stops coffee flow out of the unit, allowing you to pour a cup of ground coffee per cup, or to taste. 5. Place carafe on to the carafe plate within 20 seconds to start the brew cycle. 8. BREWING A CARAFE 1. Add one tablespoon of coffee before automatically shutting off the coffeemaker at any time, press the power button...
User Guide
Page 10
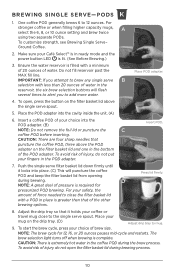
... not remove the foil lid or puncture6the8 10 C12 Insert POD. 16 20oz. Make sure your coffee or travel mug close the filter basket lid with a POD in the bottom of pressure is extremely hot water in the POD adapter. D NOTE: A great deal of the POD adapter. BREWING SINGLE SERVE-PODS 1. To customize strength, see Brewing Single Serve- Place the POD adapter into place. (C) This will flash several times to alert you to brew any single serve...
... not remove the foil lid or puncture6the8 10 C12 Insert POD. 16 20oz. Make sure your coffee or travel mug close the filter basket lid with a POD in the bottom of pressure is extremely hot water in the POD adapter. D NOTE: A great deal of the POD adapter. BREWING SINGLE SERVE-PODS 1. To customize strength, see Brewing Single Serve- Place the POD adapter into place. (C) This will flash several times to alert you to brew any single serve...
User Guide
Page 11
... not fill reservoir past the MAX fill line. If your mug on the unit's base. (H) 10. When cooled, carefully dispose of water in the reservoir, the six brew selection buttons will flash several times to alert you attempt to brew a single serve selection with less than 20 ounces of the used POD. CAUTION: The coffee POD will ensure the filter basket lid does not lift open during brewing. 8. Ensure the water reservoir is...
... not fill reservoir past the MAX fill line. If your mug on the unit's base. (H) 10. When cooled, carefully dispose of water in the reservoir, the six brew selection buttons will flash several times to alert you attempt to brew a single serve selection with less than 20 ounces of the used POD. CAUTION: The coffee POD will ensure the filter basket lid does not lift open during brewing. 8. Ensure the water reservoir is...
User Guide
Page 12
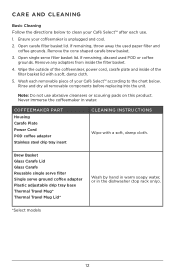
...removable components before replacing into the unit. Wash each use abrasive cleansers or scouring pads on this product. COFFEEMAKER PART Housing Carafe Plate Power Cord POD coffee adapter Stainless steel drip tray insert CLEANING INSTRUCTIONS Wipe with a soft, damp cloth. 5. Remove the cone shaped carafe brew basket. 3. Note: Do not use . 1. Remove any adapters from inside of your coffeemaker is unplugged and cool. 2. Brew Basket Glass Carafe Lid Glass Carafe Reusable single serve filter Single serve ground coffee adapter Plastic adjustable drip tray base Thermal Travel Mug* Thermal...
...removable components before replacing into the unit. Wash each use abrasive cleansers or scouring pads on this product. COFFEEMAKER PART Housing Carafe Plate Power Cord POD coffee adapter Stainless steel drip tray insert CLEANING INSTRUCTIONS Wipe with a soft, damp cloth. 5. Remove the cone shaped carafe brew basket. 3. Note: Do not use . 1. Remove any adapters from inside of your coffeemaker is unplugged and cool. 2. Brew Basket Glass Carafe Lid Glass Carafe Reusable single serve filter Single serve ground coffee adapter Plastic adjustable drip tray base Thermal Travel Mug* Thermal...
User Guide
Page 13
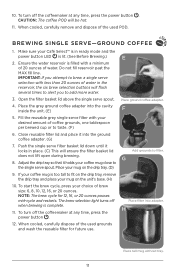
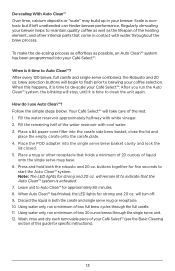
...; will turn off. 9. Fill the water reservoir approximately half-way with water throughout the brew process. Place the POD adapter into the carafe side brew basket, close the lid and place the empty carafe onto the carafe plate. 4. buttons together for five seconds to Auto Clean™ for specific instructions). 13 When Auto Clean™ has finished, the LED lights for strong and 20 oz. will take care of the rest. 1. Using water only, run...
...; will turn off. 9. Fill the water reservoir approximately half-way with water throughout the brew process. Place the POD adapter into the carafe side brew basket, close the lid and place the empty carafe onto the carafe plate. 4. buttons together for five seconds to Auto Clean™ for specific instructions). 13 When Auto Clean™ has finished, the LED lights for strong and 20 oz. will take care of the rest. 1. Using water only, run...
User Guide
Page 14
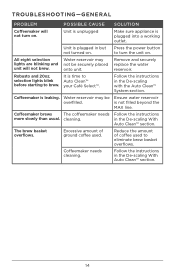
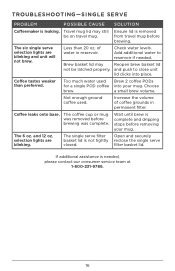
... selection lights blink Auto Clean™ before starting to turn on . cleaning. TROUBLESHOOTING-GENERAL PROBLEM POSSIBLE CAUSE SOLUTION Coffeemaker will not brew. Excessive amount of coffee used . Reduce the amount of ground coffee used to eliminate brew basket overflows. is plugged into a working outlet. Follow the instructions in the De-scaling With Auto Clean™ section. your Café Select™. Follow the instructions in but Press the power button not turned on . Remove and securely replace the water reservoir. Unit...
... selection lights blink Auto Clean™ before starting to turn on . cleaning. TROUBLESHOOTING-GENERAL PROBLEM POSSIBLE CAUSE SOLUTION Coffeemaker will not brew. Excessive amount of coffee used . Reduce the amount of ground coffee used to eliminate brew basket overflows. is plugged into a working outlet. Follow the instructions in the De-scaling With Auto Clean™ section. your Café Select™. Follow the instructions in but Press the power button not turned on . Remove and securely replace the water reservoir. Unit...
User Guide
Page 15
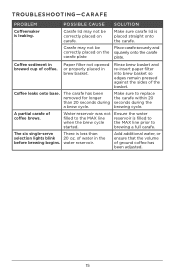
... correctly placed on carafe. The carafe has been removed for longer than selection lights blink 20 oz. A partial carafe of the basket. Coffee leaks onto base. Add additional water, or ensure that the volume of coffee. Make sure to the MAX line reservoir is placed straight onto the carafe. The six single-serve There is leaking. Coffee sediment in brewed cup of ground coffee has been adjusted. 15 Make sure carafe lid is filled to...
... correctly placed on carafe. The carafe has been removed for longer than selection lights blink 20 oz. A partial carafe of the basket. Coffee leaks onto base. Add additional water, or ensure that the volume of coffee. Make sure to the MAX line reservoir is placed straight onto the carafe. The six single-serve There is leaking. Coffee sediment in brewed cup of ground coffee has been adjusted. 15 Make sure carafe lid is filled to...
User Guide
Page 16
... water used . Not enough ground coffee used Brew 2 coffee PODs for a single POD coffee into place. Increase the volume of water in permanent filter. The single serve filter Open and securely basket lid is needed . Add additional water to close unit lid clicks into your mug. The coffee cup or mug was removed before brewing. filter basket lid. and push to reservoir if needed , please contact our consumer service team at 1-800-231-9786. 16 Less than preferred. Choose brew. selection lights are blinking and unit...
... water used . Not enough ground coffee used Brew 2 coffee PODs for a single POD coffee into place. Increase the volume of water in permanent filter. The single serve filter Open and securely basket lid is needed . Add additional water to close unit lid clicks into your mug. The coffee cup or mug was removed before brewing. filter basket lid. and push to reservoir if needed , please contact our consumer service team at 1-800-231-9786. 16 Less than preferred. Choose brew. selection lights are blinking and unit...
User Guide
Page 17
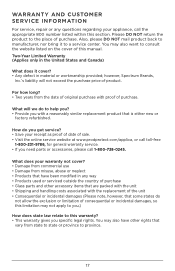
... in material or workmanship provided; WARRANTY AND CUSTOMER SERVICE INFORMATION For service, repair or any way • Products used or serviced outside the country of purchase • Glass parts and other rights that vary from the date of original purchase with a reasonably similar replacement product that some states do you specific legal rights. Two-Year Limited Warranty (Applies only in the United States and Canada) What does...
... in material or workmanship provided; WARRANTY AND CUSTOMER SERVICE INFORMATION For service, repair or any way • Products used or serviced outside the country of purchase • Glass parts and other rights that vary from the date of original purchase with a reasonably similar replacement product that some states do you specific legal rights. Two-Year Limited Warranty (Applies only in the United States and Canada) What does...
User Guide
Page 36
...;servés. Todos los derechos reservados. All rights reserved. BLACK+DECKER y el logo tipo BLACK+DECKER son marcas registradas de The Black + Decker Corporation y son utilizados bajo licencia. www.BlackAndDeckerAppliances.com © 2015 The Black + Decker ...Black + Decker Corporation and are used under license. BLACK+DECKER and the BLACK+DECKER logo are trademarks of Keurig Green Mountain, Inc. BLACK + DECKER et le logo BLACK &+DECKER sont des marques de commerce de The Black + Decker Corporation, et sont utilisés sous licence. T22-5001545 11193-00 K-Cup® es una...
...;servés. Todos los derechos reservados. All rights reserved. BLACK+DECKER y el logo tipo BLACK+DECKER son marcas registradas de The Black + Decker Corporation y son utilizados bajo licencia. www.BlackAndDeckerAppliances.com © 2015 The Black + Decker ...Black + Decker Corporation and are used under license. BLACK+DECKER and the BLACK+DECKER logo are trademarks of Keurig Green Mountain, Inc. BLACK + DECKER et le logo BLACK &+DECKER sont des marques de commerce de The Black + Decker Corporation, et sont utilisés sous licence. T22-5001545 11193-00 K-Cup® es una...


