User Manual
Page 1
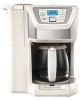
TM MILL & BREW™ 12-CUP PROGRAMMABLE COFFEE MAKER use & care manual CM5000
TM MILL & BREW™ 12-CUP PROGRAMMABLE COFFEE MAKER use & care manual CM5000
User Manual
Page 2
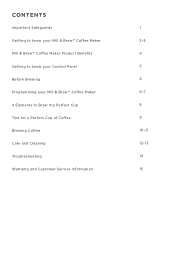
CONTENTS Important Safeguards Getting to know your Mill & Brew™ Coffee Maker Mill & Brew™ Coffee Maker Product Benefits Getting to know your Control Panel Before Brewing Programming your Mill & Brew™ Coffee Maker 4 Elements to Brew the Perfect Cup Tips for a Perfect Cup of Coffee Brewing Coffee Care and Cleaning Tr o u b l e s h o o t i n g Warranty and Customer Service Information 1 2-3 4 5 6 6 -7 8 9 10-11 12-13 14 15
CONTENTS Important Safeguards Getting to know your Mill & Brew™ Coffee Maker Mill & Brew™ Coffee Maker Product Benefits Getting to know your Control Panel Before Brewing Programming your Mill & Brew™ Coffee Maker 4 Elements to Brew the Perfect Cup Tips for a Perfect Cup of Coffee Brewing Coffee Care and Cleaning Tr o u b l e s h o o t i n g Warranty and Customer Service Information 1 2-3 4 5 6 6 -7 8 9 10-11 12-13 14 15
User Manual
Page 3
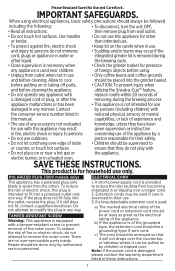
... the warranty department listed in use • Only coffee beans and coffee grounds and before cleaning the appliance. c) The cord should be used if care is exercised in water or integrated grinder lid is removed during the brewing process. Note: If the power cord is used: a) The marked electrical rating of the power cord or extension cord should be a grounding-type 3-wire cord. and injury to prevent removal of...
... the warranty department listed in use • Only coffee beans and coffee grounds and before cleaning the appliance. c) The cord should be used if care is exercised in water or integrated grinder lid is removed during the brewing process. Note: If the power cord is used: a) The marked electrical rating of the power cord or extension cord should be a grounding-type 3-wire cord. and injury to prevent removal of...
User Manual
Page 4
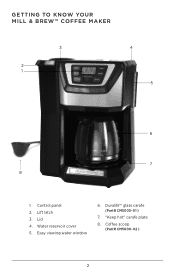
Water reservoir cover 5. Lift latch 3. Lid 4. Coffee scoop (Part# CM5000-02 ) 2 Control panel 2. "Keep hot" carafe plate 8. Duralife™ glass carafe (Part# CM5000-01 ) 7. GETTING TO KNOW YOUR MILL & BREW™ COFFEE MAKER 3 2 1 4 5 6 7 8 1. Easy viewing water window 6.
Water reservoir cover 5. Lift latch 3. Lid 4. Coffee scoop (Part# CM5000-02 ) 2 Control panel 2. "Keep hot" carafe plate 8. Duralife™ glass carafe (Part# CM5000-01 ) 7. GETTING TO KNOW YOUR MILL & BREW™ COFFEE MAKER 3 2 1 4 5 6 7 8 1. Easy viewing water window 6.
User Manual
Page 5
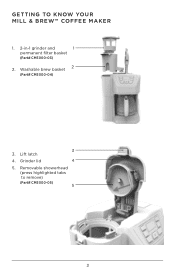
Washable brew basket (Part# CM5000-04) 3 3. Removable showerhead (press highlighted tabs to remove) (Part# CM5000-05) 5 3 Grinder lid 4 5. Lift latch 4. GETTING TO KNOW YOUR MILL & BREW™ COFFEE MAKER 1. 2-in-1 grinder and 1 permanent filter basket (Part# CM5000-03) 2 2.
Washable brew basket (Part# CM5000-04) 3 3. Removable showerhead (press highlighted tabs to remove) (Part# CM5000-05) 5 3 Grinder lid 4 5. Lift latch 4. GETTING TO KNOW YOUR MILL & BREW™ COFFEE MAKER 1. 2-in-1 grinder and 1 permanent filter basket (Part# CM5000-03) 2 2.
User Manual
Page 6
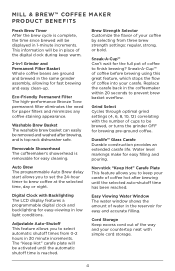
... timer to finish brewing? Replace the carafe back in low light conditions. Water level markings make for easy cleaning. Auto Brew The programmable Auto Brew delay start allows you to prevent brew basket overflow. Removable Showerhead The coffeemaker's showerhead is removable for easy filling and pouring. Grind Select Cycles through optimal grind settings (4, 6, 8, 10, 12) correlating with Backlighting The LCD display features a programmable digital clock and backlighting for easy and accurate filling. MILL & BREW™ COFFEE MAKER PRODUCT BENEFITS Fresh Brew Timer...
... timer to finish brewing? Replace the carafe back in low light conditions. Water level markings make for easy cleaning. Auto Brew The programmable Auto Brew delay start allows you to prevent brew basket overflow. Removable Showerhead The coffeemaker's showerhead is removable for easy filling and pouring. Grind Select Cycles through optimal grind settings (4, 6, 8, 10, 12) correlating with Backlighting The LCD display features a programmable digital clock and backlighting for easy and accurate filling. MILL & BREW™ COFFEE MAKER PRODUCT BENEFITS Fresh Brew Timer...
User Manual
Page 7
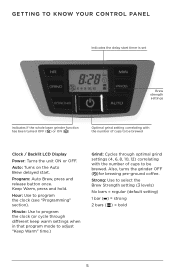
... Auto Brew delayed start timer is set Brew strength settings Indicates if the whole bean grinder function has been turned OFF ( ) or ON ( ) Optimal grind setting correlating with the number of cups to be brewed Clock / Backlit LCD Display Power: Turns the unit ON or OFF. Also, turns the grinder OFF ( )for brewing pre-ground coffee. Hour: Use to select the Brew Strength setting (3 levels) No bars = regular (default setting) 1 bar ( ) = strong 2 bars ( ) = bold 5 Minute: Use to program the clock...
... Auto Brew delayed start timer is set Brew strength settings Indicates if the whole bean grinder function has been turned OFF ( ) or ON ( ) Optimal grind setting correlating with the number of cups to be brewed Clock / Backlit LCD Display Power: Turns the unit ON or OFF. Also, turns the grinder OFF ( )for brewing pre-ground coffee. Hour: Use to select the Brew Strength setting (3 levels) No bars = regular (default setting) 1 bar ( ) = strong 2 bars ( ) = bold 5 Minute: Use to program the clock...
User Manual
Page 8
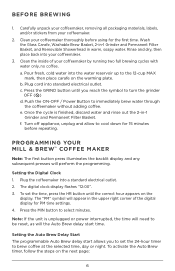
... Auto Brew timer, follow the steps on the warming plate. Push the ON-OFF / Power Button to select minutes. Turn off appliance, unplug and allow to the 12-cup MAX mark, then place carafe on the next page: 6 Plug the coffeemaker into the water reservoir up to cool down for PM time settings. 4. Wash the Glass Carafe, Washable Brew Basket, 2-in-1 Grinder and Permanent Filter Basket, and Removable Showerhead in -1 Grinder and Permanent Filter Basket. Note: If the unit...
... Auto Brew timer, follow the steps on the warming plate. Push the ON-OFF / Power Button to select minutes. Turn off appliance, unplug and allow to the 12-cup MAX mark, then place carafe on the next page: 6 Plug the coffeemaker into the water reservoir up to cool down for PM time settings. 4. Wash the Glass Carafe, Washable Brew Basket, 2-in-1 Grinder and Permanent Filter Basket, and Removable Showerhead in -1 Grinder and Permanent Filter Basket. Note: If the unit...
User Manual
Page 9
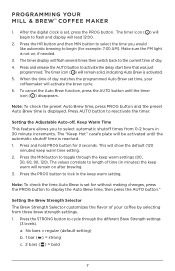
... to display the Auto Brew time, then press the AUTO button." PROGRAMMING YOUR MILL & BREW™ COFFEE MAKER 1. When the time of time (in the keep warm time setting. 2. This will read 12:00. 2. After the digital clock is set , press the PROG button. The timer icon ( ) will begin (for 3 seconds. The "Keep Hot" carafe plate will be activated until the timer icon ( ) disappears. Press the HR button and then MIN button to select the time you...
... to display the Auto Brew time, then press the AUTO button." PROGRAMMING YOUR MILL & BREW™ COFFEE MAKER 1. When the time of time (in the keep warm time setting. 2. This will read 12:00. 2. After the digital clock is set , press the PROG button. The timer icon ( ) will begin (for 3 seconds. The "Keep Hot" carafe plate will be activated until the timer icon ( ) disappears. Press the HR button and then MIN button to select the time you...
User Manual
Page 10
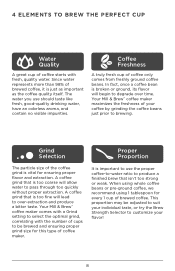
... may be brewed and ensuring proper grind size for every 1 cup of brewed coffee. When using whole coffee beans or pre-ground coffee, we recommend using 1 tablespoon for this type of coffee maker. 4 ELEMENTS TO BREW THE PERFECT CUP Water Quality A great cup of coffee starts with the number of cups to be adjusted to suit your individual taste, or try the Brew Strength Selector to customize your coffee by grinding the coffee beans just...
... may be brewed and ensuring proper grind size for every 1 cup of brewed coffee. When using whole coffee beans or pre-ground coffee, we recommend using 1 tablespoon for this type of coffee maker. 4 ELEMENTS TO BREW THE PERFECT CUP Water Quality A great cup of coffee starts with the number of cups to be adjusted to suit your individual taste, or try the Brew Strength Selector to customize your coffee by grinding the coffee beans just...

User Manual
Page 11
... or freeze your daily supply of coffee, as contact with the number of the coffee bean. • A clean coffee maker is always important. TIPS FOR A PERFECT CUP OF COFFEE • To maximize the freshness of your coffee, use the integrated grinder to grind your coffee beans just before brewing. • When brewing whole bean coffee, use the Grind setting to select the optimal grind, correlating with moisture will impact the...
... or freeze your daily supply of coffee, as contact with the number of the coffee bean. • A clean coffee maker is always important. TIPS FOR A PERFECT CUP OF COFFEE • To maximize the freshness of your coffee, use the integrated grinder to grind your coffee beans just before brewing. • When brewing whole bean coffee, use the Grind setting to select the optimal grind, correlating with moisture will impact the...
User Manual
Page 12
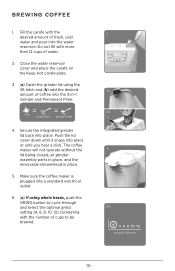
... coffee maker will not operate without the lid being closed, all grinder assembly parts in place, and the removable showerhead in -1 Grinder and Permanent Filter. 4. Push the lid cover down until it snaps into place. BREWING COFFEE 1. Close the water reservoir cover and place the carafe on the Keep Hot carafe plate. 3. (a) Open the grinder lid using whole beans, push the GRIND button to cycle through and select the optimal grind setting (4, 6, 8, 10, 12) correlating with the number of coffee into the water reservoir...
... coffee maker will not operate without the lid being closed, all grinder assembly parts in place, and the removable showerhead in -1 Grinder and Permanent Filter. 4. Push the lid cover down until it snaps into place. BREWING COFFEE 1. Close the water reservoir cover and place the carafe on the Keep Hot carafe plate. 3. (a) Open the grinder lid using whole beans, push the GRIND button to cycle through and select the optimal grind setting (4, 6, 8, 10, 12) correlating with the number of coffee into the water reservoir...
User Manual
Page 13
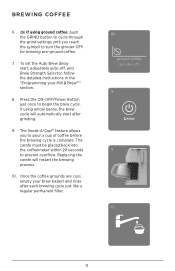
Press the ON-OFF/Power Button just once to pour a cup of coffee before the brewing cycle is complete. Replacing the carafe will automatically start , adjustable auto-off, and Brew Strength Selector, follow the detailed instructions in the "Programming your brew basket and rinse after grinding. 9. The Sneak-A-Cup™ feature allows you reach the symbol to prevent overflow. If using ground coffee, push the GRIND button to cycle through the grind settings until you to...
Press the ON-OFF/Power Button just once to pour a cup of coffee before the brewing cycle is complete. Replacing the carafe will automatically start , adjustable auto-off, and Brew Strength Selector, follow the detailed instructions in the "Programming your brew basket and rinse after grinding. 9. The Sneak-A-Cup™ feature allows you reach the symbol to prevent overflow. If using ground coffee, push the GRIND button to cycle through the grind settings until you to...
User Manual
Page 14
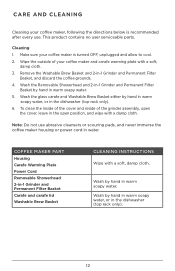
... in warm soapy water, or in -1 Grinder and Permanent Filter Basket Carafe and carafe lid Washable Brew Basket CLEANING INSTRUCTIONS Wipe with a damp cloth. Remove the Washable Brew Basket and 2-in warm soapy water. Make sure your coffee maker, following the directions below is turned OFF, unplugged and allow to cool. 2. To clean the inside of the cover and inside of your coffee maker and carafe warming plate with a soft, damp cloth. 3. COFFEE MAKER PART Housing Carafe Warming Plate Power Cord Removable Showerhead 2-in...
... in warm soapy water, or in -1 Grinder and Permanent Filter Basket Carafe and carafe lid Washable Brew Basket CLEANING INSTRUCTIONS Wipe with a damp cloth. Remove the Washable Brew Basket and 2-in warm soapy water. Make sure your coffee maker, following the directions below is turned OFF, unplugged and allow to cool. 2. To clean the inside of the cover and inside of your coffee maker and carafe warming plate with a soft, damp cloth. 3. COFFEE MAKER PART Housing Carafe Warming Plate Power Cord Removable Showerhead 2-in...

User Manual
Page 15
... Brew Basket, 2-in-1 Grinder and Permanent Filter Basket, and glass Carafe as instructed in -1 Grinder and Permanent Filter and Washable Brew Basket into the carafe (until you reach the symbol to completely remove the vinegar smell/taste. 8. Add fresh, cold water up to the 6-cup mark on the "Keep Hot" carafe plate. 3. Set empty carafe on the water window. Pour white vinegar into carafe. 6. Fill the water reservoir with Vinegar With regular use, minerals and hard water can clog your coffee maker. Turn ON coffee maker again...
... Brew Basket, 2-in-1 Grinder and Permanent Filter Basket, and glass Carafe as instructed in -1 Grinder and Permanent Filter and Washable Brew Basket into the carafe (until you reach the symbol to completely remove the vinegar smell/taste. 8. Add fresh, cold water up to the 6-cup mark on the "Keep Hot" carafe plate. 3. Set empty carafe on the water window. Pour white vinegar into carafe. 6. Fill the water reservoir with Vinegar With regular use, minerals and hard water can clog your coffee maker. Turn ON coffee maker again...
User Manual
Page 16
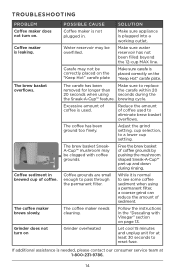
... permanent filter. The coffee maker needs cleaning. Water reservoir may be overfilled. If additional assistance is plugged into a working outlet. TROUBLESHOOTING PROBLEM Coffee maker does not turn on the "Keep Hot" carafe plate. The coffee has been ground too finely. Make sure water reservoir has not been filled beyond the 12-cup MAX line. The coffee maker brews slowly. Coffee sediment in the "Descaling with coffee grounds. The carafe has been Make sure to replace removed for at 1-800-231-9786. 14 Follow the instructions...
... permanent filter. The coffee maker needs cleaning. Water reservoir may be overfilled. If additional assistance is plugged into a working outlet. TROUBLESHOOTING PROBLEM Coffee maker does not turn on the "Keep Hot" carafe plate. The coffee has been ground too finely. Make sure water reservoir has not been filled beyond the 12-cup MAX line. The coffee maker brews slowly. Coffee sediment in the "Descaling with coffee grounds. The carafe has been Make sure to replace removed for at 1-800-231-9786. 14 Follow the instructions...
User Manual
Page 17
... province to province. 15 WARRANTY AND CUSTOMER SERVICE I N F O R M AT I O N For service, repair or any way • Products used or serviced outside the country of purchase • Glass parts and other rights that some states do to help you? • Provide you need parts or accessories, please call the appropriate 800 number listed within this section. Two-Year Limited Warranty (Applies only in the United States and Canada) What...
... province to province. 15 WARRANTY AND CUSTOMER SERVICE I N F O R M AT I O N For service, repair or any way • Products used or serviced outside the country of purchase • Glass parts and other rights that some states do to help you? • Provide you need parts or accessories, please call the appropriate 800 number listed within this section. Two-Year Limited Warranty (Applies only in the United States and Canada) What...
User Manual
Page 20
Made and printed in People's Republic of its affiliates, and used under license. www.BlackAndDeckerAppliances.com © 2014 Spectrum Brands, Inc., Middleton, WI 53562 2014-2-20-65: Rev-01 T22-5000926 BLACK & DECKER and the BLACK & DECKER Logo are registered trademarks of The Black & Decker Corporation, or one of China
Made and printed in People's Republic of its affiliates, and used under license. www.BlackAndDeckerAppliances.com © 2014 Spectrum Brands, Inc., Middleton, WI 53562 2014-2-20-65: Rev-01 T22-5000926 BLACK & DECKER and the BLACK & DECKER Logo are registered trademarks of The Black & Decker Corporation, or one of China

