Type 1 Manual - BDL170
Page 2
... by unqualified personnel could result in any other batteries may create a risk of injury when used on another laser. • Repairs and servicing MUST be suitable for one laser, may create a risk of fire. • Store idle product out of reach of procedures other than ...in explosive atmospheres, such as a telescope or transit to view the laser beam. • Position the laser so unintentional eye contact will be avoided. • Do not operate the laser around children or allow children to operate the laser. • Do not disassemble. V volts mW milliwatts nm wavelength in...
... by unqualified personnel could result in any other batteries may create a risk of injury when used on another laser. • Repairs and servicing MUST be suitable for one laser, may create a risk of fire. • Store idle product out of reach of procedures other than ...in explosive atmospheres, such as a telescope or transit to view the laser beam. • Position the laser so unintentional eye contact will be avoided. • Do not operate the laser around children or allow children to operate the laser. • Do not disassemble. V volts mW milliwatts nm wavelength in...
Type 1 Manual - BDL170
Page 3
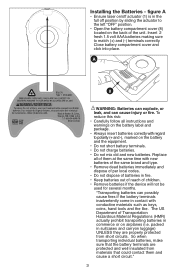
..., make sure that could contact them at the same time with conductive materials such as keys, coins, hand tools and the like. figure A • Ensure laser on airplanes (i.e. Close battery compartment cover and click into place. Installing the Batteries - To reduce this risk: • Carefully follow all of children. • Remove...
..., make sure that could contact them at the same time with conductive materials such as keys, coins, hand tools and the like. figure A • Ensure laser on airplanes (i.e. Close battery compartment cover and click into place. Installing the Batteries - To reduce this risk: • Carefully follow all of children. • Remove...
Type 1 Manual - BDL170
Page 4
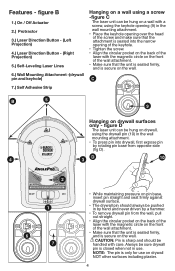
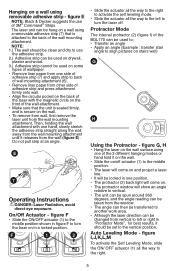
...from opposite side (fig D). 4 3D 10 CAUTION 2RADIACIÓN LÁSER. NO MIRE FIJAMENTE HACIA EL RAYO. ATENCIÓN LASER RADIATION. Always be pushed in the wall mounting attachment. • Place the keyhole opening of the keyhole. • Tighten the ...that the attachment is secure on the wall. figure B 1.) On / Off Actuator 2.) Protractor 3.) Laser Direction Button - (Left Projection) 4.) Laser Direction Button - (Right Projection) 5.) Self-Leveling Laser Lines 6.) Wall Mounting Attachment -(drywall pin and keyhole) 7.) Self Adhesive Strip Hanging on a wall using...
...from opposite side (fig D). 4 3D 10 CAUTION 2RADIACIÓN LÁSER. NO MIRE FIJAMENTE HACIA EL RAYO. ATENCIÓN LASER RADIATION. Always be pushed in the wall mounting attachment. • Place the keyhole opening of the keyhole. • Tighten the ...that the attachment is secure on the wall. figure B 1.) On / Off Actuator 2.) Protractor 3.) Laser Direction Button - (Left Projection) 4.) Laser Direction Button - (Right Projection) 5.) Self-Leveling Laser Lines 6.) Wall Mounting Attachment -(drywall pin and keyhole) 7.) Self Adhesive Strip Hanging on a wall using...
Type 1 Manual - BDL170
Page 5
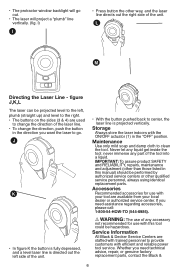
...the vertical position. On/Off Actuator - The laser unit can be hung on a wall using ...all the way to turn the laser on in figure F to back...on the back of the laser with one hand, slowly...laser on the wall. • To remove from wall, first remove the laser unit from the wall mounting attachment. E 7 Operating Instructions DANGER: Laser Radiation, avoid direct eye exposure. Auto Leveling Mode - figure E NOTE: Black & Decker... laser off actuator (1) to the middle position. • The laser will come on and project a laser ...; Although the laser direction can be used on the front...
...the vertical position. On/Off Actuator - The laser unit can be hung on a wall using ...all the way to turn the laser on in figure F to back...on the back of the laser with one hand, slowly...laser on the wall. • To remove from wall, first remove the laser unit from the wall mounting attachment. E 7 Operating Instructions DANGER: Laser Radiation, avoid direct eye exposure. Auto Leveling Mode - figure E NOTE: Black & Decker... laser off actuator (1) to the middle position. • The laser will come on and project a laser ...; Although the laser direction can be used on the front...
Type 1 Manual - BDL170
Page 6
... identical replacement parts. Accessories Recommended accessories for use with your local dealer or authorized service center. Service Information All Black & Decker Service Centers are staffed with trained personnel to go out. • The laser will project a "plumb" line vertically. (fig. Whether you need technical advice, repair, or genuine factory replacement parts, contact the...
... identical replacement parts. Accessories Recommended accessories for use with your local dealer or authorized service center. Service Information All Black & Decker Service Centers are staffed with trained personnel to go out. • The laser will project a "plumb" line vertically. (fig. Whether you need technical advice, repair, or genuine factory replacement parts, contact the...
Type 1 Manual - BDL170
Page 7
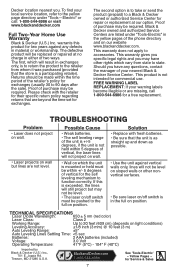
...to 90 days after the sale). Returns should be pushed to state. TECHNICAL SPECIFICATIONS Laser Diode Wavelength: 650 ± 5 nm (red color) Laser Class: Class 2 Working Range: Up to a Black & Decker owned or authorized Service Center for two years against vertical walls only, lines will...product (prepaid) to 20 feet (609 cm) (depends on position. TROUBLESHOOTING Problem • Laser does not project on wall. • Laser projects on our website www.blackanddecker.com. Black & Decker owned and authorized Service Centers are missing, call : 1-800-544-6986 or visit www....
...to 90 days after the sale). Returns should be pushed to state. TECHNICAL SPECIFICATIONS Laser Diode Wavelength: 650 ± 5 nm (red color) Laser Class: Class 2 Working Range: Up to a Black & Decker owned or authorized Service Center for two years against vertical walls only, lines will...product (prepaid) to 20 feet (609 cm) (depends on position. TROUBLESHOOTING Problem • Laser does not project on wall. • Laser projects on our website www.blackanddecker.com. Black & Decker owned and authorized Service Centers are missing, call : 1-800-544-6986 or visit www....
