Type 1 Manual - BDL170
Page 2
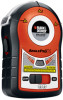
... the manufacturer for one laser, may create a risk of laser radiation. Use of any way can result. • Do not use in nanometers Class 2 Class 2 Laser For your convenience and safety, the following symbols. Repairs performed by a qualified repair facility. CAUTION: Use caution when drilling, nailing or cutting into walls, floors and cweiriilninggsorwphipicehs.mAalywcaoynstatuinrneleocfftrtichael power when working near electrical wires. Failure to operate the laser. • Do not...
... the manufacturer for one laser, may create a risk of laser radiation. Use of any way can result. • Do not use in nanometers Class 2 Class 2 Laser For your convenience and safety, the following symbols. Repairs performed by a qualified repair facility. CAUTION: Use caution when drilling, nailing or cutting into walls, floors and cweiriilninggsorwphipicehs.mAalywcaoynstatuinrneleocfftrtichael power when working near electrical wires. Failure to operate the laser. • Do not...
Type 1 Manual - BDL170
Page 3
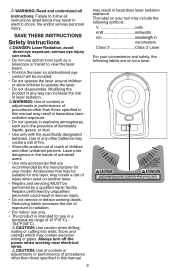
... new batteries. Insert 2 fresh 1.5 volt AAA batteries making sure to polarity (+ and -), marked on the back of the unit. The US Department of Transportation Hazardous Material Regulations (HMR) actually prohibit transporting batteries in the full off actuator (1) is in commerce or on the battery label and package. • Always insert batteries correctly with conductive materials such as keys, coins, hand tools...
... new batteries. Insert 2 fresh 1.5 volt AAA batteries making sure to polarity (+ and -), marked on the back of the unit. The US Department of Transportation Hazardous Material Regulations (HMR) actually prohibit transporting batteries in the full off actuator (1) is in commerce or on the battery label and package. • Always insert batteries correctly with conductive materials such as keys, coins, hand tools...
Type 1 Manual - BDL170
Page 4
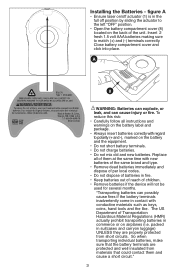
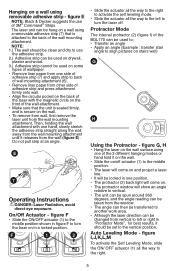
figure B 1.) On / Off Actuator 2.) Protractor 3.) Laser Direction Button - (Left Projection) 4.) Laser Direction Button - (Right Projection) 5.) Self-Leveling Laser Lines 6.) Wall Mounting Attachment -(drywall pin and keyhole) 7.) Self Adhesive Strip Hanging on a wall using a screw -figure C The laser unit can be pushed in use on pin base, insert pin straight and seat firmly against drywall surface. • The drywall pin should be sure drywall pin is closed when not in by...
figure B 1.) On / Off Actuator 2.) Protractor 3.) Laser Direction Button - (Left Projection) 4.) Laser Direction Button - (Right Projection) 5.) Self-Leveling Laser Lines 6.) Wall Mounting Attachment -(drywall pin and keyhole) 7.) Self Adhesive Strip Hanging on a wall using a screw -figure C The laser unit can be pushed in use on pin base, insert pin straight and seat firmly against drywall surface. • The drywall pin should be sure drywall pin is closed when not in by...
Type 1 Manual - BDL170
Page 5
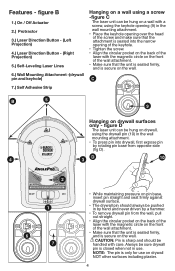
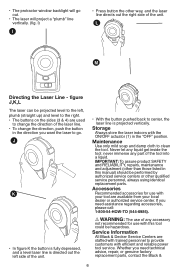
... laser on the wall surface using removable adhesive strip - The laser unit can be locked in one hand, slowly stretch the adhesive strip straight along the wall away from the wall mounting attachment until it should be clean and dry to use of wall mounting attachment (6). • Remove liner paper from vertical to left to the right. 5 E 7 Operating Instructions DANGER: Laser Radiation, avoid direct...
... laser on the wall surface using removable adhesive strip - The laser unit can be locked in one hand, slowly stretch the adhesive strip straight along the wall away from the wall mounting attachment until it should be clean and dry to use of wall mounting attachment (6). • Remove liner paper from vertical to left to the right. 5 E 7 Operating Instructions DANGER: Laser Radiation, avoid direct...
Type 1 Manual - BDL170
Page 6
...). Service Information All Black & Decker Service Centers are available from your local dealer or authorized service center. L M Directing the Laser Line - • The protractor window backlight will go . Maintenance Use only mild soap and damp cloth to center, the laser line is projected vertically. Whether you need technical advice, repair, or genuine factory replacement parts, contact the Black & 6 Accessories Recommended accessories for use with efficient and reliable power tool service. Never...
...). Service Information All Black & Decker Service Centers are available from your local dealer or authorized service center. L M Directing the Laser Line - • The protractor window backlight will go . Maintenance Use only mild soap and damp cloth to center, the laser line is projected vertically. Whether you need technical advice, repair, or genuine factory replacement parts, contact the Black & 6 Accessories Recommended accessories for use with efficient and reliable power tool service. Never...
Type 1 Manual - BDL170
Page 7
... your local service location, refer to a Black & Decker owned or authorized Service Center for a free replacement. Decker location nearest you have other nonvertical surfaces. • Be sure laser on position. To find your nearest Black & Decker Service Center. This product is to take or send the product (prepaid) to the yellow page directory under "Tools-Electric" in the full on /off switch must be...
... your local service location, refer to a Black & Decker owned or authorized Service Center for a free replacement. Decker location nearest you have other nonvertical surfaces. • Be sure laser on position. To find your nearest Black & Decker Service Center. This product is to take or send the product (prepaid) to the yellow page directory under "Tools-Electric" in the full on /off switch must be...

Type 1 Manual - BDL170
Page 24
BDL170 Form # 90565465 Copyright © 2011 Black & Decker 24 APRIL 2011 Printed in China Cat No.
BDL170 Form # 90565465 Copyright © 2011 Black & Decker 24 APRIL 2011 Printed in China Cat No.


