Instruction Manual
Page 2
... this instruction manual for their safety. When using this appliance, read this manual. This appliance is important for use the vacuum cleaner if it contains relates to read and understand this instruction manual carefully before continuing. 2 CAUTION: Indicates a potentially hazardous..., smoking or burning objects, etc. The information it is a risk of the appliance by persons (including children) with the vacuum cleaner. WARNINGS: Before using an electrical appliances, basic precautions should be followed, including the following: READ ALL INSTRUCTIONS BEFORE USING ...
... this instruction manual for their safety. When using this appliance, read this manual. This appliance is important for use the vacuum cleaner if it contains relates to read and understand this instruction manual carefully before continuing. 2 CAUTION: Indicates a potentially hazardous..., smoking or burning objects, etc. The information it is a risk of the appliance by persons (including children) with the vacuum cleaner. WARNINGS: Before using an electrical appliances, basic precautions should be followed, including the following: READ ALL INSTRUCTIONS BEFORE USING ...
Instruction Manual
Page 3
...appliance is damaged, it from the outlet. No liability can be replaced by non-compliance with these instructions or any uses other improper use vacuum cleaner if it . DO NOT use . DO disconnect the appliance from a power source of appliance. DO keep hair, loose clothing, fingers...DO NOT modify the polarized plug to disconnect. Clean or replace filters before connecting the flexible suction hose. DO NOT handle the plug or vacuum cleaner with a damaged cord or plug. DO NOT attempt to avoid a hazard. Industrial or commercial use only on the product identification ...
...appliance is damaged, it from the outlet. No liability can be replaced by non-compliance with these instructions or any uses other improper use vacuum cleaner if it . DO NOT use . DO disconnect the appliance from a power source of appliance. DO keep hair, loose clothing, fingers...DO NOT modify the polarized plug to disconnect. Clean or replace filters before connecting the flexible suction hose. DO NOT handle the plug or vacuum cleaner with a damaged cord or plug. DO NOT attempt to avoid a hazard. Industrial or commercial use only on the product identification ...
Instruction Manual
Page 4
...Than 6 18 10 18 12 16 16 14 American Wire Gauge 16 16 14 16 14 12 16 14 12 12 Not Recommended Transporting your Vacuum To move your tool may include the following table shows the correct size to use one heavy enough to use depending on your... product will cause a drop in line voltage resulting in doubt, use the next heavier gauge. Never pull or carry the vacuum cleaner by the flexible hose. 4 Never carry or pull the vacuum cleaner by its cord. IMPORTANT SAFETY INSTRUCTION CONT. The symbols and their definitions are as follows: V volts A amperes Hz...
...Than 6 18 10 18 12 16 16 14 American Wire Gauge 16 16 14 16 14 12 16 14 12 12 Not Recommended Transporting your Vacuum To move your tool may include the following table shows the correct size to use one heavy enough to use depending on your... product will cause a drop in line voltage resulting in doubt, use the next heavier gauge. Never pull or carry the vacuum cleaner by the flexible hose. 4 Never carry or pull the vacuum cleaner by its cord. IMPORTANT SAFETY INSTRUCTION CONT. The symbols and their definitions are as follows: V volts A amperes Hz...
Instruction Manual
Page 5
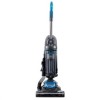
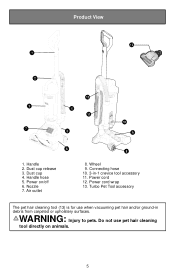
Power on animals. 5 Power cord wrap 13. Dust cup release 3. Nozzle 7. Power cord 12. Product View 13 1 2 12 3 4 11 7 5 10 9 6 1. Dust cup 4. Handle hose 5. Wheel 9. Handle 2. Connecting hose 10. 3-in debris from carpeted or upholstery surfaces. WARNING: Injury to pets. Do not use when vacuuming pet hair and/or ground-in -1 crevice tool accessory 11. Turbo Pet Tool accessory The pet hair cleaning tool (13) is for use pet hair cleaning tool directly on /off 6. Air outlet 8 8.
Power on animals. 5 Power cord wrap 13. Dust cup release 3. Nozzle 7. Power cord 12. Product View 13 1 2 12 3 4 11 7 5 10 9 6 1. Dust cup 4. Handle hose 5. Wheel 9. Handle 2. Connecting hose 10. 3-in debris from carpeted or upholstery surfaces. WARNING: Injury to pets. Do not use when vacuuming pet hair and/or ground-in -1 crevice tool accessory 11. Turbo Pet Tool accessory The pet hair cleaning tool (13) is for use pet hair cleaning tool directly on /off 6. Air outlet 8 8.
Instruction Manual
Page 6
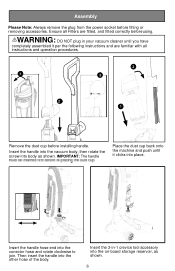
... from the power socket before installing handle. Then insert the handle into the on-board storage reservoir, as shown. Insert the 3-in your vacuum cleaner until it per the following instructions and are familiar with all Filters are fitted, and fitted correctly before using. Insert the handle into ...the vacuum body, then rotate the screw into the conector hose and rotate clockwise to join. Insert the handle hose end into body as shown. 6...
... from the power socket before installing handle. Then insert the handle into the on-board storage reservoir, as shown. Insert the 3-in your vacuum cleaner until it per the following instructions and are familiar with all Filters are fitted, and fitted correctly before using. Insert the handle into ...the vacuum body, then rotate the screw into the conector hose and rotate clockwise to join. Insert the handle hose end into body as shown. 6...
Instruction Manual
Page 8
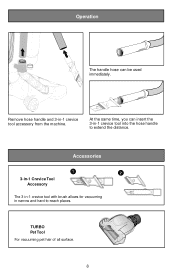
Remove hose handle and 3-in narrow and hard-to extend the distance. At the same time, you can be used immediately. TURBO Pet Tool For vacuuming pet hair of all surface. 8 Accessories 1 2 3-in-1 Crevice Tool Accessory The 3-in-1 crevice tool with brush allows for vacuuming in -1 crevice tool accessory from the machine. Operation The handle hose can insert the 3-in-1 crevice tool into the hose handle to -reach places.
Remove hose handle and 3-in narrow and hard-to extend the distance. At the same time, you can be used immediately. TURBO Pet Tool For vacuuming pet hair of all surface. 8 Accessories 1 2 3-in-1 Crevice Tool Accessory The 3-in-1 crevice tool with brush allows for vacuuming in -1 crevice tool accessory from the machine. Operation The handle hose can insert the 3-in-1 crevice tool into the hose handle to -reach places.
Instruction Manual
Page 9
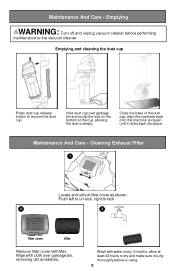
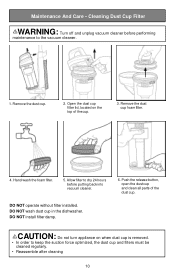
... the dust to remove the dust cup. Cleaning Exhaust Filter 1 Locate and unlock filter cover as shown. Push left to un-lock, right to the vacuum cleaner. Emptying WARNING: Turn off and unplug vacuum cleaner before re-using. 9 Emptying and cleaning the dust cup Press dust cup release button to empty.
... the dust to remove the dust cup. Cleaning Exhaust Filter 1 Locate and unlock filter cover as shown. Push left to un-lock, right to the vacuum cleaner. Emptying WARNING: Turn off and unplug vacuum cleaner before re-using. 9 Emptying and cleaning the dust cup Press dust cup release button to empty.
Instruction Manual
Page 10
.... 6. Open the dust cup filter lid, located on when dust cup is removed. • In order to dry 24 hours before performing maintenance to the vacuum cleaner. 1. DO NOT operate without filter installed. Push the release button, open the dust cup and clean all parts of the cup. 3. DO NOT wash...
.... 6. Open the dust cup filter lid, located on when dust cup is removed. • In order to dry 24 hours before performing maintenance to the vacuum cleaner. 1. DO NOT operate without filter installed. Push the release button, open the dust cup and clean all parts of the cup. 3. DO NOT wash...
Instruction Manual
Page 11
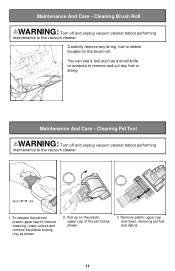
... any string, hair or debris located on the plastic upper cap of the pet tool as shown. 2. Cleaning Pet Tool WARNING: Turn off and unplug vacuum cleaner before performing maintenance to the vacuum cleaner. Pull up on the brush roll. Cleaning Brush Roll WARNING: Turn off and unplug...
... any string, hair or debris located on the plastic upper cap of the pet tool as shown. 2. Cleaning Pet Tool WARNING: Turn off and unplug vacuum cleaner before performing maintenance to the vacuum cleaner. Pull up on the brush roll. Cleaning Brush Roll WARNING: Turn off and unplug...

Instruction Manual
Page 12
Maintenance And Care - Clean only the outside of the vacuum cleaner. After cleaning, wipe off the moisture on vacuum cleaner, components and accessories with a dry cloth. Cleaning Vacuum And Tools Do not clean the vacuum cleaner, components or accessories using petrol or any other flammable liquid or solvents, etc. Do Not place accessories, tools or components in a dishwasher. 12 Use only a moist cloth and mild detergent for cleaning the vacuum cleaner, components and accessories.
Maintenance And Care - Clean only the outside of the vacuum cleaner. After cleaning, wipe off the moisture on vacuum cleaner, components and accessories with a dry cloth. Cleaning Vacuum And Tools Do not clean the vacuum cleaner, components or accessories using petrol or any other flammable liquid or solvents, etc. Do Not place accessories, tools or components in a dishwasher. 12 Use only a moist cloth and mild detergent for cleaning the vacuum cleaner, components and accessories.
Instruction Manual
Page 13
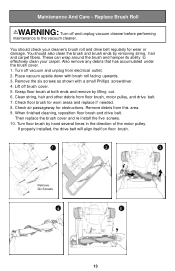
...as shown with brush roll facing upwards. 3. When finished cleaning, reposition floor brush and drive belt. You should check your carpet. Lift off vacuum and unplug from electrical outlet. 2. Then replace the brush cover and re-install the five screws. 10. Replace Brush Roll WARNING: Turn ...off and unplug vacuum cleaner before performing maintenance to effectively clean your cleaner's brush roll and drive belt regularly for wear or damage. Also remove any debris ...
...as shown with brush roll facing upwards. 3. When finished cleaning, reposition floor brush and drive belt. You should check your carpet. Lift off vacuum and unplug from electrical outlet. 2. Then replace the brush cover and re-install the five screws. 10. Replace Brush Roll WARNING: Turn ...off and unplug vacuum cleaner before performing maintenance to effectively clean your cleaner's brush roll and drive belt regularly for wear or damage. Also remove any debris ...
Instruction Manual
Page 14
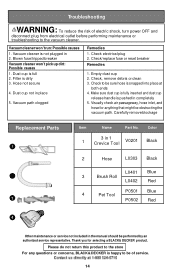
... breaker Remedies 1. Visually check air passageway, hose inlet, and hose for selecting a BLACK& DECKER product. Thank you for anything that might be performed by an authorized service representative. Hose not secure 4. Dust cup not in the manual should be obstructing the vacuum path. Check, remove debris or clean 3. Color 1 3 in 1 Crevice Tool V0201...
... breaker Remedies 1. Visually check air passageway, hose inlet, and hose for selecting a BLACK& DECKER product. Thank you for anything that might be performed by an authorized service representative. Hose not secure 4. Dust cup not in the manual should be obstructing the vacuum path. Check, remove debris or clean 3. Color 1 3 in 1 Crevice Tool V0201...


