
Instruction Manual
Page 1
BDASL101 BDASL102 BDASL103 BDASL201 BDASL202 BDASL203 9 Please have the model number available when you call.
BDASL101 BDASL102 BDASL103 BDASL201 BDASL202 BDASL203 9 Please have the model number available when you call.

Instruction Manual
Page 2
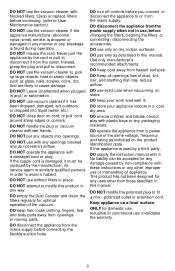
... do not play with the vacuum cleaner. Safety Direction Please read and understand this instruction manual for their safety. DO NOT pick up toxic material (i.e. chlorine bleach, ammonia, drain cleaner, etc.) DO NOT vacuum Toner (for laser printer, copy machines etc.) as the filter can become blocked. DO NOT run over the power cord with the appliance. Turn off and clear all the...
... do not play with the vacuum cleaner. Safety Direction Please read and understand this instruction manual for their safety. DO NOT pick up toxic material (i.e. chlorine bleach, ammonia, drain cleaner, etc.) DO NOT vacuum Toner (for laser printer, copy machines etc.) as the filter can become blocked. DO NOT run over the power cord with the appliance. Turn off and clear all the...
Instruction Manual
Page 3
... with wet hands. DO operate the appliance from the mains supply before changing the filters, cleaning the filters or connecting / disconnecting the accessories. DO NOT Leave Unattended when plugged in and / or switched on the product identification plate. DO disconnect the appliance from a power source of appliance. DO Keep all openings free of the vacuum. If this manual. DO NOT use the vacuum cleaner if the appliance malfunctions, abnormal noise, smell...
... with wet hands. DO operate the appliance from the mains supply before changing the filters, cleaning the filters or connecting / disconnecting the accessories. DO NOT Leave Unattended when plugged in and / or switched on the product identification plate. DO disconnect the appliance from a power source of appliance. DO Keep all openings free of the vacuum. If this manual. DO NOT use the vacuum cleaner if the appliance malfunctions, abnormal noise, smell...
Instruction Manual
Page 4
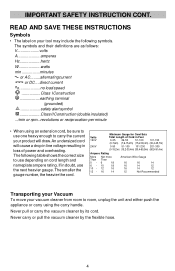
... min minutes or AC.........alternatingcurrent or DC ....direct current no no load speed Class I Construction earthing terminal (grounded safety alert symbol Class II Construction (double insulated) .../min or rpm...revolutions or reciprocation per minute • When using the carry handle. An undersized cord will draw. Volts 120V 240V Minimum Gauge for Cord Sets Total Length of power and overheating.
... min minutes or AC.........alternatingcurrent or DC ....direct current no no load speed Class I Construction earthing terminal (grounded safety alert symbol Class II Construction (double insulated) .../min or rpm...revolutions or reciprocation per minute • When using the carry handle. An undersized cord will draw. Volts 120V 240V Minimum Gauge for Cord Sets Total Length of power and overheating.

Instruction Manual
Page 5
Dust cup release Power on/off Nozzle Connecting hose Power cord wrap
Dust cup release Power on/off Nozzle Connecting hose Power cord wrap
Instruction Manual
Page 6
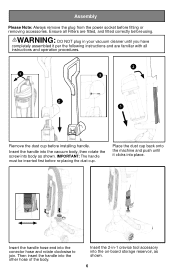
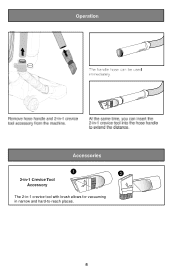
... conector hose and rotate clockwise to join. Insert the handle hose end into the other hose of the body. Insert the handle into the vacuum body, then rotate the screw into the on-board storage reservoir, as shown. WARNING: DO NOT plug in -1 crevice tool accessory into body as shown. 6 Assembly Please Note: Always remove the plug from the power socket before installing handle.
... conector hose and rotate clockwise to join. Insert the handle hose end into the other hose of the body. Insert the handle into the vacuum body, then rotate the screw into the on-board storage reservoir, as shown. WARNING: DO NOT plug in -1 crevice tool accessory into body as shown. 6 Assembly Please Note: Always remove the plug from the power socket before installing handle.

Instruction Manual
Page 7
Plug in your machine and push ON/OFF button to engage for operation. Operation 2 Twist the quick release cord hook to release the power cord. 1 Step on the brush cover and pull back on handle, to switch ON/OFF. To maintain optimal performance, please emtpy dust cup when debris reaches MAX FILL line. 7
Plug in your machine and push ON/OFF button to engage for operation. Operation 2 Twist the quick release cord hook to release the power cord. 1 Step on the brush cover and pull back on handle, to switch ON/OFF. To maintain optimal performance, please emtpy dust cup when debris reaches MAX FILL line. 7
Instruction Manual
Page 8
The 2-in-1 crevice tool with brush allows for vacuuming in narrow and hard-to-reach places.
The 2-in-1 crevice tool with brush allows for vacuuming in narrow and hard-to-reach places.
Instruction Manual
Page 9
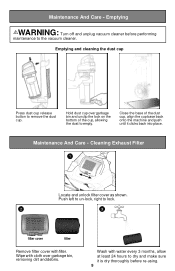
... the dust cup, align the cup base back onto the machine and push until it is dry thoroughly before re-using. 9 Maintenance And Care - Emptying WARNING: Turn off and unplug vacuum cleaner before performing maintenance to dry and make sure it clicks back into place. Wipe with filter. Wash with water every 3 months, allow at least 24 hours to the vacuum cleaner. Cleaning Exhaust Filter 1 Locate and unlock filter cover...
... the dust cup, align the cup base back onto the machine and push until it is dry thoroughly before re-using. 9 Maintenance And Care - Emptying WARNING: Turn off and unplug vacuum cleaner before performing maintenance to dry and make sure it clicks back into place. Wipe with filter. Wash with water every 3 months, allow at least 24 hours to the vacuum cleaner. Cleaning Exhaust Filter 1 Locate and unlock filter cover...
Instruction Manual
Page 10
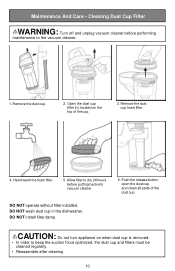
... the vacuum cleaner. 1. Cleaning Dust Cup Filter WARNING: Turn off and unplug vacuum cleaner before putting back into vacuum cleaner. DO NOT install filter damp. 6. CAUTION: Do not turn appliance on the top of the dust cup. Remove the dust cup. 2. Remove the dust cup foam filter. 4. DO NOT operate without filter installed. Push the release button, open the dust cup and clean all parts of the cup. 3. Hand wash the foam filter. 5. DO NOT wash dust cup in the dishwasher. Allow filter to dry 24 hours before performing maintenance to keep the suction force...
... the vacuum cleaner. 1. Cleaning Dust Cup Filter WARNING: Turn off and unplug vacuum cleaner before putting back into vacuum cleaner. DO NOT install filter damp. 6. CAUTION: Do not turn appliance on the top of the dust cup. Remove the dust cup. 2. Remove the dust cup foam filter. 4. DO NOT operate without filter installed. Push the release button, open the dust cup and clean all parts of the cup. 3. Hand wash the foam filter. 5. DO NOT wash dust cup in the dishwasher. Allow filter to dry 24 hours before performing maintenance to keep the suction force...
Instruction Manual
Page 11
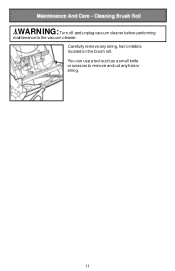
Carefully remove any hair or string. 11 You can use a tool such as a small knife or scissors to the vacuum cleaner. .&.WARN ING: Turn off and unplug vacuum cleaner before performing maintenance to remove and cut any string, hair or debris located on the brush roll.
Carefully remove any hair or string. 11 You can use a tool such as a small knife or scissors to the vacuum cleaner. .&.WARN ING: Turn off and unplug vacuum cleaner before performing maintenance to remove and cut any string, hair or debris located on the brush roll.
Instruction Manual
Page 12
After cleaning, wipe off the moisture on vacuum cleaner, components and accessories with a dry cloth. Use only a moist cloth and mild detergent for cleaning the vacuum cleaner, components and accessories. Clean only the outside of the vacuum cleaner. Do Not place accessories, tools or components in a dishwasher. 12 Cleaning Vacuum And Tools Do not clean the vacuum cleaner, components or accessories using petrol or any other flammable liquid or solvents, etc. Maintenance And Care -
After cleaning, wipe off the moisture on vacuum cleaner, components and accessories with a dry cloth. Use only a moist cloth and mild detergent for cleaning the vacuum cleaner, components and accessories. Clean only the outside of the vacuum cleaner. Do Not place accessories, tools or components in a dishwasher. 12 Cleaning Vacuum And Tools Do not clean the vacuum cleaner, components or accessories using petrol or any other flammable liquid or solvents, etc. Maintenance And Care -
Instruction Manual
Page 14
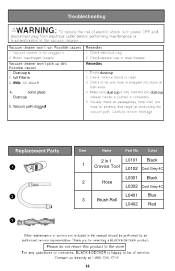
Dust cup is full Filter is dirty Dust cup dust cup dust cup dust cup Item Name Part No. Color 2 in 1 L0101 Black 1 Crevice Tool L0102 Cool Grey 4C L0301 Black 2 Hose L0302 Cool Grey 4C L0401 Blue 3 Brush Roll L0402 Red
Dust cup is full Filter is dirty Dust cup dust cup dust cup dust cup Item Name Part No. Color 2 in 1 L0101 Black 1 Crevice Tool L0102 Cool Grey 4C L0301 Black 2 Hose L0302 Cool Grey 4C L0401 Blue 3 Brush Roll L0402 Red
Instruction Manual
Page 15
authorized Service Agent Imported By Midea USA, Inc. 5 Sylvan Way Parsippany, NJ 07054, USA 1-800-524-6716 authorized please call customer service at 1-800-524-6716. one (1) service agent.
authorized Service Agent Imported By Midea USA, Inc. 5 Sylvan Way Parsippany, NJ 07054, USA 1-800-524-6716 authorized please call customer service at 1-800-524-6716. one (1) service agent.


