
User Guide - English
Page 2
... floor sweeper in the design, manufacture, and service of high quality homecare products like your BISSELL PowerClean upright vacuum. Thanks for buying a BISSELL PowerClean Vacuum We're glad you 'll receive fast, considerate assistance. Today, BISSELL is well made, and we know about floor care went into the design and construction of us at BISSELL. Thanks again, from all of this complete, high-tech home cleaning...
... floor sweeper in the design, manufacture, and service of high quality homecare products like your BISSELL PowerClean upright vacuum. Thanks for buying a BISSELL PowerClean Vacuum We're glad you 'll receive fast, considerate assistance. Today, BISSELL is well made, and we know about floor care went into the design and construction of us at BISSELL. Thanks again, from all of this complete, high-tech home cleaning...
User Guide - English
Page 3
... the polarized plug to operate vacuum cleaner or use as a toy. ■ Close attention is running. ■ Brush may reduce air flow. ■ Keep hair, loose clothing, fingers, and all instructions before conducting maintenance. Do not use with wet hands. ■ Do not put any purpose other than right). Do not change the plug in place. ■ Use only on dry, indoor surfaces. ■ Keep appliance on wet surfaces. ■...
... the polarized plug to operate vacuum cleaner or use as a toy. ■ Close attention is running. ■ Brush may reduce air flow. ■ Keep hair, loose clothing, fingers, and all instructions before conducting maintenance. Do not use with wet hands. ■ Do not put any purpose other than right). Do not change the plug in place. ■ Use only on dry, indoor surfaces. ■ Keep appliance on wet surfaces. ■...
User Guide - English
Page 5
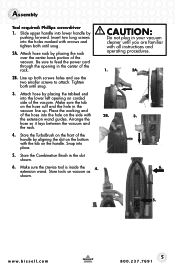
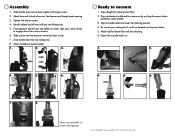
... holes and use the two smaller screws to feed the power cord through the opening on the hose cuff and the hole in the center of the vacuum. Snap into lower handle by aligning the slot on vacuum as 4. 6. Slide upper handle into place. 5. the extension wand guides. Make sure the crevice tool is inside the extension wand. Assembly Tool required: Phillips screwdriver 1. Attach hose rack by...
... holes and use the two smaller screws to feed the power cord through the opening on the hose cuff and the hole in the center of the vacuum. Snap into lower handle by aligning the slot on vacuum as 4. 6. Slide upper handle into place. 5. the extension wand guides. Make sure the crevice tool is inside the extension wand. Assembly Tool required: Phillips screwdriver 1. Attach hose rack by...
User Guide - English
Page 6
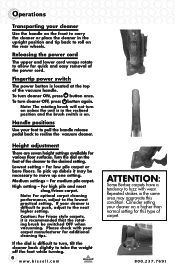
... turn cleaner ON, press button once. Lowest setting - High setting - Note: For optimal carpet cleaning performance, adjust to recline the vacuum cleaner. Consider setting your cleaner on a higher than normal setting for quick and easy removal of the power cord. To turn cleaner OFF, press button again. Handle positions Use your foot to pull the handle release pedal back to the lowest practical setting. To pick up debris it is located at the top of the vacuum handle...
... turn cleaner ON, press button once. Lowest setting - High setting - Note: For optimal carpet cleaning performance, adjust to recline the vacuum cleaner. Consider setting your cleaner on a higher than normal setting for quick and easy removal of the power cord. To turn cleaner OFF, press button again. Handle positions Use your foot to pull the handle release pedal back to the lowest practical setting. To pick up debris it is located at the top of the vacuum handle...

User Guide - English
Page 7
.... The brush will start rotating when the unit is reclined. It is recommended the rotating brush be damaged by the rotating brush during vacuuming. You may be turned OFF when cleaning this type of the handle. Operations Fingertip brush switch The rotating brush is turned on or off using the switch located below the power switch on . To turn the brush OFF, press button again. The brush should be on for bare floor cleaning or...
.... The brush will start rotating when the unit is reclined. It is recommended the rotating brush be damaged by the rotating brush during vacuuming. You may be turned OFF when cleaning this type of the handle. Operations Fingertip brush switch The rotating brush is turned on or off using the switch located below the power switch on . To turn the brush OFF, press button again. The brush should be on for bare floor cleaning or...
User Guide - English
Page 8
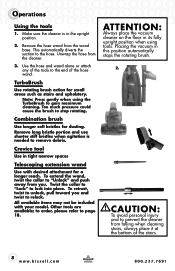
... place the vacuum cleaner on the floor in the upright position. 2. Make sure the cleaner is needed to the end of the stairs. 8 www.bissell.com 800.237.7691 Remove the hose wand from the cleaner. 3. This automatically diverts the suction to lock into place. Unwrap the hose from the wand base. Use the hose and wand alone or attach any of the tools to remove debris. Combination brush Use longer soft...
... place the vacuum cleaner on the floor in the upright position. 2. Make sure the cleaner is needed to the end of the stairs. 8 www.bissell.com 800.237.7691 Remove the hose wand from the cleaner. 3. This automatically diverts the suction to lock into place. Unwrap the hose from the wand base. Use the hose and wand alone or attach any of the tools to remove debris. Combination brush Use longer soft...
User Guide - English
Page 10
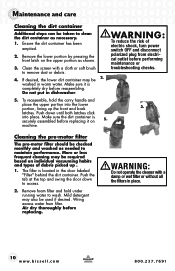
... on individual vacuuming habits and types of electric shock, turn power switch OFF and disconnect polarized plug from filter. Clean the screen with a damp or wet filter or without all the filters in the door labeled "Filter" behind the dirt container. Cleaning the pre-motor filter The pre-motor filter should be required based on the upper portion as needed to wash. Air dry thoroughly before replacing it is completely dry before performing maintenance or troubleshooting checks. 5. washed in...
... on individual vacuuming habits and types of electric shock, turn power switch OFF and disconnect polarized plug from filter. Clean the screen with a damp or wet filter or without all the filters in the door labeled "Filter" behind the dirt container. Cleaning the pre-motor filter The pre-motor filter should be required based on the upper portion as needed to wash. Air dry thoroughly before replacing it is completely dry before performing maintenance or troubleshooting checks. 5. washed in...
User Guide - English
Page 11
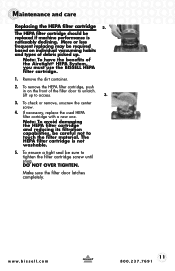
... individual vacuuming habits and types of the Airetight® HEPA System, you must use the BISSELL HEPA filter cartridge. 1. If necessary, replace the used HEPA filter cartridge with a new one. More or less frequent replacing may be careful not to tighten the filter cartridge screw until snug. Lift up . To check or remove, unscrew the center screw. 4. The HEPA filter cartridge is noticeably declining. Maintenance and care Replacing the HEPA filter cartridge...
... individual vacuuming habits and types of the Airetight® HEPA System, you must use the BISSELL HEPA filter cartridge. 1. If necessary, replace the used HEPA filter cartridge with a new one. More or less frequent replacing may be careful not to tighten the filter cartridge screw until snug. Lift up . To check or remove, unscrew the center screw. 4. The HEPA filter cartridge is noticeably declining. Maintenance and care Replacing the HEPA filter cartridge...

User Guide - English
Page 12
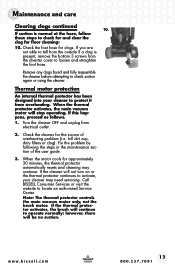
... tubes for a clog. 9. If you notice a change in the sound of machine for clogs. 8. Remove lower portion of electric shock, turn power switch off . Maintenance and care Clearing clogs Low suction or poor pickup may be removed to clear the clog by 8. Turn power switch off and disconnect polarized plug from electrical outlet. 6. 3. WARNING: To reduce the risk of dirt container. Unplug cleaner from electrical outlet before performing maintenance or troubleshooting checks. 2. Empty if needed. Dirt Inlet 6. If a clog...
... tubes for a clog. 9. If you notice a change in the sound of machine for clogs. 8. Remove lower portion of electric shock, turn power switch off . Maintenance and care Clearing clogs Low suction or poor pickup may be removed to clear the clog by 8. Turn power switch off and disconnect polarized plug from electrical outlet. 6. 3. WARNING: To reduce the risk of dirt container. Unplug cleaner from electrical outlet before performing maintenance or troubleshooting checks. 2. Empty if needed. Dirt Inlet 6. If a clog...
User Guide - English
Page 13
... suction. full dirt cup, dirty filters or clog). Fix the problem by following the steps in the maintenance section of overheating problem (i.e. When the motor cools for clogs. If this happens, proceed as follows. 1. Maintenance and care Clearing clogs continued 10. Note: The thermal protector controls the main vacuum motor only, not the brush motor. however, there will stop operating. Thermal motor protection An internal thermal protector has been designed into your cleaner may continue. Check the foot hose...
... suction. full dirt cup, dirty filters or clog). Fix the problem by following the steps in the maintenance section of overheating problem (i.e. When the motor cools for clogs. If this happens, proceed as follows. 1. Maintenance and care Clearing clogs continued 10. Note: The thermal protector controls the main vacuum motor only, not the brush motor. however, there will stop operating. Thermal motor protection An internal thermal protector has been designed into your cleaner may continue. Check the foot hose...
User Guide - English
Page 14
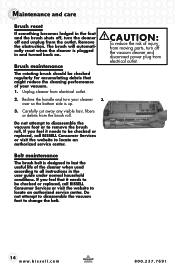
... debris that it needs to be checked or replaced, call BISSELL Consumer Services or visit the website to all instructions in the user guide under normal household conditions. Recline the handle and turn off and unplug from moving parts, turn your vacuum. 1. Do not attempt to disassemble the vacuum foot to remove the brush roll. If you feel that might reduce the cleaning performance of your cleaner 3. Remove the obstruction. If...
... debris that it needs to be checked or replaced, call BISSELL Consumer Services or visit the website to all instructions in the user guide under normal household conditions. Recline the handle and turn off and unplug from moving parts, turn your vacuum. 1. Do not attempt to disassemble the vacuum foot to remove the brush roll. If you feel that might reduce the cleaning performance of your cleaner 3. Remove the obstruction. If...
User Guide - English
Page 15
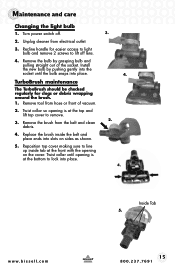
... 5. Turn power switch off lens. 4. www.bissell.com 15 800.237.7691 Maintenance and care Changing the light bulb 1. Twist collar so opening is at the front with the opening is at the top and lift top cover to lock into the socket until opening on sides as shown. 5. Remove the brush from hose or front of the socket. Unplug cleaner from electrical outlet. 3. Install the new...
... 5. Turn power switch off lens. 4. www.bissell.com 15 800.237.7691 Maintenance and care Changing the light bulb 1. Twist collar so opening is at the front with the opening is at the top and lift top cover to lock into the socket until opening on sides as shown. 5. Remove the brush from hose or front of the socket. Unplug cleaner from electrical outlet. 3. Install the new...
User Guide - English
Page 16
... and or gasket missing or not installed properly 8. Hose wand not properly positioned 2. Check and clean foam filter, check and replace HEPA filter cartridge if needed 7. Hose not properly attached 7. Check filter door and gasket to reset brush (pg. 14) 5. Power cord not plugged in cleaner 5. Recline vacuum to lower setting 2. Turn dial to operate brush 3. Dirt container full 4. Make sure hose collar is in upright position 3. Make sure brush switch is twisted to be reset 5. Blown fuse/tripped breaker 3. Brush needs to lock position 8.
... and or gasket missing or not installed properly 8. Hose wand not properly positioned 2. Check and clean foam filter, check and replace HEPA filter cartridge if needed 7. Hose not properly attached 7. Check filter door and gasket to reset brush (pg. 14) 5. Power cord not plugged in cleaner 5. Recline vacuum to lower setting 2. Turn dial to operate brush 3. Dirt container full 4. Make sure hose collar is in upright position 3. Make sure brush switch is twisted to be reset 5. Blown fuse/tripped breaker 3. Brush needs to lock position 8.

User Guide - English
Page 17
... not installed properly 1. Troubleshooting Vacuum cleaner is properly attached to diverter area 7. Hose not installed properly 6. Thank you for correct installation 4. Incorrect height setting Visible dust escaping from cleaner Possible causes 1. Check filter door and gasket 2. Dirt container not installed properly 4. Also make sure foot hose is difficult to push Possible causes Remedies 1. Foam filter missing or not installed properly 2. Check hose for holes or cracks and replace if needed Other maintenance or service...
... not installed properly 1. Troubleshooting Vacuum cleaner is properly attached to diverter area 7. Hose not installed properly 6. Thank you for correct installation 4. Incorrect height setting Visible dust escaping from cleaner Possible causes 1. Check filter door and gasket 2. Dirt container not installed properly 4. Also make sure foot hose is difficult to push Possible causes Remedies 1. Foam filter missing or not installed properly 2. Check hose for holes or cracks and replace if needed Other maintenance or service...
User Guide - English
Page 18
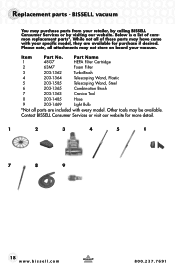
... BISSELL Consumer Services or visit our website for purchase if desired. BISSELL vacuum You may have come with every model. Item 1 Part No. 48G7 Part Name HEPA Filter Cartridge 2 63M7 Foam Filter 3 203-1362 TurboBrush 4 203-1364 Telescoping Wand, Plastic 5 203-1585 Telescoping Wand, Steel 6 203-1365 Combination Brush 7 203-1363 Crevice Tool 8 203-1485 Hose 9 203-1469 Light Bulb *Not all parts are included with your specific model...
... BISSELL Consumer Services or visit our website for purchase if desired. BISSELL vacuum You may have come with every model. Item 1 Part No. 48G7 Part Name HEPA Filter Cartridge 2 63M7 Foam Filter 3 203-1362 TurboBrush 4 203-1364 Telescoping Wand, Plastic 5 203-1585 Telescoping Wand, Steel 6 203-1365 Combination Brush 7 203-1363 Crevice Tool 8 203-1485 Hose 9 203-1469 Light Bulb *Not all parts are included with your specific model...
User Guide - English
Page 19
... WITH THE USE OF THIS PRODUCT. Damage or malfunction caused by E-mail, telephone, or regular mail as filters, belts, or brushes. Friday 8 a.m. - 10 p.m. ET Or Write: BISSELL Homecare, Inc. www.bissell.com 19 800.237.7691 If you need information about repairs or replacement parts, or if you need additional instruction regarding this warranty or have questions about your BISSELL product should require service: Contact BISSELL Consumer Services to...
... WITH THE USE OF THIS PRODUCT. Damage or malfunction caused by E-mail, telephone, or regular mail as filters, belts, or brushes. Friday 8 a.m. - 10 p.m. ET Or Write: BISSELL Homecare, Inc. www.bissell.com 19 800.237.7691 If you need information about repairs or replacement parts, or if you need additional instruction regarding this warranty or have questions about your BISSELL product should require service: Contact BISSELL Consumer Services to...

User Guide - English
Page 20
... warranty, call: BISSELL Consumer Services 1-800-237-7691 Monday - Printed in the event of your product! Friday 8 a.m. - 10 p.m. ET ATTN: Consumer Services Or visit the BISSELL website - ET Saturday 9 a.m. - Special Promotions Optional: Register your product. BISSELL consumer services For information about repairs or replacement parts, or questions about your original sales receipt. www.bissell.com When contacting BISSELL, have model number of purchase date in China Part Number...
... warranty, call: BISSELL Consumer Services 1-800-237-7691 Monday - Printed in the event of your product! Friday 8 a.m. - 10 p.m. ET ATTN: Consumer Services Or visit the BISSELL website - ET Saturday 9 a.m. - Special Promotions Optional: Register your product. BISSELL consumer services For information about repairs or replacement parts, or questions about your original sales receipt. www.bissell.com When contacting BISSELL, have model number of purchase date in China Part Number...

QuickStart Guide
Page 1
... to User's Guide Earn BISSELL rewards! Contact us directly at 1-800-237-7691 or visit the website for assembly: Phillips head screw driver Telescoping Extension Wand Crevice Tool (inside Extension wand) h. 2 Long Screws and 2 Short Screws a. b. h. What's needed Rotating brush information 1. 2. 1. clean and replace as dirt reaches "full" line 2. Brush will only activate when brush switch is on and vacuum is recommended to turn off brush switch when vacuuming frieze carpet Telescoping extension Wand 1. 1. avoid...
... to User's Guide Earn BISSELL rewards! Contact us directly at 1-800-237-7691 or visit the website for assembly: Phillips head screw driver Telescoping Extension Wand Crevice Tool (inside Extension wand) h. 2 Long Screws and 2 Short Screws a. b. h. What's needed Rotating brush information 1. 2. 1. clean and replace as dirt reaches "full" line 2. Brush will only activate when brush switch is on and vacuum is recommended to turn off brush switch when vacuuming frieze carpet Telescoping extension Wand 1. 1. avoid...
QuickStart Guide
Page 2
... of hose and lock into cleaning position 4. Empty dirt cup after each use 1. 2. 3. 4. 5. 6. 4. 5. 6. 7. 8. Snap combination tool into extension wand and store in clip 7. Plug into holder on upper handle 3. Be sure to press rotating brush switch on handle release to engage the white suction diverter 6. Attach tool for carpet or bare floor 2. For complete users guide visit www.bissell.com Attach TurboBrush Tool to power button 5. Adjust height for above floor and stair cleaning 6. Assembly 1. Slide handle onto vacuum base...
... of hose and lock into cleaning position 4. Empty dirt cup after each use 1. 2. 3. 4. 5. 6. 4. 5. 6. 7. 8. Snap combination tool into extension wand and store in clip 7. Plug into holder on upper handle 3. Be sure to press rotating brush switch on handle release to engage the white suction diverter 6. Attach tool for carpet or bare floor 2. For complete users guide visit www.bissell.com Attach TurboBrush Tool to power button 5. Adjust height for above floor and stair cleaning 6. Assembly 1. Slide handle onto vacuum base...
Warranty
Page 1
... OR WRITE: BISSELL Inc P.O. OR CALL: BISSELL Consumer Services toll free Monday - Damage or malfunction caused by E-mail, telephone, or regular mail as filters, bags, belts, or brushes. If you need information about repairs or replacement parts, or if you . *Exceptions and exclusions from state to fans or routine maintenance components such as described below , upon receipt of your warranty - This warranty does not apply...
... OR WRITE: BISSELL Inc P.O. OR CALL: BISSELL Consumer Services toll free Monday - Damage or malfunction caused by E-mail, telephone, or regular mail as filters, bags, belts, or brushes. If you need information about repairs or replacement parts, or if you . *Exceptions and exclusions from state to fans or routine maintenance components such as described below , upon receipt of your warranty - This warranty does not apply...


