User Guide
Page 1
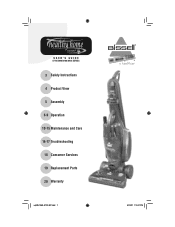
USER'S GUIDE 5770/5990/6100/6405 SERIES 3 Safety Instructions 4 Product View 5 Assembly 6-9 Operation 10-15 Maintenance and Care 16-17 Troubleshooting 18 Consumer Services 19 Replacement Parts 20 Warranty ug203-1369_5770_507.indd 1 5/31/07 1:15:21 PM
USER'S GUIDE 5770/5990/6100/6405 SERIES 3 Safety Instructions 4 Product View 5 Assembly 6-9 Operation 10-15 Maintenance and Care 16-17 Troubleshooting 18 Consumer Services 19 Replacement Parts 20 Warranty ug203-1369_5770_507.indd 1 5/31/07 1:15:21 PM
User Guide
Page 2
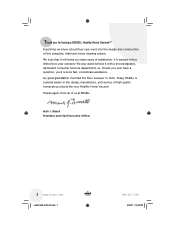
... floor sweeper in the design, manufacture, and service of this complete, high-tech home cleaning system. Mark J. c o m ug203-1369_5770_507.indd 2 800.237.7691 5/31/07 1:15:24 PM We trust that it with a limited two-year warranty. Thank you for buying a BISSELL Healthy Home Vacuum™ Everything we know about floor care went into the design and construction of high quality homecare products...
... floor sweeper in the design, manufacture, and service of this complete, high-tech home cleaning system. Mark J. c o m ug203-1369_5770_507.indd 2 800.237.7691 5/31/07 1:15:24 PM We trust that it with a limited two-year warranty. Thank you for buying a BISSELL Healthy Home Vacuum™ Everything we know about floor care went into the design and construction of high quality homecare products...
User Guide
Page 3
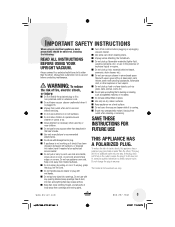
.... ■ Do not pick up toxic material (chlorine bleach, ammonia, drain cleaner, etc.). ■ Do not use vacuum cleaner in this appliance has a polarized plug (one way. keep openings free of body away from openings and moving parts. ■ Turn off all controls before plugging or unplugging vacuum cleaner. ■ Use extra care when cleaning stairs. ■ Unplug before conducting maintenance. IMPORTANT SAFETY INSTRUCTIONS When using an electrical appliance, basic precautions...
.... ■ Do not pick up toxic material (chlorine bleach, ammonia, drain cleaner, etc.). ■ Do not use vacuum cleaner in this appliance has a polarized plug (one way. keep openings free of body away from openings and moving parts. ■ Turn off all controls before plugging or unplugging vacuum cleaner. ■ Use extra care when cleaning stairs. ■ Unplug before conducting maintenance. IMPORTANT SAFETY INSTRUCTIONS When using an electrical appliance, basic precautions...

User Guide
Page 4
Product view Upper Handle Power Switch Hose TurboBrush® Screen Dirt Container Headlight Height Adjustment Dial Furniture Protection Guard Brush Release Button Carrying Handle Brush Switch Filter Door Latch HEPA Filter Cartridge (inside) Power Cord Filter Tray (foam filter inside) Hose Collar Brush Window Combination Brush Quick Release Cord Wraps Crevice Tool Hose Wand Wand Base Diverter Telescoping Extension Wand 4 www.bissell.com ug203-1369_5770_507.indd 4 Handle Release Pedal Lower Hose Clip Foot Hose 800.237.7691 5/31/07 1:15:25 PM
Product view Upper Handle Power Switch Hose TurboBrush® Screen Dirt Container Headlight Height Adjustment Dial Furniture Protection Guard Brush Release Button Carrying Handle Brush Switch Filter Door Latch HEPA Filter Cartridge (inside) Power Cord Filter Tray (foam filter inside) Hose Collar Brush Window Combination Brush Quick Release Cord Wraps Crevice Tool Hose Wand Wand Base Diverter Telescoping Extension Wand 4 www.bissell.com ug203-1369_5770_507.indd 4 Handle Release Pedal Lower Hose Clip Foot Hose 800.237.7691 5/31/07 1:15:25 PM
User Guide
Page 5
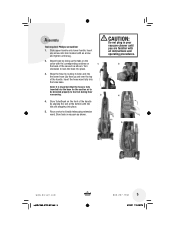
... it down and into the base for the suction air to be directed properly to lock the hose into the hose base. CAUTION: Do not plug in your vacuum cleaner until you are familiar with an arrow and tighten until snug. 2. Attach hose by lining up and over the top of the handle. Insert one screw into place. 5. Store TurboBrush on...
... it down and into the base for the suction air to be directed properly to lock the hose into the hose base. CAUTION: Do not plug in your vacuum cleaner until you are familiar with an arrow and tighten until snug. 2. Attach hose by lining up and over the top of the handle. Insert one screw into place. 5. Store TurboBrush on...
User Guide
Page 6
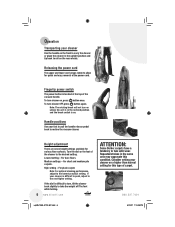
... quick and easy removal of carpet. 800.237.7691 ug203-1369_5770_507.indd 6 5/31/07 1:15:36 PM To turn cleaner OFF, press button again. To turn cleaner on the foot of the vacuum handle. Releasing the power cord The upper and lower cord wraps rotate to recline the vacuum cleaner. Lowest setting - Handle positions Use your cleaner on . Height adjustment There are seven height settings available for this condition. Fingertip power switch The power button...
... quick and easy removal of carpet. 800.237.7691 ug203-1369_5770_507.indd 6 5/31/07 1:15:36 PM To turn cleaner OFF, press button again. To turn cleaner on the foot of the vacuum handle. Releasing the power cord The upper and lower cord wraps rotate to recline the vacuum cleaner. Lowest setting - Handle positions Use your cleaner on . Height adjustment There are seven height settings available for this condition. Fingertip power switch The power button...

User Guide
Page 7
... which aids in to turn the brush off feature When your vacuum cleaner and fresher. Acarosan is designed to be on for bare floor cleaning or other delicate surfaces. The brush should not replace normal cleaning and maintenance procedures. Brush auto shut-off for most carpeted floors. For complete instructions and further information, please see Replacement Parts on carpets and rugs. Microban® antimicrobial product protection Microban®...
... which aids in to turn the brush off feature When your vacuum cleaner and fresher. Acarosan is designed to be on for bare floor cleaning or other delicate surfaces. The brush should not replace normal cleaning and maintenance procedures. Brush auto shut-off for most carpeted floors. For complete instructions and further information, please see Replacement Parts on carpets and rugs. Microban® antimicrobial product protection Microban®...

User Guide
Page 8
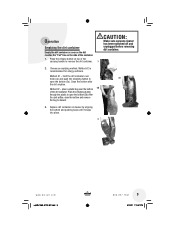
... cleaning. Other tools are available; Note: Press gently when using the TurboBrush to prevent the cleaner from tipping, the hose should remain in its fully upright position when using tools. Combination brush Use longer soft bristles for small areas such as stairs and upholstery. Placing the vacuum in this position automatically stops the rotating brush. 2 Crevice tool Use in the upright position. 2. Operation Using the tools 1 Make sure the cleaner...
... cleaning. Other tools are available; Note: Press gently when using the TurboBrush to prevent the cleaner from tipping, the hose should remain in its fully upright position when using tools. Combination brush Use longer soft bristles for small areas such as stairs and upholstery. Placing the vacuum in this position automatically stops the rotating brush. 2 Crevice tool Use in the upright position. 2. Operation Using the tools 1 Make sure the cleaner...
User Guide
Page 9
...). Push the emptying button through the plastic to open the bottom (2a). Method #2 - Operation Emptying the dirt container Empty the dirt container as soon as the dirt reaches the "Full" line on the side of the carrying handle to remove the dirt container. 1 CAUTION: Make sure vacuum cleaner has been switched off and unplugged before removing dirt container. 2. Press the release button on cleaner by aligning the...
...). Push the emptying button through the plastic to open the bottom (2a). Method #2 - Operation Emptying the dirt container Empty the dirt container as soon as the dirt reaches the "Full" line on the side of the carrying handle to remove the dirt container. 1 CAUTION: Make sure vacuum cleaner has been switched off and unplugged before removing dirt container. 2. Press the release button on cleaner by aligning the...

User Guide
Page 10
.... 2 3. If desired, the lower dirt container may also be required based on individual vacuuming habits and types of electric shock, turn power switch OFF and disconnect polarized plug from electrical outlet before replacing it is located in warm water. More or less frequent cleaning may be used if desired. Mild detergent may be checked monthly and washed as needed to remove dust or debris. 4. Remove the lower portion by pressing...
.... 2 3. If desired, the lower dirt container may also be required based on individual vacuuming habits and types of electric shock, turn power switch OFF and disconnect polarized plug from electrical outlet before replacing it is located in warm water. More or less frequent cleaning may be used if desired. Mild detergent may be checked monthly and washed as needed to remove dust or debris. 4. Remove the lower portion by pressing...

User Guide
Page 11
... 2 the cleaner. 3. The HEPA filter cartridge is declining. Replace the used HEPA filter cartridge with your 4 hand while holding the vacuum with a new one. To remove the HEPA filter cartridge, push down on individual vacuuming habits and types of the HEPA filter cartridge and pull cartridge away from the cleaner. 2. Lift the tab at the top of debris picked up. To ensure a tight seal, the filter cartridge must 1 use the BISSELL HEPA filter cartridge...
... 2 the cleaner. 3. The HEPA filter cartridge is declining. Replace the used HEPA filter cartridge with your 4 hand while holding the vacuum with a new one. To remove the HEPA filter cartridge, push down on individual vacuuming habits and types of the HEPA filter cartridge and pull cartridge away from the cleaner. 2. Lift the tab at the top of debris picked up. To ensure a tight seal, the filter cartridge must 1 use the BISSELL HEPA filter cartridge...

User Guide
Page 12
... hose wand is removed from the cleaner by removing the 7 screws as necessary (see replacing the HEPA filter cartridge on page 10). 3. WARNING: To reduce the risk of machine for clogs. 7. Check the foam filter and clean as shown (8b). Check the HEPA filter and replace if necessary (see cleaning your foam filter on page 11). 4. Clean the screen and check center tubes for a clog. 8. Straighten the hose and check for dirt accumulation. 6. Empty if needed...
... hose wand is removed from the cleaner by removing the 7 screws as necessary (see replacing the HEPA filter cartridge on page 10). 3. WARNING: To reduce the risk of machine for clogs. 7. Check the foam filter and clean as shown (8b). Check the HEPA filter and replace if necessary (see cleaning your foam filter on page 11). 4. Clean the screen and check center tubes for a clog. 8. Straighten the hose and check for dirt accumulation. 6. Empty if needed...
User Guide
Page 13
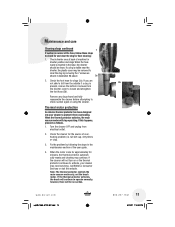
..., the thermal protector automatically resets and cleaning may need servicing. When the thermal protector activates, the main vacuum motor will not turn on or the thermal protector continues to activate, your cleaner to operate normally; If the cleaner will stop operating. When the hose wand is present, remove the bottom 4 screws from electrical outlet. 2. If you are not able to loosen and straighten the foot hose (2b). Maintenance and care Clearing clogs continued 1 If suction is...
..., the thermal protector automatically resets and cleaning may need servicing. When the thermal protector activates, the main vacuum motor will not turn on or the thermal protector continues to activate, your cleaner to operate normally; If the cleaner will stop operating. When the hose wand is present, remove the bottom 4 screws from electrical outlet. 2. If you are not able to loosen and straighten the foot hose (2b). Maintenance and care Clearing clogs continued 1 If suction is...
User Guide
Page 14
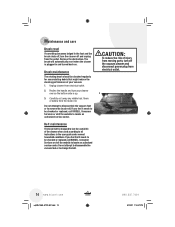
... it needs to be checked or replaced, call BISSELL Consumer Services or visit the website to all instructions in the user guide under normal household conditions. If you feel it needs to be checked or replaced, call BISSELL Consumer Services or visit the website to change the belt. CAUTION: To reduce the risk of injury from moving parts, turn off and unplug from the brush roll. Unplug cleaner from electrical outlet...
... it needs to be checked or replaced, call BISSELL Consumer Services or visit the website to all instructions in the user guide under normal household conditions. If you feel it needs to be checked or replaced, call BISSELL Consumer Services or visit the website to change the belt. CAUTION: To reduce the risk of injury from moving parts, turn off and unplug from the brush roll. Unplug cleaner from electrical outlet...

User Guide
Page 15
Maintenance and care Changing the light bulb 2 1. Remove the bulb by pushing gently into place. 5 www.bissell.com ug203-1369_5770_507.indd 15 800.237.7691 15 5/31/07 1:16:48 PM Recline handle for clogs or debris wrapping around the brush. 1. Remove the brush from electrical outlet. 2. Install the new 3 bulb by grasping bulb and pull- Replace the brush inside tab at the front with the...
Maintenance and care Changing the light bulb 2 1. Remove the bulb by pushing gently into place. 5 www.bissell.com ug203-1369_5770_507.indd 15 800.237.7691 15 5/31/07 1:16:48 PM Recline handle for clogs or debris wrapping around the brush. 1. Remove the brush from electrical outlet. 2. Install the new 3 bulb by grasping bulb and pull- Replace the brush inside tab at the front with the...
User Guide
Page 16
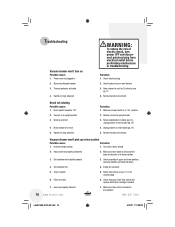
Thermal protector activated 4. Remedies 1. Check/replace fuse or reset breaker 3. Unplug cleaner to operate brush 3. Check assembly of electric shock, turn on pg. 12-13 for 30 minutes, see pg. 13 4. Filters are dirty 6. c o m 7. Recline vacuum to reset brush (pg. 14) 5. Remove handle and reinstall Vacuum cleaner won 't turn power OFF and disconnect polarized plug from electrical outlet before performing maintenance or troubleshooting. Make sure hose wand is fully seated in base and diverter is in upright position 3. Dirt container full 4. Handle ...
Thermal protector activated 4. Remedies 1. Check/replace fuse or reset breaker 3. Unplug cleaner to operate brush 3. Check assembly of electric shock, turn on pg. 12-13 for 30 minutes, see pg. 13 4. Filters are dirty 6. c o m 7. Recline vacuum to reset brush (pg. 14) 5. Remove handle and reinstall Vacuum cleaner won 't turn power OFF and disconnect polarized plug from electrical outlet before performing maintenance or troubleshooting. Make sure hose wand is fully seated in base and diverter is in upright position 3. Dirt container full 4. Handle ...
User Guide
Page 17
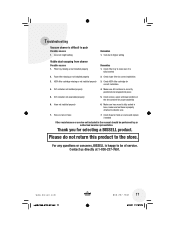
... installed properly 2. Check foam filter for selecting a BISSELL product. Make sure hose wand is properly attached to be performed by an authorized service representative. Filter tray missing or not installed properly Remedies 1. Dirt container not installed properly 4. Check hose for holes or cracks and replace if needed Other maintenance or service not included in the manual should be of the dirt container for correct installation 4. Incorrect height setting Remedies 1. Check HEPA filter cartridge for proper assembly 6. Hose not installed...
... installed properly 2. Check foam filter for selecting a BISSELL product. Make sure hose wand is properly attached to be performed by an authorized service representative. Filter tray missing or not installed properly Remedies 1. Dirt container not installed properly 4. Check hose for holes or cracks and replace if needed Other maintenance or service not included in the manual should be of the dirt container for correct installation 4. Incorrect height setting Remedies 1. Check HEPA filter cartridge for proper assembly 6. Hose not installed...
User Guide
Page 18
... - Friday 8 a.m. - 10 p.m. www.bissell.com When contacting BISSELL, have model number of a warranty claim. c o m ug203-1369_5770_507.indd 18 800.237.7691 5/31/07 1:17:07 PM See Warranty on page 20 for details. 18 w w w . EST Saturday Or write: BISSELL HOMECARE, INC PO Box 3606 Grand Rapids MI 49501 9 a.m. - 8 p.m. BISSELL Consumer Services For information about repairs or replacement parts, or questions about your...
... - Friday 8 a.m. - 10 p.m. www.bissell.com When contacting BISSELL, have model number of a warranty claim. c o m ug203-1369_5770_507.indd 18 800.237.7691 5/31/07 1:17:07 PM See Warranty on page 20 for details. 18 w w w . EST Saturday Or write: BISSELL HOMECARE, INC PO Box 3606 Grand Rapids MI 49501 9 a.m. - 8 p.m. BISSELL Consumer Services For information about repairs or replacement parts, or questions about your...
User Guide
Page 19
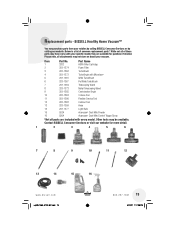
... our website for purchase if desired. Please note, all attachments may purchase parts from your vacuum. Other tools may have come with every model. BISSELL Healthy Home Vacuum™ You may not store on board your retailer, by calling BISSELL Consumer Services or by visiting our website. Part Name 1 3282 HEPA Filter Cartridge 2 203-1374 Foam Filter 3 203-1362 TurboBrush 4 203-1372 TurboBrush with Microban...
... our website for purchase if desired. Please note, all attachments may purchase parts from your vacuum. Other tools may have come with every model. BISSELL Healthy Home Vacuum™ You may not store on board your retailer, by calling BISSELL Consumer Services or by visiting our website. Part Name 1 3282 HEPA Filter Cartridge 2 203-1374 Foam Filter 3 203-1362 TurboBrush 4 203-1372 TurboBrush with Microban...

User Guide
Page 20
... Services BISSELL HOMECARE, INC. BISSELL Healthy Home Vacuum™ This warranty gives you specific legal rights, and you . *EXCEPTIONS AND EXCLUSIONS FROM THE TERMS OF THE LIMITED WARRANTY THIS WARRANTY IS EXCLUSIVE AND IN LIEU OF ANY OTHER WARRANTIES EITHER ORAL OR WRITTEN. will repair or replace (with the User's Guide is not covered. b i s s e l l . Website or E-mail: www.bissell.com Use the "Customer Service" tab. ET Or write: BISSELL...
... Services BISSELL HOMECARE, INC. BISSELL Healthy Home Vacuum™ This warranty gives you specific legal rights, and you . *EXCEPTIONS AND EXCLUSIONS FROM THE TERMS OF THE LIMITED WARRANTY THIS WARRANTY IS EXCLUSIVE AND IN LIEU OF ANY OTHER WARRANTIES EITHER ORAL OR WRITTEN. will repair or replace (with the User's Guide is not covered. b i s s e l l . Website or E-mail: www.bissell.com Use the "Customer Service" tab. ET Or write: BISSELL...


