Bissell ICONpet Cordless Vacuum 2288 Support and Manuals
Get Help and Manuals for this Bissell item
View All Support Options Below
Free Bissell ICONpet Cordless Vacuum 2288 manuals!
Problems with Bissell ICONpet Cordless Vacuum 2288?
Ask a Question
Free Bissell ICONpet Cordless Vacuum 2288 manuals!
Problems with Bissell ICONpet Cordless Vacuum 2288?
Ask a Question
Most Recent Bissell ICONpet Cordless Vacuum 2288 Questions

Lower Flex Hose
Is the lower flexible hose replaceable on the brush roller section? What is the part number of the f...
Is the lower flexible hose replaceable on the brush roller section? What is the part number of the f...
(Posted by sunnyparks 1 year ago)
Popular Bissell ICONpet Cordless Vacuum 2288 Manual Pages
User Guide - Page 1

Go to get ready for a comprehensive walkthrough of your machine, but online you'll find additional resources like tips and troubleshooting, videos, product registration, parts and more.
ICONpet CORDLESS VACUUM
MODEL SERIES 2288, 2774
Go online for first use, including setting up, using and maintaining your product! This guide has everything you need to support.BISSELL.com.
User Guide - Page 2
...to turn OFF this user guide. »» Use ... fingers, and all parts of injury.
»&#...187; Have servicing performed by a qualified repair person using an...must be replaced by the
manufacturer, its service agent or...INSTRUCTIONS
THIS MODEL IS FOR HOUSEHOLD USE ONLY.
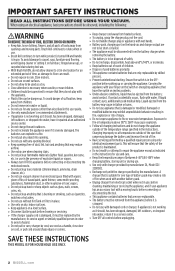
2 BISSELL... INSTRUCTIONS
READ ALL INSTRUCTIONS BEFORE USING YOUR VACUUM....,
avoid tipping cleaner or setting it on a level surface...
User Guide - Page 3

... 7 Troubleshooting 11 Attaching Tools for Hand Vac Use 7 Warranty 11
BISSELL.com 3
Safety Instructions 2 Emptying the Dirt Tank 8 Assembly 5 Removing the Brush Roll 8 Installing the Wall Mount 5 Cleaning & Replacing the Filters 9 Charging the Battery 6 Disposing of your product, go to help you chose the ICONpet High-Powered Cordless Vacuum. We put this guide together to support...
User Guide - Page 4
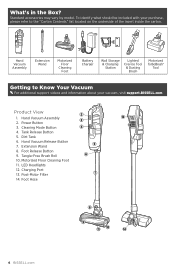
... the underside of the insert inside the carton. Product View
1. Power Button 3. Hand Vacuum Release Button 7. Extension Wand 8. Tank Release Button 5. Foot Hose
1 2 3 4
5 6
7
12 13
8
9
11
10
14
4 BISSELL.com To identify what should be included with your vacuum, visit support.BISSELL.com. Motorized Floor Cleaning Foot 11. Cleaning Mode Button 4. Post-Motor Filter 14...
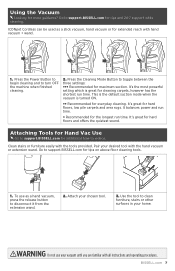
User Guide - Page 5

...instructions. In order to support.BISSELL.com for more tips and video instructions on the Wall Storage & Charging Station for instructions. Plug the power adapter into the side of the Wall Storage & Charging Station. Installing... cord clip.
3. To install the charging cord, remove the power cord clip from the Wall Storage & Charging Station. Connect the Hand Vacuum Assembly to page 6, "...
User Guide - Page 6

... 4 hours to videos. Plug the charger into the Wall Storage & Charging Station. Once installed, hang the machine onto the station.
6 BISSELL.com
2. Charging the Battery
Go to support.BISSELL.com for additional how-to get a full charge.
Charging with the Hand Vacuum
4
1. To charge the battery you can plug the charger directly into the Hand...
User Guide - Page 7
... vacuum or extension wand. Press the Cleaning Mode Button to support.BISSELL.com for the longest run time.
• Recommended for tips on above floor cleaning tools.
1. It's great for maximum suction. Press the Power Button to begin cleaning and to clean furniture, stairs or other
surfaces in your desired tool with all instructions...
User Guide - Page 8
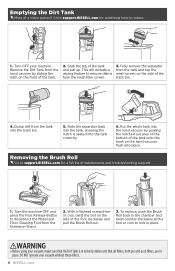
...vacuum by guiding the notched out area on the bottom of the tank onto the hook on the
side of the tank and pull up. Fully remove the separator from the Extension Wand.
2. Removing the Brush Roll
Go to support.BISSELL... feature to lock in place. To replace, push the Brush Roll back in locked position and that the Dirt Tank is seated into the hand vacuum by sliding the
latch on the side...
User Guide - Page 9
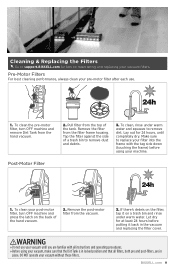
...and rinse under warm water and squeeze to support.BISSELL.com for 24 hours, until you are in the vacuum and replacing the filter cover. BISSELL.com 9 DO NOT operate your pre-motor ...a trash bin to replace your filter into the frame with all instructions and operating procedures. »»Before using your vacuum until completely dry. To clean your vacuum filters. Make sure to...
User Guide - Page 10

...battery assembly by
unplugging the two sockets
from the 3. For specific disposal instructions of the unit.
4. Remove five screws from the vacuum.
5. DO NOT separate individual batteries. Make sure the unit...in your ICONpet Cordless, see instructions on this page.
10 BISSELL.com
For removal of the Batteries
Go to support.BISSELL.com for additional support and how-to Federal and
state...
User Guide - Page 11
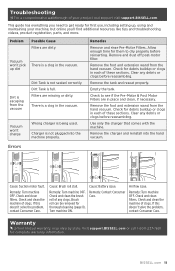
... resources like tips and troubleshooting, videos, product registration, parts, and more. Remove the tank and reseat properly. Allow enough time for debris buildup or clogs in the vacuum.
Remedy: Turn machine OFF. Remedy: Contact Consumer Care.
Check and clean filters.
Vacuum won 't pick up , using and maintaining your product and support visit support.BISSELL.com. Remove and...
User Guide - Page 12

...us online for a comprehensive walkthrough of your product, including troubleshooting, product registration, parts and more pets. REGISTER
INFO
VIDEOS
PARTS
SUPPORT
©2019 BISSELL Inc. Go to learn more !
Printed in China. Go to www.BISSELL.com/savepets to support.BISSELL.com.
All rights reserved.
Thanks to your product donation. Part Number 162-1192 07/19 RevA Visit our...
Bissell ICONpet Cordless Vacuum 2288 Reviews
We have not received any reviews for Bissell yet.