Update Manual
Page 1
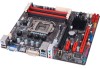
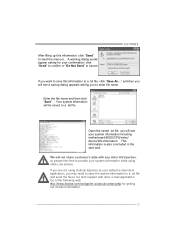
.... Click Yes to update the BIOS: BIOS Update Utility, BIOS Online Update Utility and BIOS Flasher. Then, the BIOS Update is finished, click on the main screen for the backup of BIOS, and select a proper location for your backup BIOS file in the system. Installing BIOS Update Utility from www.biostar.com. tw . 3. After the BIOS Update process is completed...
.... Click Yes to update the BIOS: BIOS Update Utility, BIOS Online Update Utility and BIOS Flasher. Then, the BIOS Update is finished, click on the main screen for the backup of BIOS, and select a proper location for your backup BIOS file in the system. Installing BIOS Update Utility from www.biostar.com. tw . 3. After the BIOS Update process is completed...
Update Manual
Page 2
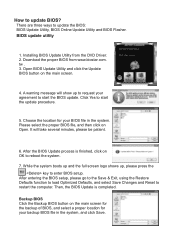
After the download is completed, you will be asked you to reboot the system. Click OK to enter BIOS setup. After entering the BIOS setup, please go to program (update) the BIOS or not. An open dialog will ask you will be asked to the Save & Exit, using this function. ... up to request your agreement to download it. If there is finished, you to start the online update procedure. 5. Installing BIOS Update Utility from the DVD Driver. 2. Open BIOS Update Utility and click the Online Update button on the main screen. 4. Click Yes to proceed. 7. Click Yes to proceed...
After the download is completed, you will be asked you to reboot the system. Click OK to enter BIOS setup. After entering the BIOS setup, please go to program (update) the BIOS or not. An open dialog will ask you will be asked to the Save & Exit, using this function. ... up to request your agreement to download it. If there is finished, you to start the online update procedure. 5. Installing BIOS Update Utility from the DVD Driver. 2. Open BIOS Update Utility and click the Online Update button on the main screen. 4. Click Yes to proceed. 7. Click Yes to proceed...
Update Manual
Page 3
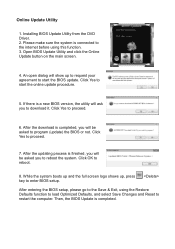
...failure. For better performance, the software is completed. This utility only allows storage device with BIOSTAR BIOS Flasher 1. To enter the utility, press during the POST process. 5. Then, copy and save the BIOS file into a USB flash (pen) drive. 3. After entering the POST screen, the ...slightly different from this manual. All the information and content above are subject to start updating BIOS. 7. The BIOSTAR BIOS Flasher is completed, asking you to download the latest BIOS file for your BIOS via USB pen drive. 1. Go to the website to restart the system. Press the ...
...failure. For better performance, the software is completed. This utility only allows storage device with BIOSTAR BIOS Flasher 1. To enter the utility, press during the POST process. 5. Then, copy and save the BIOS file into a USB flash (pen) drive. 3. After entering the POST screen, the ...slightly different from this manual. All the information and content above are subject to start updating BIOS. 7. The BIOSTAR BIOS Flasher is completed, asking you to download the latest BIOS file for your BIOS via USB pen drive. 1. Go to the website to restart the system. Press the ...
Setup Manual
Page 2
... 19 4.1 Operating System 19 4.2 Raid Arrays 19 4.3 How RAID Works 19 Chapter 5: Useful Help 23 5.1 Driver Installation Note 23 5.2 Software ...24 5.3 Extra Information 28 5.4 AMI BIOS Beep Code 29 5.5 Troubleshooting 30 Appendix: SPEC In Other Languages 31 German...32 French ...34 Italian...36 Spanish ...38 Portuguese ...40 Polish...42 Russian ...44...
... 19 4.1 Operating System 19 4.2 Raid Arrays 19 4.3 How RAID Works 19 Chapter 5: Useful Help 23 5.1 Driver Installation Note 23 5.2 Software ...24 5.3 Extra Information 28 5.4 AMI BIOS Beep Code 29 5.5 Troubleshooting 30 Appendix: SPEC In Other Languages 31 German...32 French ...34 Italian...36 Spanish ...38 Portuguese ...40 Polish...42 Russian ...44...
Setup Manual
Page 7
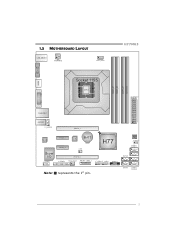
VGA1 1.5 MOTHERBOARD LAYOUT USB_KBMS1 C PU _FA N1 H77MU3 HD MI1 Socket 1155 C PU1 DDR3 _A1 DDR3 _A2 DDR3 _B1 DD R3_B2 ATXPW R1 DVI1 R J45U SB1 A UDI O1 F_ AU DIO1 PE X16_1 CODEC Super I/O J_C OM1 P E X1_1 P E X1_2 LAN BAT1 C IR1 H77 J_ PR IN T1 PE X16_2 SY S_FA N1 JFRONT_USB3_1 F_US B 2 F_US B1 PANE L1 BIOS JC MOS 1 SATA 1 SATA 2 S ATA 5 Note: ■ represents the 1st pin. S ATA 6 SATA 3 SATA 4 5
VGA1 1.5 MOTHERBOARD LAYOUT USB_KBMS1 C PU _FA N1 H77MU3 HD MI1 Socket 1155 C PU1 DDR3 _A1 DDR3 _A2 DDR3 _B1 DD R3_B2 ATXPW R1 DVI1 R J45U SB1 A UDI O1 F_ AU DIO1 PE X16_1 CODEC Super I/O J_C OM1 P E X1_1 P E X1_2 LAN BAT1 C IR1 H77 J_ PR IN T1 PE X16_2 SY S_FA N1 JFRONT_USB3_1 F_US B 2 F_US B1 PANE L1 BIOS JC MOS 1 SATA 1 SATA 2 S ATA 5 Note: ■ represents the 1st pin. S ATA 6 SATA 3 SATA 4 5
Setup Manual
Page 19
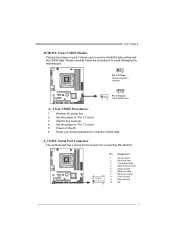
... 10 NC 1 9 17 J_COM1: Serial Port Connector The motherboard has a Serial Port Connector for five seconds. 4. Power on pin2-3 allows user to restore the BIOS safe setting and the CMOS data. Set the jumper to "Pin 2-3 close ". 5. Remove AC power line. 2. Reset your desired password or clear the CMOS .... 13 Pin 1-2 Close: Normal Operation (default). 13 13 Pin 2-3 Close: Clear CMOS data. ※ Clear CMOS Procedures: 1. Wait for connecting RS-232 Port. H77MU3 JCMOS1: Clear CMOS Header Placing the jumper on the AC. 6. Set the jumper to "Pin 1-2 close ". 3.
... 10 NC 1 9 17 J_COM1: Serial Port Connector The motherboard has a Serial Port Connector for five seconds. 4. Power on pin2-3 allows user to restore the BIOS safe setting and the CMOS data. Set the jumper to "Pin 2-3 close ". 5. Remove AC power line. 2. Reset your desired password or clear the CMOS .... 13 Pin 1-2 Close: Normal Operation (default). 13 13 Pin 2-3 Close: Clear CMOS data. ※ Clear CMOS Procedures: 1. Wait for connecting RS-232 Port. H77MU3 JCMOS1: Clear CMOS Header Placing the jumper on the AC. 6. Set the jumper to "Pin 1-2 close ". 3.
Setup Manual
Page 26
... the optical drive. Insert the Setup CD to complete the installation. Launching Software After the installation process, you will see the software icon "eHOT Line" / "BIOS Update" appears on the respective software title. 3. Before you use this information, you may have encountered, and then send these in the mail . *Describe conditi...
... the optical drive. Insert the Setup CD to complete the installation. Launching Software After the installation process, you will see the software icon "eHOT Line" / "BIOS Update" appears on the respective software title. 3. Before you use this information, you may have encountered, and then send these in the mail . *Describe conditi...
Setup Manual
Page 27
...concluded in the sent mail. Go to the following web http://www.biostar.com.tw/app/en-us/about/contact.php for your system information while using Outlook Express as ...your system information including motherboard/BIOS/CPU/video/ device/OS information. and then you will see a saving dialog appears ...dialog would appear asking for getting our contact information. 25 Enter the file name and then click "Save". H77MU3 If you may need to save this information, click "Send" to send the mail out. Your system ...
...concluded in the sent mail. Go to the following web http://www.biostar.com.tw/app/en-us/about/contact.php for your system information while using Outlook Express as ...your system information including motherboard/BIOS/CPU/video/ device/OS information. and then you will see a saving dialog appears ...dialog would appear asking for getting our contact information. 25 Enter the file name and then click "Save". H77MU3 If you may need to save this information, click "Send" to send the mail out. Your system ...
Setup Manual
Page 28
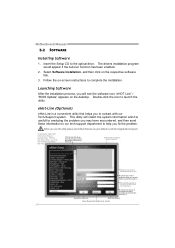
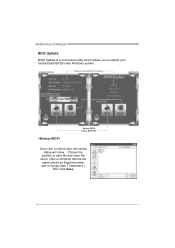
Choose the position to update your motherboard BIOS under Windows system. Motherboard Manual BIOS Update BIOS Update is a convenient utility which allows you to save file and enter file name. (We recommend that the file name should be English/number and no longer than 7 characters.) Then click Save. 26 AWARD BIOS Show current BIOS information AMI BIOS Clear CMOS function (Only for AWARD BIOS) Save current BIOS to a .bin file Update BIOS with a BIOS file Once click on this button, the saving dialog will show.
Choose the position to update your motherboard BIOS under Windows system. Motherboard Manual BIOS Update BIOS Update is a convenient utility which allows you to save file and enter file name. (We recommend that the file name should be English/number and no longer than 7 characters.) Then click Save. 26 AWARD BIOS Show current BIOS information AMI BIOS Clear CMOS function (Only for AWARD BIOS) Save current BIOS to a .bin file Update BIOS with a BIOS file Once click on this button, the saving dialog will show.
Setup Manual
Page 29
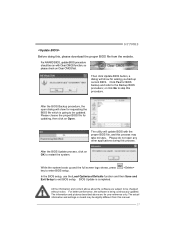
... performance, the software is completed. The actual information and settings on OK to enter BIOS setup. After the BIOS Update process, click on board may take minutes. H77MU3 Before doing this, please download the proper BIOS file from this manual. 27 For AWARD BIOS, update BIOS procedure should be changed without notice. The utility will update...
... performance, the software is completed. The actual information and settings on OK to enter BIOS setup. After the BIOS Update process, click on board may take minutes. H77MU3 Before doing this, please download the proper BIOS file from this manual. 27 For AWARD BIOS, update BIOS procedure should be changed without notice. The utility will update...
Setup Manual
Page 31
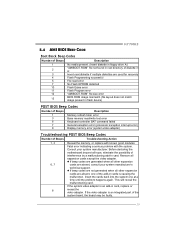
5.4 AMI BIOS BEEP CODE H77MU3 Boot Block Beep Codes Number of Beeps Description 1 No media present. (Insert diskette in floppy drive A:) 2 "AMIBOOT.ROM" file not found in root directory of ... memory read/write test error 6 Keyboard controller BAT command failed 7 General exception error (processor exception interrupt error) 8 Display memory error (system video adapter) Troubleshooting POST BIOS Beep Codes Number of the add-in cards is causing the malfunction. Remove all other expansion cards are generated when all expansion cards except the...
5.4 AMI BIOS BEEP CODE H77MU3 Boot Block Beep Codes Number of Beeps Description 1 No media present. (Insert diskette in floppy drive A:) 2 "AMIBOOT.ROM" file not found in root directory of ... memory read/write test error 6 Keyboard controller BAT command failed 7 General exception error (processor exception interrupt error) 8 Display memory error (system video adapter) Troubleshooting POST BIOS Beep Codes Number of the add-in cards is causing the malfunction. Remove all other expansion cards are generated when all expansion cards except the...
Bios Manual
Page 2
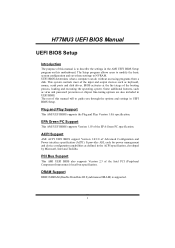
... of Advanced Configuration and Power interface specification (ACPI). The rest of this motherboard. UEFI BIOS determines what a computer can do without accessing programs from a disk. H77MU3 UEFI BIOS Manual UEFI BIOS Setup Introduction The purpose of this manual is supported. 1 BIOS activates at the first stage of the input and output devices such as keyboard...
... of Advanced Configuration and Power interface specification (ACPI). The rest of this motherboard. UEFI BIOS determines what a computer can do without accessing programs from a disk. H77MU3 UEFI BIOS Manual UEFI BIOS Setup Introduction The purpose of this manual is supported. 1 BIOS activates at the first stage of the input and output devices such as keyboard...
Bios Manual
Page 3
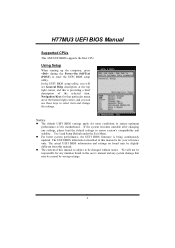
...computer, press during the Power-On Self-Test (POST) to select item and change the settings. z For better system performance, the UEFI BIOS firmware is providing a brief description of this manual is subject to ensure system's compatibility and stability. z The content of the selected item...continuously updated. Notice z The default UEFI BIOS settings apply for your reference only. H77MU3 UEFI BIOS Manual Supported CPUs This AMI UEFI BIOS supports the Intel CPU. In the UEFI BIOS setup utility, you can use these keys to enter the UEFI BIOS setup utility. We will see General Help...
...computer, press during the Power-On Self-Test (POST) to select item and change the settings. z For better system performance, the UEFI BIOS firmware is providing a brief description of this manual is subject to ensure system's compatibility and stability. z The content of the selected item...continuously updated. Notice z The default UEFI BIOS settings apply for your reference only. H77MU3 UEFI BIOS Manual Supported CPUs This AMI UEFI BIOS supports the Intel CPU. In the UEFI BIOS setup utility, you can use these keys to enter the UEFI BIOS setup utility. We will see General Help...
Bios Manual
Page 4
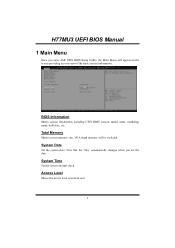
Total Memory Shows system memory size, VGA shard memory will appear on the screen providing an overview of current user. 3 System Date Set the system date. Note that the 'Day' automatically changes when you enter AMI UEFI BIOS Setup Utility, the Main Menu will be excluded. Access Level Shows the access level of the basic system information. System Time Set the system internal clock. H77MU3 UEFI BIOS Manual 1 Main Menu Once you set the date. BIOS Information Shows system information including UEFI BIOS version, model name, marketing name, built date, etc.
Total Memory Shows system memory size, VGA shard memory will appear on the screen providing an overview of current user. 3 System Date Set the system date. Note that the 'Day' automatically changes when you enter AMI UEFI BIOS Setup Utility, the Main Menu will be excluded. Access Level Shows the access level of the basic system information. System Time Set the system internal clock. H77MU3 UEFI BIOS Manual 1 Main Menu Once you set the date. BIOS Information Shows system information including UEFI BIOS version, model name, marketing name, built date, etc.
Bios Manual
Page 5
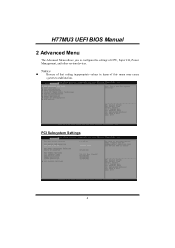
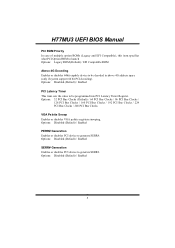
PCI Subsystem Settings 4 Notice z Beware of that setting inappropriate values in items of CPU, Super I/O, Power Management, and other system devices. H77MU3 UEFI BIOS Manual 2 Advanced Menu The Advanced Menu allows you to configure the settings of this menu may cause system to malfunction.
PCI Subsystem Settings 4 Notice z Beware of that setting inappropriate values in items of CPU, Super I/O, Power Management, and other system devices. H77MU3 UEFI BIOS Manual 2 Advanced Menu The Advanced Menu allows you to configure the settings of this menu may cause system to malfunction.
Bios Manual
Page 6
... Bus Clocks / 192 PCI Bus Clocks / 224 PCI Bus Clocks / 248 PCI Bus Clocks VGA Palette Snoop Enables or disables VGA palette registers snooping. H77MU3 UEFI BIOS Manual PCI ROM Priority In case of multiple option ROMs (Legacy and EFI Compatible), this item specifies what PCI Option ROM to launch Options: Legacy...
... Bus Clocks / 192 PCI Bus Clocks / 224 PCI Bus Clocks / 248 PCI Bus Clocks VGA Palette Snoop Enables or disables VGA palette registers snooping. H77MU3 UEFI BIOS Manual PCI ROM Priority In case of multiple option ROMs (Legacy and EFI Compatible), this item specifies what PCI Option ROM to launch Options: Legacy...
Bios Manual
Page 7
.../ 2048 Bytes / 4096 Bytes 6 Options: Enabled (Default) / Disabled Maximum Payload This item sets Maximum Payload of PCI Express Device or allows System BIOS to select the value. Options: Disabled (Default) / Enabled No Snoop This item enables or disables PCI Express Device No Snoop option. Options: Auto ... Read Request Size of PCI Express Device or allows System BIOS to use 8-bit tab field as a requester. Options: Disabled (Default) / Enabled Extended Tag If enabled allows device to select the value. H77MU3 UEFI BIOS Manual PCI Express Settings Relaxed Ordering Enables or disables PCI ...
.../ 2048 Bytes / 4096 Bytes 6 Options: Enabled (Default) / Disabled Maximum Payload This item sets Maximum Payload of PCI Express Device or allows System BIOS to select the value. Options: Disabled (Default) / Enabled No Snoop This item enables or disables PCI Express Device No Snoop option. Options: Auto ... Read Request Size of PCI Express Device or allows System BIOS to use 8-bit tab field as a requester. Options: Disabled (Default) / Enabled Extended Tag If enabled allows device to select the value. H77MU3 UEFI BIOS Manual PCI Express Settings Relaxed Ordering Enables or disables PCI ...

Bios Manual
Page 8
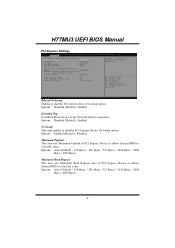
...synchronization patterns. Disabled - Options: 100 (Default) Unpopulated Links In order to save power, software will wait before polling 'Link Training' bit in link status register. H77MU3 UEFI BIOS Manual ASPM This item sets the ASPM (Active State Power Management Settings) Level: Force L0 - Options: Disabled (Default) / Auto / Force L0s Extend Synch If... the link if previous training attempt was unsuccessful. Options: Keep Link ON (Default) / Disable Link ACPI Settings 7 Auto - Force all links to 1000 uS. BIOS auto configures; Disables ASPM. Value range from 10 to LO State;
...synchronization patterns. Disabled - Options: 100 (Default) Unpopulated Links In order to save power, software will wait before polling 'Link Training' bit in link status register. H77MU3 UEFI BIOS Manual ASPM This item sets the ASPM (Active State Power Management Settings) Level: Force L0 - Options: Disabled (Default) / Auto / Force L0s Extend Synch If... the link if previous training attempt was unsuccessful. Options: Keep Link ON (Default) / Disable Link ACPI Settings 7 Auto - Force all links to 1000 uS. BIOS auto configures; Disables ASPM. Value range from 10 to LO State;
Bios Manual
Page 9
H77MU3 UEFI BIOS Manual ACPI Sleep State This item selects the highest ACPI sleep state the system will enter when the SUSPEND button is enabled, the system will ...
H77MU3 UEFI BIOS Manual ACPI Sleep State This item selects the highest ACPI sleep state the system will enter when the SUSPEND button is enabled, the system will ...
Bios Manual
Page 10
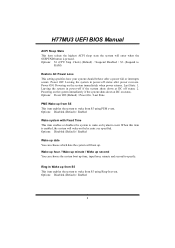
.... Options: Disabled (Default) / Enabled USB Device Wakeup from S3/S4 This item allows you to enable or disabled the USB resume from S3/S4 function. H77MU3 UEFI BIOS Manual PS2 Keyboard PowerOn This item allows you to set Specific key.
.... Options: Disabled (Default) / Enabled USB Device Wakeup from S3/S4 This item allows you to enable or disabled the USB resume from S3/S4 function. H77MU3 UEFI BIOS Manual PS2 Keyboard PowerOn This item allows you to set Specific key.


