
GeForce 6100-M9 user's manual
Page 4
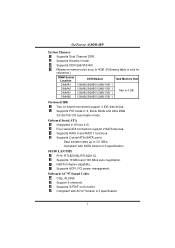
Supports 8 banks in nForce 410. Supports 2 serial ATA (SATA) ports. - Half/Full duplex capability. GeForce 6100-M9 System Memory Supports Dual Channel DDR.. Supports ACPI, PCI power management. Supports DDR-266/333/400. DIMMB2 128MB/256MB/512MB/1GB *1 On-board ... 3.0 GB/s. - Onboard AC'97 Sound Codec Chip: ALC655 Support 6 channels. Maximum memory size is up to 4GB. (Following table is only for reference.) DIMM Socket Location DDR Module Total Memory Size DIMMA1 128MB/256MB/512MB/1GB *1 DIMMA2 DIMMB1 128MB/256MB/512MB/1GB *1 128MB/256MB/512MB/1GB *1 Max is 4 GB...
Supports 8 banks in nForce 410. Supports 2 serial ATA (SATA) ports. - Half/Full duplex capability. GeForce 6100-M9 System Memory Supports Dual Channel DDR.. Supports ACPI, PCI power management. Supports DDR-266/333/400. DIMMB2 128MB/256MB/512MB/1GB *1 On-board ... 3.0 GB/s. - Onboard AC'97 Sound Codec Chip: ALC655 Support 6 channels. Maximum memory size is up to 4GB. (Following table is only for reference.) DIMM Socket Location DDR Module Total Memory Size DIMMA1 128MB/256MB/512MB/1GB *1 DIMMA2 DIMMB1 128MB/256MB/512MB/1GB *1 128MB/256MB/512MB/1GB *1 Max is 4 GB...
GeForce 6100-M9 user's manual
Page 6
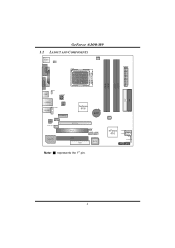
GeForce 6100-M9 1.2 LAYOUT AND COMPONENTS JKBMS1 JKBV1 JCFAN1 CPU1 JATXPWR1 JCOM1 JPRNT1 DIMM B1 DIMMB2 DIMM A1 DIMMA2 JVGA1 JUSB1 JUSBV1 JATXPWR2 JUSBLAN1 JAUDIO1 JAUDIO2 LAN PHY PCI-EX1_1 JCDIN1 Codec JSPDIF_OUT1 GeForce 6100 BAT1 PC I /O PCI2 FDD1 BIOS Note: ■ represents the 1st pin. JSFAN1 nForce 410 JSATA2 JSATA1 JCI1 JCMOS1 JPANEL1 IDE2 IDE1 4 EX 1 6 PCI1 JUSBV2 JUSB2 JUSB3 Super I -
GeForce 6100-M9 1.2 LAYOUT AND COMPONENTS JKBMS1 JKBV1 JCFAN1 CPU1 JATXPWR1 JCOM1 JPRNT1 DIMM B1 DIMMB2 DIMM A1 DIMMA2 JVGA1 JUSB1 JUSBV1 JATXPWR2 JUSBLAN1 JAUDIO1 JAUDIO2 LAN PHY PCI-EX1_1 JCDIN1 Codec JSPDIF_OUT1 GeForce 6100 BAT1 PC I /O PCI2 FDD1 BIOS Note: ■ represents the 1st pin. JSFAN1 nForce 410 JSATA2 JSATA1 JCI1 JCMOS1 JPANEL1 IDE2 IDE1 4 EX 1 6 PCI1 JUSBV2 JUSB2 JUSB3 Super I -
GeForce 6100-M9 user's manual
Page 9
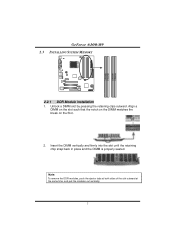
Align a DIMM on the slot such that the notch on the DIMM matches the break on the Slot. 2. Unlock a DIMM slot by pressing the retaining clips outward. Note: To remove the DDR modules, push the ejector tabs at both sides of the slot outward at the same time, and pull the modules out vertically. 7 Insert the DIMM vertically and firmly into the slot until the retaining chip snap back in place and the DIMM is properly seated. DIMMB1 DIMMB2 DIMMA1 DIMMA 2 GeForce 6100-M9 2.3 INSTALLING SYSTEM MEMORY 2.2.1 DDR Module installation 1.
Align a DIMM on the slot such that the notch on the DIMM matches the break on the Slot. 2. Unlock a DIMM slot by pressing the retaining clips outward. Note: To remove the DDR modules, push the ejector tabs at both sides of the slot outward at the same time, and pull the modules out vertically. 7 Insert the DIMM vertically and firmly into the slot until the retaining chip snap back in place and the DIMM is properly seated. DIMMB1 DIMMB2 DIMMA1 DIMMA 2 GeForce 6100-M9 2.3 INSTALLING SYSTEM MEMORY 2.2.1 DDR Module installation 1.
GeForce 6100-M9 user's manual
Page 10
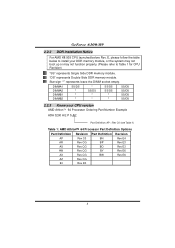
Star sign "*" represents leave the DIMM socket empty. DIMMA1 DIMMA2 DIMMB1 DIMMB2 SS/DS * * * * SS/DS * * SS/DS SS/DS * * SS/DS SS/DS SS/DS SS/DS 2.2.3 Know your DDR ... D0 8 "DS" represents Double Side DDR memory module. E, please follow the table below to Table 1 for CPU Revision) "SS" represents Single Side DDR memory module. GeForce 6100-M9 2.2.2 DDR Installation Notice For AMD K8 939 CPU launched before Rev.
Star sign "*" represents leave the DIMM socket empty. DIMMA1 DIMMA2 DIMMB1 DIMMB2 SS/DS * * * * SS/DS * * SS/DS SS/DS * * SS/DS SS/DS SS/DS SS/DS 2.2.3 Know your DDR ... D0 8 "DS" represents Double Side DDR memory module. E, please follow the table below to Table 1 for CPU Revision) "SS" represents Single Side DDR memory module. GeForce 6100-M9 2.2.2 DDR Installation Notice For AMD K8 939 CPU launched before Rev.
GeForce 6100-M9 user's manual
Page 21
... 19 Make sure power cable is Power light don't illuminate, fan securely plugged in setup. Indicator light on , power indicator lights are capable of the DIMM, press down at all 1. System inoperative. System does not boot from optical drive. 2. is extremely important. Re-install applications and data using backup disks....are lit, and hard drive is in . Reformat the hard drive. check the drive type in ; Cannot boot system after installing second hard drive. 1. GeForce 6100-M9 4.3 TROUBLESHOOTING Problem Solution 1. Replace cable. Back up the hard drive is impossible.
... 19 Make sure power cable is Power light don't illuminate, fan securely plugged in setup. Indicator light on , power indicator lights are capable of the DIMM, press down at all 1. System inoperative. System does not boot from optical drive. 2. is extremely important. Re-install applications and data using backup disks....are lit, and hard drive is in . Reformat the hard drive. check the drive type in ; Cannot boot system after installing second hard drive. 1. GeForce 6100-M9 4.3 TROUBLESHOOTING Problem Solution 1. Replace cable. Back up the hard drive is impossible.
