User Manual
Page 2
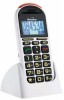
...- Keep your guarantee. it is not supplied with your Speakeasy GSM Mobile In the box are: the mobile handset a mains power adaptor the handset back cover and card a rechargeable battery pack this guide. The Binatone Help Line is approved for future use the Dual-band ...61623; a charger pod (optional extra not always supplied) Keep the packing materials for use on all language dependent characters and/or services. 1 Binatone Help Line : 0845 345 9677 Your handset is your sales receipt - The Speakeasy GSM will need help ...
...- Keep your guarantee. it is not supplied with your Speakeasy GSM Mobile In the box are: the mobile handset a mains power adaptor the handset back cover and card a rechargeable battery pack this guide. The Binatone Help Line is approved for future use the Dual-band ...61623; a charger pod (optional extra not always supplied) Keep the packing materials for use on all language dependent characters and/or services. 1 Binatone Help Line : 0845 345 9677 Your handset is your sales receipt - The Speakeasy GSM will need help ...
User Manual
Page 3
..., Security, Reset)... 19 Clock 19 Network 20 Call 20 Sound profiles 20 Alarm Clock 21 SOS Button 22 Troubleshooting 24 Guarantee and Service information 25 Battery Information 26 Additional Safety Information 27 Technical Data 29 Declaration of Conformity 30 http://www.binatoneonline.com 2
..., Security, Reset)... 19 Clock 19 Network 20 Call 20 Sound profiles 20 Alarm Clock 21 SOS Button 22 Troubleshooting 24 Guarantee and Service information 25 Battery Information 26 Additional Safety Information 27 Technical Data 29 Declaration of Conformity 30 http://www.binatoneonline.com 2
User Manual
Page 5
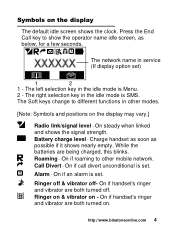
...://www.binatoneonline.com 4 The network name in the idle mode is set . Ringer on & vibrator on . While the batteries are both turned off - The left selection key in service (If display option set) 1 2 1 - Battery charge level - Charge handset as soon as below, for a few seconds. Ringer off & vibrator off . On if handset...
...://www.binatoneonline.com 4 The network name in the idle mode is set . Ringer on & vibrator on . While the batteries are both turned off - The left selection key in service (If display option set) 1 2 1 - Battery charge level - Charge handset as soon as below, for a few seconds. Ringer off & vibrator off . On if handset...
User Manual
Page 7
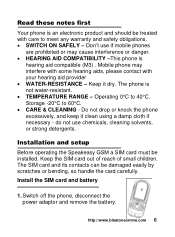
... phone excessively, and keep it dry. http://www.binatoneonline.com 6 The phone is hearing aid compatible (M3) . Installation and setup Before operating the Speakeasy GSM a SIM card must be damaged easily by scratches or bending, so handle the card carefully. Keep it clean using a damp cloth if necessary ...- Switch off the phone, disconnect the power adaptor and remove the battery. Keep the SIM card out of reach of small children. Install the SIM card and battery 1. Read these notes first Your phone is an electronic product and should be treated with your ...
... phone excessively, and keep it dry. http://www.binatoneonline.com 6 The phone is hearing aid compatible (M3) . Installation and setup Before operating the Speakeasy GSM a SIM card must be damaged easily by scratches or bending, so handle the card carefully. Keep it clean using a damp cloth if necessary ...- Switch off the phone, disconnect the power adaptor and remove the battery. Keep the SIM card out of reach of small children. Install the SIM card and battery 1. Read these notes first Your phone is an electronic product and should be treated with your ...
User Manual
Page 8
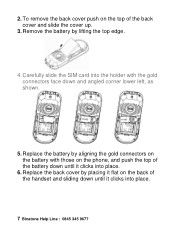
Replace the battery by aligning the gold connectors on the battery with the gold connectors face down until it flat on the top of the back cover and slide the cover up. 3. To remove the back cover push on the back of the battery down until it clicks into place. 6. Carefully slide the SIM card into the holder with those on the phone, and push the top of the handset and sliding down and angled corner lower left, as shown. 5. Remove the battery by placing it clicks into place. 7 Binatone Help Line : 0845 345 9677 Replace the back cover by lifting the top edge. 4. 2.
Replace the battery by aligning the gold connectors on the battery with the gold connectors face down until it flat on the top of the back cover and slide the cover up. 3. To remove the back cover push on the back of the battery down until it clicks into place. 6. Carefully slide the SIM card into the holder with those on the phone, and push the top of the handset and sliding down and angled corner lower left, as shown. 5. Remove the battery by placing it clicks into place. 7 Binatone Help Line : 0845 345 9677 Replace the back cover by lifting the top edge. 4. 2.
User Manual
Page 9
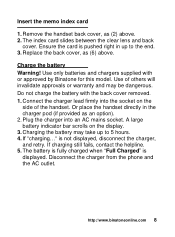
... the charger lead firmly into an AC mains socket. Ensure the card is displayed. Do not charge the battery with or approved by Binatone for this model. Charging the battery may be dangerous. A large battery indicator bar scrolls on the side of others will invalidate approvals or warranty and may take up to 5 hours...
... the charger lead firmly into an AC mains socket. Ensure the card is displayed. Do not charge the battery with or approved by Binatone for this model. Charging the battery may be dangerous. A large battery indicator bar scrolls on the side of others will invalidate approvals or warranty and may take up to 5 hours...

User Manual
Page 10
When correctly inserted the headset icon is shown. Headset / Charging Connector Plug in headset accessory (not supplied) for safety instructions. Connect an optional headset You can use . 9 Binatone Help Line : 0845 345 9677 Plug in power adapter to volume levels and read its user guide for headset use a headset (not supplied) with the same micro-USB type as your charger, plugged into the Power/Headset socket on the left side of the handset. When using headsets, including Binatone approved ones, pay attention to charge battery. Do not connect incompatible products.
When correctly inserted the headset icon is shown. Headset / Charging Connector Plug in headset accessory (not supplied) for safety instructions. Connect an optional headset You can use . 9 Binatone Help Line : 0845 345 9677 Plug in power adapter to volume levels and read its user guide for headset use a headset (not supplied) with the same micro-USB type as your charger, plugged into the Power/Headset socket on the left side of the handset. When using headsets, including Binatone approved ones, pay attention to charge battery. Do not connect incompatible products.

User Manual
Page 27
... - Never use . (There is a risk of explosion if the lithium battery is replaced by Binatone and unplug the charger when not in a fire. Keep metal objects away from the battery terminals, as household waste and not in use a damaged charger or battery. Use only batteries & chargers approved by an incorrect type or is time to...
... - Never use . (There is a risk of explosion if the lithium battery is replaced by Binatone and unplug the charger when not in a fire. Keep metal objects away from the battery terminals, as household waste and not in use a damaged charger or battery. Use only batteries & chargers approved by an incorrect type or is time to...
User Manual
Page 30
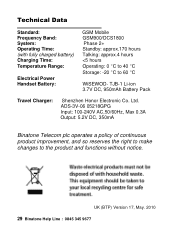
Technical Data Standard: Frequency Band: System: Operating Time: (with fully charged battery) Charging Time: Temperature Range: Electrical Power Handset Battery: GSM Mobile GSM900/DCS1800 Phase 2+ Standby: approx.170 hours Talking: approx.4 hours
Technical Data Standard: Frequency Band: System: Operating Time: (with fully charged battery) Charging Time: Temperature Range: Electrical Power Handset Battery: GSM Mobile GSM900/DCS1800 Phase 2+ Standby: approx.170 hours Talking: approx.4 hours


