User Guide
Page 1
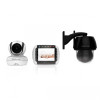
User's Guide Digital Video Monitor with Indoor and Outdoor Camera Units Model: FOCUS360 The features described in this User's Guide are subject to modifications without prior notice.
User's Guide Digital Video Monitor with Indoor and Outdoor Camera Units Model: FOCUS360 The features described in this User's Guide are subject to modifications without prior notice.

User Guide
Page 2
...x Power adapter for the Indoor Camera Unit • 1 x Power adapter with all the information you with connector for your new Motorola Digital Video Monitor with this easy to confirm warranty status. to your records. For product related questions, please call: US and Canada 1-888-331-3383 Email: [email protected] This User's Guide provides you need to provide a copy of the digital video monitor by inserting it to work even if you can use system. If you have always wondered what happens when you fully charge the battery ...
...x Power adapter for the Indoor Camera Unit • 1 x Power adapter with all the information you with connector for your new Motorola Digital Video Monitor with this easy to confirm warranty status. to your records. For product related questions, please call: US and Canada 1-888-331-3383 Email: [email protected] This User's Guide provides you need to provide a copy of the digital video monitor by inserting it to work even if you can use system. If you have always wondered what happens when you fully charge the battery ...
User Guide
Page 3
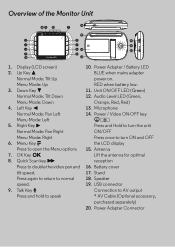
... return to speak * AV Cable (Optional accessory, purchased separately) 20. Unit ON/OFF LED (Green) Normal Mode: Tilt Down 12. OK Key O 8. Overview of the Monitor Unit 14 POWER 10 11 12 1 15 2 6 19 3 7 18 4 8 16 20 5 9 13 17 1. Menu Key M Press once to turn the unit Normal Mode: Pan Right...
... return to speak * AV Cable (Optional accessory, purchased separately) 20. Unit ON/OFF LED (Green) Normal Mode: Tilt Down 12. OK Key O 8. Overview of the Monitor Unit 14 POWER 10 11 12 1 15 2 6 19 3 7 18 4 8 16 20 5 9 13 17 1. Menu Key M Press once to turn the unit Normal Mode: Pan Right...
User Guide
Page 4
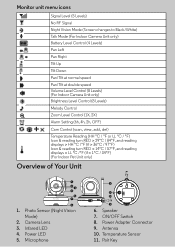
... Vision Mode) 2. Speaker 7. Antenna 10. Power LED 5. Microphone 9 11 10 8 6. Pair Key Infared LED 4. ON/OFF Switch 8. Temperature Sensor 11. Camera Lens 3. Power Adapter Connector 9. Monitor unit menu icons 1 Signal Level (5 Levels) No RF Signal Night Vision Mode (Screen changes to Black/White) T Talk Mode (For Indoor Camera Unit only) Battery...
... Vision Mode) 2. Speaker 7. Antenna 10. Power LED 5. Microphone 9 11 10 8 6. Pair Key Infared LED 4. ON/OFF Switch 8. Temperature Sensor 11. Camera Lens 3. Power Adapter Connector 9. Monitor unit menu icons 1 Signal Level (5 Levels) No RF Signal Night Vision Mode (Screen changes to Black/White) T Talk Mode (For Indoor Camera Unit only) Battery...
User Guide
Page 5
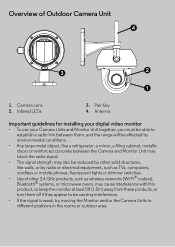
...or dimmer switches. • Use of Outdoor Camera Unit 1. Camera Lens 2. Antenna Important guidelines for installing your digital video monitor • To use your Camera Units and Monitor Unit together, you must be able to establish a radio link between them, and the range will be affected by environmental ...such as wireless networks (Wi-Fi® routers), Bluetooth® systems, or microwave ovens, may cause interference with this product, so keep the monitor at least 5ft (1.5m) away from these products, or turn them off if they appear to be causing interference. • If the signal...
...or dimmer switches. • Use of Outdoor Camera Unit 1. Camera Lens 2. Antenna Important guidelines for installing your digital video monitor • To use your Camera Units and Monitor Unit together, you must be able to establish a radio link between them, and the range will be affected by environmental ...such as wireless networks (Wi-Fi® routers), Bluetooth® systems, or microwave ovens, may cause interference with this product, so keep the monitor at least 5ft (1.5m) away from these products, or turn them off if they appear to be causing interference. • If the signal...
User Guide
Page 6
... (For Indoor Camera Unit only 19 4. Disposal of contents 1. Getting Started 12 2.1 Indoor Camera Unit Power Supply 12 2.2 Monitor Unit Battery Installation 12 2.3 Monitor Unit Power Supply 13 2.4 Outdoor Camera Unit Installation 14 2.4.1 Mounting the Outdoor Camera Unit 15 2.5 Registration (Pairing 17 2.6 View... Video Through TV 17 3. Monitor Unit Menu Options 20 4.1 Volume (For Indoor Camera Unit only 20 4.2 Brightness 20 4.3 Melody (For Indoor Camera Unit only ...
... (For Indoor Camera Unit only 19 4. Disposal of contents 1. Getting Started 12 2.1 Indoor Camera Unit Power Supply 12 2.2 Monitor Unit Battery Installation 12 2.3 Monitor Unit Power Supply 13 2.4 Outdoor Camera Unit Installation 14 2.4.1 Mounting the Outdoor Camera Unit 15 2.5 Registration (Pairing 17 2.6 View... Video Through TV 17 3. Monitor Unit Menu Options 20 4.1 Volume (For Indoor Camera Unit only 20 4.2 Brightness 20 4.3 Melody (For Indoor Camera Unit only ...

User Guide
Page 7
... voltage constituting a risk of electric shock is present within a crib or near a bed. Never place camera or cords within this unit is being used to monitor infants or children, keep this and all other electrical devices out of your pet is prone to the product. ENGLISH 1. DO NOT REMOVE COVERS. If...
... voltage constituting a risk of electric shock is present within a crib or near a bed. Never place camera or cords within this unit is being used to monitor infants or children, keep this and all other electrical devices out of your pet is prone to the product. ENGLISH 1. DO NOT REMOVE COVERS. If...
User Guide
Page 8
...; Only insert a battery pack of children and pet(s). • Do not cover the digital video monitor with a towel or blanket. • Never use extension cords with it . • This digital video monitor is not a substitute for responsible supervision and interaction. • Keep this User's Guide for future...• Do not touch the plug contacts with all its functions so that you are familiar with power adapters. WARNING This digital video monitor is compliant with sharp or metal objects. Keep small parts away from children and pet(s) when assembling. • This product is a ...
...; Only insert a battery pack of children and pet(s). • Do not cover the digital video monitor with a towel or blanket. • Never use extension cords with it . • This digital video monitor is not a substitute for responsible supervision and interaction. • Keep this User's Guide for future...• Do not touch the plug contacts with all its functions so that you are familiar with power adapters. WARNING This digital video monitor is compliant with sharp or metal objects. Keep small parts away from children and pet(s) when assembling. • This product is a ...
User Guide
Page 10
...: Maintain electrical safety. The openings should not be modified so as radiators, heat registers, stoves, or other similar surface. Do not use receivers or video monitors near or over a radiator or heat register. Use this camera equipment on the case are provided for example, near a swimming pool, etc. • Heat - An...
...: Maintain electrical safety. The openings should not be modified so as radiators, heat registers, stoves, or other similar surface. Do not use receivers or video monitors near or over a radiator or heat register. Use this camera equipment on the case are provided for example, near a swimming pool, etc. • Heat - An...
User Guide
Page 12
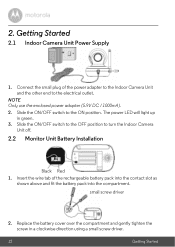
Slide the ON/OFF switch to turn the Indoor Camera Unit off. 2.2 Monitor Unit Battery Installation Black Red 1. Slide the ON/OFF switch to the OFF position to the ON position. Insert the wire tab of the power ...
Slide the ON/OFF switch to turn the Indoor Camera Unit off. 2.2 Monitor Unit Battery Installation Black Red 1. Slide the ON/OFF switch to the OFF position to the ON position. Insert the wire tab of the power ...
User Guide
Page 13
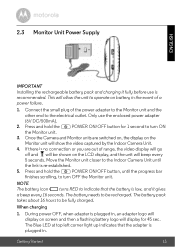
...is re-established. 5. NOTE The battery icon 0 turns RED to the Indoor Camera Unit until the progress bar finishes scrolling, to turn OFF the Monitor unit. During power OFF, when adapter is recommended. Connect the small plug of range, the video display will go off and will be shown on... the Monitor unit will beep every 5 seconds. The battery needs to be recharged. The battery pack takes about 16 hours to be fully charged. Getting Started...
...is re-established. 5. NOTE The battery icon 0 turns RED to the Indoor Camera Unit until the progress bar finishes scrolling, to turn OFF the Monitor unit. During power OFF, when adapter is recommended. Connect the small plug of range, the video display will go off and will be shown on... the Monitor unit will beep every 5 seconds. The battery needs to be recharged. The battery pack takes about 16 hours to be fully charged. Getting Started...
User Guide
Page 14
...122°F (-10°C~50°C). • Avoid installing the camera where there are thick walls or obstructions between the camera and the monitor unit. • Avoid installing in a location which requires the wireless signal to rain or snow. • Determine a location for submersion ... strong light source or direct sunlight. • Before starting permanent installation, verify the Camera Unit's performance by observing the image on a monitor when the Camera Unit is positioned in . 2.4 Outdoor Camera Unit Installation IMPORTANT • This product is not intended for the Camera Unit ...
...122°F (-10°C~50°C). • Avoid installing the camera where there are thick walls or obstructions between the camera and the monitor unit. • Avoid installing in a location which requires the wireless signal to rain or snow. • Determine a location for submersion ... strong light source or direct sunlight. • Before starting permanent installation, verify the Camera Unit's performance by observing the image on a monitor when the Camera Unit is positioned in . 2.4 Outdoor Camera Unit Installation IMPORTANT • This product is not intended for the Camera Unit ...
User Guide
Page 17
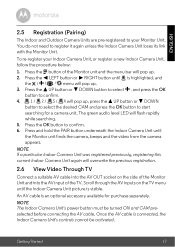
...will overwrite the previous registration. 2.6 View Video Through TV Connect a suitable AV cable into the AV OUT socket on the TV menu until the Monitor unit finds the camera, beeps and the video from the camera appears. ENGLISH 2.5 Registration (Pairing) The Indoor and Outdoor Camera Units are pre-...registered to your Indoor Camera Unit, or register a new Indoor Camera Unit, follow the procedure below: 1. To re-register your Monitor Unit. Press and hold the PAIR button underneath the Indoor Camera Unit until the Indoor Camera Unit picture is connected, the Indoor Camera Unit...
...will overwrite the previous registration. 2.6 View Video Through TV Connect a suitable AV cable into the AV OUT socket on the TV menu until the Monitor unit finds the camera, beeps and the video from the camera appears. ENGLISH 2.5 Registration (Pairing) The Indoor and Outdoor Camera Units are pre-...registered to your Indoor Camera Unit, or register a new Indoor Camera Unit, follow the procedure below: 1. To re-register your Monitor Unit. Press and hold the PAIR button underneath the Indoor Camera Unit until the Indoor Camera Unit picture is connected, the Indoor Camera Unit...

User Guide
Page 18
...; Mount the Outdoor Camera Unit on the wall under the shelter (recommended) and point the camera lens towards the area you want to monitor. • Adjust the Indoor Camera Unit's head angle by rotating the camera up clear images in black and white. Press the + UP button or - ... Indoor Camera Unit's loudspeaker. NOTE Do not place the Indoor Camera Unit within reach of ambient light, the LEDs will be remotely controlled from the Monitor unit. 1. When the built-in photo sensor detects a low level of a child or pet(s)! The T icon will automatically activate and the screen on the ...
...; Mount the Outdoor Camera Unit on the wall under the shelter (recommended) and point the camera lens towards the area you want to monitor. • Adjust the Indoor Camera Unit's head angle by rotating the camera up clear images in black and white. Press the + UP button or - ... Indoor Camera Unit's loudspeaker. NOTE Do not place the Indoor Camera Unit within reach of ambient light, the LEDs will be remotely controlled from the Monitor unit. 1. When the built-in photo sensor detects a low level of a child or pet(s)! The T icon will automatically activate and the screen on the ...
User Guide
Page 19
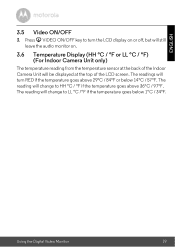
The reading will turn the LCD display on or off, but will still leave the audio monitor on. 3.6 Temperature Display (HH °C / °F or LL °C / °F) (For Indoor Camera Unit only) The temperature reading from the temperature sensor at the top ... below 14°C / 57°F. The reading will be displayed at the back of the LCD screen. ENGLISH 3.5 Video ON/OFF 3. Using the Digital Video Monitor 19 Press V VIDEO ON/OFF key to HH °C / °F if the temperature goes above 29°C / 84°F or below 1°C / 34°...
The reading will turn the LCD display on or off, but will still leave the audio monitor on. 3.6 Temperature Display (HH °C / °F or LL °C / °F) (For Indoor Camera Unit only) The temperature reading from the temperature sensor at the top ... below 14°C / 57°F. The reading will be displayed at the back of the LCD screen. ENGLISH 3.5 Video ON/OFF 3. Using the Digital Video Monitor 19 Press V VIDEO ON/OFF key to HH °C / °F if the temperature goes above 29°C / 84°F or below 1°C / 34°...
User Guide
Page 20
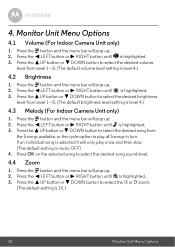
Monitor Unit Menu Options 4.1 Volume (For Indoor Camera Unit only) 1. Press the < LEFT button or > RIGHT button until Z is level 4.) 4.3 Melody (For Indoor Camera Unit only) 1. ... default setting is highlighted. 3. If an individual song is selected it will pop up . 2. Press the < LEFT button or > RIGHT button until is 1X.) 20 Monitor Unit Menu Options Press the M button and the menu bar will only play all 5 songs in turn. DOWN button to select the desired song from...
Monitor Unit Menu Options 4.1 Volume (For Indoor Camera Unit only) 1. Press the < LEFT button or > RIGHT button until Z is level 4.) 4.3 Melody (For Indoor Camera Unit only) 1. ... default setting is highlighted. 3. If an individual song is selected it will pop up . 2. Press the < LEFT button or > RIGHT button until is 1X.) 20 Monitor Unit Menu Options Press the M button and the menu bar will only play all 5 songs in turn. DOWN button to select the desired song from...
User Guide
Page 21
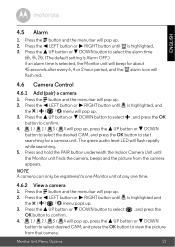
... / menu will pop up , press the + UP button or - DOWN button to select desired CAM, and press the OK button to one Monitor unit at any one time. 4.6.2 View a camera 1. Monitor Unit Menu Options 21 DOWN button to confirm. 4. 1 / 2 / 3 / 4 will flash red. 4.6 Camera Control 4.6.1 Add (pair)... a camera 1. Press the < LEFT button or > RIGHT button until the Monitor unit finds the camera, beeps and the picture from that camera. DOWN button to select the desired CAM, and press the OK button to confirm. 4. 1 / 2 / 3...
... / menu will pop up , press the + UP button or - DOWN button to select desired CAM, and press the OK button to one Monitor unit at any one time. 4.6.2 View a camera 1. Monitor Unit Menu Options 21 DOWN button to confirm. 4. 1 / 2 / 3 / 4 will flash red. 4.6 Camera Control 4.6.1 Add (pair)... a camera 1. Press the < LEFT button or > RIGHT button until the Monitor unit finds the camera, beeps and the picture from that camera. DOWN button to select the desired CAM, and press the OK button to confirm. 4. 1 / 2 / 3...
User Guide
Page 22
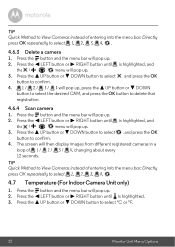
... is highlighted. 3. Press the + UP button or - DOWN button to select the desired CAM, and press the OK button to select °C or °F. 22 Monitor Unit Menu Options Press the + UP button or - DOWN button to delete that registration. 4.6.4 Scan camera 1. Press the < LEFT button or > RIGHT button until is...
... is highlighted. 3. Press the + UP button or - DOWN button to select the desired CAM, and press the OK button to select °C or °F. 22 Monitor Unit Menu Options Press the + UP button or - DOWN button to delete that registration. 4.6.4 Scan camera 1. Press the < LEFT button or > RIGHT button until is...
User Guide
Page 24
... cleaning agents or abrasive solvents. Cleaning and care • Do not clean any part of reliability for assistance. 24 Cleaning Cleaning Clean your Digital Video Monitor with a slightly damp cloth or with thinners or other solvents and chemicals -- contact Customer Service for your Digital Video... Monitor away from hot, humid areas or strong sunlight, and don't let it get wet. • Every effort has been made to repair it yourself -- this ...
... cleaning agents or abrasive solvents. Cleaning and care • Do not clean any part of reliability for assistance. 24 Cleaning Cleaning Clean your Digital Video Monitor with a slightly damp cloth or with thinners or other solvents and chemicals -- contact Customer Service for your Digital Video... Monitor away from hot, humid areas or strong sunlight, and don't let it get wet. • Every effort has been made to repair it yourself -- this ...
User Guide
Page 25
... screen by disconnecting them back in. • Is the unit turned on ? Registration If the Indoor/Outdoor Camera Unit has lost its link with the Monitor Unit • Try recharging or replacing the battery pack. • If the Indoor/Outdoor Camera Unit is still active and will go blank after 2 ...minutes to the Monitor Unit. • Reset the units by pressing any key. ENGLISH 7. The unit is too far away it ON. • Is the correct camera selected? ...
... screen by disconnecting them back in. • Is the unit turned on ? Registration If the Indoor/Outdoor Camera Unit has lost its link with the Monitor Unit • Try recharging or replacing the battery pack. • If the Indoor/Outdoor Camera Unit is still active and will go blank after 2 ...minutes to the Monitor Unit. • Reset the units by pressing any key. ENGLISH 7. The unit is too far away it ON. • Is the correct camera selected? ...