
User Manual
Page 1
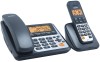
Before operating this set, please read these instructions carefully. USER GUIDE Concept Combo 3525 Twin Concept Combo 3525 Triple Binatone Helpline (for UK only) Monday to Friday from 9:00am to 5:00pm Tel: 0845 345 9677 **Please note that all calls are charged at local rate Or visit our website: www.binatonetelecom.com THE CORDLESS HANDSET IS NOT DESIGNED FOR MAKING EMERGENCY TELEPHONE CALLS WHEN THE POWER FAILS, BUT IF THERE IS A POWER FAILURE, YOU CAN STILL USE THE BASE AND THE CORDED HANDSET TO MAKE AN EMERGENCY CALL.
Before operating this set, please read these instructions carefully. USER GUIDE Concept Combo 3525 Twin Concept Combo 3525 Triple Binatone Helpline (for UK only) Monday to Friday from 9:00am to 5:00pm Tel: 0845 345 9677 **Please note that all calls are charged at local rate Or visit our website: www.binatonetelecom.com THE CORDLESS HANDSET IS NOT DESIGNED FOR MAKING EMERGENCY TELEPHONE CALLS WHEN THE POWER FAILS, BUT IF THERE IS A POWER FAILURE, YOU CAN STILL USE THE BASE AND THE CORDED HANDSET TO MAKE AN EMERGENCY CALL.

User Manual
Page 4
... 4.9.2 STORE A REDIAL NUMBER INTO THE PHONEBOOK 23 4.9.3 DELETE A REDIAL NUMBER 23 4.9.4 DELETE ALL REDIAL LIST ENTRIES 23 Using the corded base: 4.10 MAKE AN EXTERNAL CALL 24 4.10.1 PREPARATORY DIALLING 24 4.10.2 DIRECT DIALLING 24 4.10.3 CALL FROM THE PHONEBOOK 24 4.10.4 CALL FROM THE CALL LIST 24 4.10.5 CALL FROM THE REDIAL LIST 24 4.10.6 CALL TIMER 24 4.11 ANSWER A CALL 24 4.12 END A CALL 25 4.13 ADJUST EARPIECE AND HANDSFREE VOLUME 25 4.14 MUTE A CALL 25 4.15 EMERGENCY CALL WITHOUT MAINS POWER...
... 4.9.2 STORE A REDIAL NUMBER INTO THE PHONEBOOK 23 4.9.3 DELETE A REDIAL NUMBER 23 4.9.4 DELETE ALL REDIAL LIST ENTRIES 23 Using the corded base: 4.10 MAKE AN EXTERNAL CALL 24 4.10.1 PREPARATORY DIALLING 24 4.10.2 DIRECT DIALLING 24 4.10.3 CALL FROM THE PHONEBOOK 24 4.10.4 CALL FROM THE CALL LIST 24 4.10.5 CALL FROM THE REDIAL LIST 24 4.10.6 CALL TIMER 24 4.11 ANSWER A CALL 24 4.12 END A CALL 25 4.13 ADJUST EARPIECE AND HANDSFREE VOLUME 25 4.14 MUTE A CALL 25 4.15 EMERGENCY CALL WITHOUT MAINS POWER...

User Manual
Page 6
... PIN CODE 42 7.4.5 RESET YOUR PHONE 42 Using the corded base: 7.5 SET DATE AND TIME 43 7.6 DE-REGISTER A HANDSET 43 7.7 RINGER SETUP 44 7.7.1 CHANGE RINGER MELODY 44 7.7.2 CHANGE RINGER VOLUME 44 7.8 SET THE DIAL MODE 44 7.9 SET THE RECALL (FLASH) TIME 45 7.10 SET THE KEY TONE 45 7.11 SET THE BASE LANGUAGE 45 7.12 CHANGE THE SYSTEM PIN 45 7.13 BASE DEFAULT 46 8 REGISTRATION 47 9 ANSWERING MACHINE (TAM 48 Using a cordless handset: 9.1 TURN ON/OFF THE ANSWERING MACHINE 48 9.2 LISTEN TO THE MESSAGES IN THE ANSWERING MACHINE 49 9.3 DELETE ALL MESSAGES IN THE ANSWERING MACHINE 50...
... PIN CODE 42 7.4.5 RESET YOUR PHONE 42 Using the corded base: 7.5 SET DATE AND TIME 43 7.6 DE-REGISTER A HANDSET 43 7.7 RINGER SETUP 44 7.7.1 CHANGE RINGER MELODY 44 7.7.2 CHANGE RINGER VOLUME 44 7.8 SET THE DIAL MODE 44 7.9 SET THE RECALL (FLASH) TIME 45 7.10 SET THE KEY TONE 45 7.11 SET THE BASE LANGUAGE 45 7.12 CHANGE THE SYSTEM PIN 45 7.13 BASE DEFAULT 46 8 REGISTRATION 47 9 ANSWERING MACHINE (TAM 48 Using a cordless handset: 9.1 TURN ON/OFF THE ANSWERING MACHINE 48 9.2 LISTEN TO THE MESSAGES IN THE ANSWERING MACHINE 49 9.3 DELETE ALL MESSAGES IN THE ANSWERING MACHINE 50...

User Manual
Page 7
... 59 9.10.1 USING THE DIRECT KEY 59 9.10.2 USING THE MENU 60 9.11 INCOMING CALL MESSAGES (ICM 60 9.12 TAM SETTINGS 61 9.12.1 SET THE ANSWER DELAY 61 9.12.2 SET THE MAXIMUM RECORDING TIME FOR INCOMING MESSAGES 61 9.12.3 TURN ON OR OFF THE BASE SCREENING 61 9.12.4 ACTIVATE REMOTE ACCESS 61 9.12.5 CHANGE THE COMPRESSION RATE 62 REMOTE CARD 62 9.12.6 CHANGE THE 4-DIGIT REMOTE ACCESS PIN 63 9.12.7 RESET THE TAM TO DEFAULT SETTINGS 63 10 TROUBLESHOOTING 64 11...
... 59 9.10.1 USING THE DIRECT KEY 59 9.10.2 USING THE MENU 60 9.11 INCOMING CALL MESSAGES (ICM 60 9.12 TAM SETTINGS 61 9.12.1 SET THE ANSWER DELAY 61 9.12.2 SET THE MAXIMUM RECORDING TIME FOR INCOMING MESSAGES 61 9.12.3 TURN ON OR OFF THE BASE SCREENING 61 9.12.4 ACTIVATE REMOTE ACCESS 61 9.12.5 CHANGE THE COMPRESSION RATE 62 REMOTE CARD 62 9.12.6 CHANGE THE 4-DIGIT REMOTE ACCESS PIN 63 9.12.7 RESET THE TAM TO DEFAULT SETTINGS 63 10 TROUBLESHOOTING 64 11...

User Manual
Page 8
... the power supply cord or plug is not covered by following : 1) Read and understand all the instructions. 2) Follow all warnings and instructions marked on the product. 3) Unplug this product outdoors during a thunderstorm. The operation periods for damage arising from the telephone line and the mains socket when there are only applicable with the default battery capacities. 10) The use of other battery types or...
... the power supply cord or plug is not covered by following : 1) Read and understand all the instructions. 2) Follow all warnings and instructions marked on the product. 3) Unplug this product outdoors during a thunderstorm. The operation periods for damage arising from the telephone line and the mains socket when there are only applicable with the default battery capacities. 10) The use of other battery types or...

User Manual
Page 10
2 INSTALLING YOUR PHONE 2.1 Connecting the corded base station ① Use the coiled cord to connect the corded handset to . If you will not work without it. (If the mains power fails, calls can still be compatible. Warning: Use only the power adapter provided for normal operation, and the cordless handset will need more broadband (ADSL) micro-filters, contact your telephone line socket. Note: The base unit needs mains power for the base station. Warning: Always use the cables provided...
2 INSTALLING YOUR PHONE 2.1 Connecting the corded base station ① Use the coiled cord to connect the corded handset to . If you will not work without it. (If the mains power fails, calls can still be compatible. Warning: Use only the power adapter provided for normal operation, and the cordless handset will need more broadband (ADSL) micro-filters, contact your telephone line socket. Note: The base unit needs mains power for the base station. Warning: Always use the cables provided...
User Manual
Page 13
... hold to delete all the characters / digits During a call: Press to mute/ unmute the microphone In idle mode: Press to intercom another handset or base 7 OFF ( ) During a call: Press to end a call and go back to idle screen In menu / editing mode: Press to go back to previous menu In idle mode: Press and hold to power off the handset In idle mode (when the handset is powered off): Press and hold to power...
... hold to delete all the characters / digits During a call: Press to mute/ unmute the microphone In idle mode: Press to intercom another handset or base 7 OFF ( ) During a call: Press to end a call and go back to idle screen In menu / editing mode: Press to go back to previous menu In idle mode: Press and hold to power off the handset In idle mode (when the handset is powered off): Press and hold to power...

User Manual
Page 14
... Indicates more characters or numbers after those being displayed. Indicates that handset. Flashes when there is sounding. Flashes when the alarm is a new answering machine message. RIGHT SOFT KEY function. Flashes when there is in lists, above or below. (INT) RIGHT SOFT KEY function. Steady when the answering machine is detected. Indicates new call in range of the telephone. Flashes when low battery power level is turned on a charger. Press to access the main menu.
... Indicates more characters or numbers after those being displayed. Indicates that handset. Flashes when there is sounding. Flashes when the alarm is a new answering machine message. RIGHT SOFT KEY function. Flashes when there is in lists, above or below. (INT) RIGHT SOFT KEY function. Steady when the answering machine is detected. Indicates new call in range of the telephone. Flashes when low battery power level is turned on a charger. Press to access the main menu.

User Manual
Page 15
...?---- FLASH TIME List Entry. 3.3 Cordless Handset Menu Structure In idle mode, pressto go to CALL LIST, the first option in the menu list. RING SETUP TONE SETUP LANGUAGE RENAME HS HS DISPLAY AUTO ANSWER DATE & TIME MSG PLAYBACK DELETE ALL MEMO TAM ON/OFF TAM SETTINGS ANSWER MODE TAM LANGUAGE OGM SETTINGS ANSWER DELAY RECORD TIME REMOTE ACC. Press to go back to the previous level Refer to enter a sub-menu or function. COMPRESSION BS SCREENING CHANGE PIN 13 Key Press Main Menu CALL LIST PHONEBOOK BS SETTINGS...
...?---- FLASH TIME List Entry. 3.3 Cordless Handset Menu Structure In idle mode, pressto go to CALL LIST, the first option in the menu list. RING SETUP TONE SETUP LANGUAGE RENAME HS HS DISPLAY AUTO ANSWER DATE & TIME MSG PLAYBACK DELETE ALL MEMO TAM ON/OFF TAM SETTINGS ANSWER MODE TAM LANGUAGE OGM SETTINGS ANSWER DELAY RECORD TIME REMOTE ACC. Press to go back to the previous level Refer to enter a sub-menu or function. COMPRESSION BS SCREENING CHANGE PIN 13 Key Press Main Menu CALL LIST PHONEBOOK BS SETTINGS...
User Manual
Page 17
.... In Phonebook list / Redial list / Call List / Call Log: Press to access the Call List. During ringing: Press to idle screen. In menu mode: Press to scroll down the list. In editing mode: Press to move the cursor one character to clear a character / digit. During a call . 10 CLEAR/MUTE ( ) In main menu mode: Press to go back to access phonebook list. 9 TAM ON/OFF Indication On steady when the answering machine is a new message. In editing / predialling mode: Press to...
.... In Phonebook list / Redial list / Call List / Call Log: Press to access the Call List. During ringing: Press to idle screen. In menu mode: Press to scroll down the list. In editing mode: Press to move the cursor one character to clear a character / digit. During a call . 10 CLEAR/MUTE ( ) In main menu mode: Press to go back to access phonebook list. 9 TAM ON/OFF Indication On steady when the answering machine is a new message. In editing / predialling mode: Press to...

User Manual
Page 19
... the menu structure. DELETE? Shows the number and melody, and plays the melody. 17 MACHINE MSG PLAYBACK DELETE ALL MEMO TAM ON/OFF TAM SETTINGS The following for : ADD VIEW EDIT DELETE DELETE ALL PB STATUS CALL LOG MISSED RECEIVED DIALED DATE & TIME TIME FORMAT SETt CLOCK LANGUAGE ENGLISH DEUTSCH FRANCAIS ITALIANO TURKCE ESPANOL GREEK SVENSKA NORSK NEDERLANDS SETTINGS RING SETUP DELETE HS DIAL MODE FLASH TIME KEY TONE CHANGE PIN BS DEFAULT PAGE ALL HS REGISTRATION ANS. intercom numbers, immediately calls...
... the menu structure. DELETE? Shows the number and melody, and plays the melody. 17 MACHINE MSG PLAYBACK DELETE ALL MEMO TAM ON/OFF TAM SETTINGS The following for : ADD VIEW EDIT DELETE DELETE ALL PB STATUS CALL LOG MISSED RECEIVED DIALED DATE & TIME TIME FORMAT SETt CLOCK LANGUAGE ENGLISH DEUTSCH FRANCAIS ITALIANO TURKCE ESPANOL GREEK SVENSKA NORSK NEDERLANDS SETTINGS RING SETUP DELETE HS DIAL MODE FLASH TIME KEY TONE CHANGE PIN BS DEFAULT PAGE ALL HS REGISTRATION ANS. intercom numbers, immediately calls...

User Manual
Page 20
...the text with the keys to delete the last character. 4. You can be helpful when storing a name in the phonebook and renaming your handset. Press and hold to the next position after a short pause. 2. It is displayed to indicate the current...and Digit Entry The following tables show you where each letter and punctuation character can move to delete the entire text string. Using a cordless handset: 3.7.1 English Character Set Key Key press 1 2 3 4 5 6 7 8 9 0 Alphanumeric Editing Number Editing (For phonebook name editing and renaming handset) (For phone number editing, date/time ...
...the text with the keys to delete the last character. 4. You can be helpful when storing a name in the phonebook and renaming your handset. Press and hold to the next position after a short pause. 2. It is displayed to indicate the current...and Digit Entry The following tables show you where each letter and punctuation character can move to delete the entire text string. Using a cordless handset: 3.7.1 English Character Set Key Key press 1 2 3 4 5 6 7 8 9 0 Alphanumeric Editing Number Editing (For phonebook name editing and renaming handset) (For phone number editing, date/time ...
User Manual
Page 23
... redial number. 4.1.6 Call timer Your handset automatically times the duration of the call . Press to the line and then enter the phone number. (Note: if you enter a wrong digit you answer a call or 15 seconds after dialling and remains on the charging cradle: When the phone rings, press to answer a call automatically, and no buttons need to select the desired Call List entry. When entering the number, if you make a mistake, press to delete digits. 4.1.2 Direct...
... redial number. 4.1.6 Call timer Your handset automatically times the duration of the call . Press to the line and then enter the phone number. (Note: if you enter a wrong digit you answer a call or 15 seconds after dialling and remains on the charging cradle: When the phone rings, press to answer a call automatically, and no buttons need to select the desired Call List entry. When entering the number, if you make a mistake, press to delete digits. 4.1.2 Direct...
User Manual
Page 24
... CALL or the Caller Display number, when there is ringing. In idle, press and hold again. 22 Note: You can lock the keypad so that it cannot be used accidentally while carrying it around. During a call when the handset is an incoming call : Press to mute the microphone and "MUTED" will display on the LCD. The current setting is displayed on the Keypad Lock You can still use . 4.5 Adjust Volume...
... CALL or the Caller Display number, when there is ringing. In idle, press and hold again. 22 Note: You can lock the keypad so that it cannot be used accidentally while carrying it around. During a call when the handset is an incoming call : Press to mute the microphone and "MUTED" will display on the LCD. The current setting is displayed on the Keypad Lock You can still use . 4.5 Adjust Volume...

User Manual
Page 27
... "MUTED " is displayed on the display, and the caller will remain at the last selected level. 4.14 Mute a Call You can talk to someone nearby without Mains Power The corded base unit can also answer an incoming call in handsfree mode. 4.13 Adjust Earpiece and Handsfree Volume There are 5 levels (VOLUME 1 to VOLUME 5) to choose from memories or use the speakerphone when the mains power is off . "MUTED" will be replaced by "LINE IN USE" on the display...
... "MUTED " is displayed on the display, and the caller will remain at the last selected level. 4.14 Mute a Call You can talk to someone nearby without Mains Power The corded base unit can also answer an incoming call in handsfree mode. 4.13 Adjust Earpiece and Handsfree Volume There are 5 levels (VOLUME 1 to VOLUME 5) to choose from memories or use the speakerphone when the mains power is off . "MUTED" will be replaced by "LINE IN USE" on the display...

User Manual
Page 50
... new ones can be able to leave you a message. Using a cordless handset: 9.1 Turn On/Off the Answering Machine You can turn the answering machine on or off using the handset. They will not display on the handset LCD. ¾ If the answering machine is set answer delay and the caller can then leave you a message. Press to confirm. ¾ If the answering machine is set to your callers. The answering machine can store up to 59 messages within the maximum recording time...
... new ones can be able to leave you a message. Using a cordless handset: 9.1 Turn On/Off the Answering Machine You can turn the answering machine on or off using the handset. They will not display on the handset LCD. ¾ If the answering machine is set answer delay and the caller can then leave you a message. Press to confirm. ¾ If the answering machine is set to your callers. The answering machine can store up to 59 messages within the maximum recording time...
User Manual
Page 55
Press and to confirm the setting. 53 The call can be screened at the base. 9.5.7.1 Screening at the base By default, answering machine calls are played automatically through the base speaker and the volume can be turned off. 1. Press to select your desired recording time from the available options 60S, 120S, 180S or UNLIMITED. (The current selection is on the base. Press and to select ANS. Press and...
Press and to confirm the setting. 53 The call can be screened at the base. 9.5.7.1 Screening at the base By default, answering machine calls are played automatically through the base speaker and the volume can be turned off. 1. Press to select your desired recording time from the available options 60S, 120S, 180S or UNLIMITED. (The current selection is on the base. Press and to select ANS. Press and...

User Manual
Page 56
... to confirm. 9.5.9 Remote Access Your phone lets you check your messages, or otherwise operate your answering machine. Press to show PIN?----, then enter the Old PIN. (Default Remote Access PIN is 0000). 5. The 4-digit remote access PIN code is not the same as the new PIN entered in Step 6 is used to prevent other people from a tonedialling phone. Press and to use this feature, see 9.5.9.2. 9.5.9.1 Change the 4-Digit Remote Access PIN 1. MACHINE. 2. Press and to...
... to confirm. 9.5.9 Remote Access Your phone lets you check your messages, or otherwise operate your answering machine. Press to show PIN?----, then enter the Old PIN. (Default Remote Access PIN is 0000). 5. The 4-digit remote access PIN code is not the same as the new PIN entered in Step 6 is used to prevent other people from a tonedialling phone. Press and to use this feature, see 9.5.9.2. 9.5.9.1 Change the 4-Digit Remote Access PIN 1. MACHINE. 2. Press and to...

User Manual
Page 64
... recording incoming message. Press to confirm. 9.12.5 Change the Compression Rate Three different compression rates (HIGH, MEDIUM and LOW) are provided for you to select different quality levels of how to select ANS. MACHINE. 2. Press and to confirm. Press to select TAM SETTING. 3. CC3525 system Remote operation 1 Using a tone-dialling phone, dial your home number 2 While your outgoing message is switched off the remote access respectively. 5. Press and to set a new code...
... recording incoming message. Press to confirm. 9.12.5 Change the Compression Rate Three different compression rates (HIGH, MEDIUM and LOW) are provided for you to select different quality levels of how to select ANS. MACHINE. 2. Press and to confirm. Press to select TAM SETTING. 3. CC3525 system Remote operation 1 Using a tone-dialling phone, dial your home number 2 While your outgoing message is switched off the remote access respectively. 5. Press and to set a new code...

User Manual
Page 66
... wrong remote access code. You are using the base to make a call . d. d. Answer the incoming call and try to make a call , the fault may be on cordless handset. Try making a call now works, the adapter may be faulty. If the call . Answering Machine The unit does not record new messages. The connection cord of the functions may be limited when used in the mains. The adapter cord is turned off . c. Wait until the line is not activated. Use the original line cord supplied. Connect base station to a PBX...
... wrong remote access code. You are using the base to make a call . d. d. Answer the incoming call and try to make a call , the fault may be on cordless handset. Try making a call now works, the adapter may be faulty. If the call . Answering Machine The unit does not record new messages. The connection cord of the functions may be limited when used in the mains. The adapter cord is turned off . c. Wait until the line is not activated. Use the original line cord supplied. Connect base station to a PBX...


