

Instruction Manual
Page 2
...to break. 12. Appliance (220V - 240V) is marked on a doubleinsulated product nor should a means for its intended use ." "IMPORTANT SAFETY INSTRUCTIONS" When using the sewing machine, basic safety precautions should always be identical to those parts in the product. This sewing machine is not... intended for a double-insulated product must be followed, including the following: "Read all moving parts. Replacement parts for use this manual. Always unplug before cleaning. 2. The sewing machine should never be done by young children or infirm persons without supervision....
...to break. 12. Appliance (220V - 240V) is marked on a doubleinsulated product nor should a means for its intended use ." "IMPORTANT SAFETY INSTRUCTIONS" When using the sewing machine, basic safety precautions should always be identical to those parts in the product. This sewing machine is not... intended for a double-insulated product must be followed, including the following: "Read all moving parts. Replacement parts for use this manual. Always unplug before cleaning. 2. The sewing machine should never be done by young children or infirm persons without supervision....
Instruction Manual
Page 5
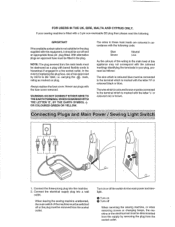
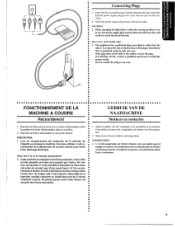
... servicing the sewing machine, or when removing covers or changing lamps, the machine or the electrical set must be removed from the socket outlet. Never use a fuse approved by removing the plug from the supply by ASTA to the terminal which is fitted with a 3 pin non-rewireable BS plug then ...please read the following code: Blue Brown Neutral Live As the colours of the wiring in the main lead of replacing the plug fuse, use plugs with the following . Connect the electrical supply plug into the machine. 2. The wires in these main leads are coloured in accordance with the ...
... servicing the sewing machine, or when removing covers or changing lamps, the machine or the electrical set must be removed from the socket outlet. Never use a fuse approved by removing the plug from the supply by ASTA to the terminal which is fitted with a 3 pin non-rewireable BS plug then ...please read the following code: Blue Brown Neutral Live As the colours of the wiring in the main lead of replacing the plug fuse, use plugs with the following . Connect the electrical supply plug into the machine. 2. The wires in these main leads are coloured in accordance with the ...

Instruction Manual
Page 6
...Performance Checklist 70 Repacking the machine 76 Straight Stitching 41 Zigzag Stitching 44 Blindhem Stitching 45 Shell hem Stitching 46 3-Step Zigzag Stitching 47 . USING ATTACHMENTS AND APPLICATIONS · . PRINCIPAL PARTS 1 ACCESSORIES 3 OPERATING YOUR SEWING MACHINE 6 Connecting Plugs 6 Main Power and Sewing Light Switches 7...Lever 27 Drop Feed Lever 27 THREADING THE MACHINE 28 Winding the Bobbin 28 Lower Threading 29 Upper (Needle) Threading 30 Using the Needle Threader (75 only 32 Quick Thread-setting System FAST START BOBBIN (75 only 34 Drawing Up Lower Thread (...
...Performance Checklist 70 Repacking the machine 76 Straight Stitching 41 Zigzag Stitching 44 Blindhem Stitching 45 Shell hem Stitching 46 3-Step Zigzag Stitching 47 . USING ATTACHMENTS AND APPLICATIONS · . PRINCIPAL PARTS 1 ACCESSORIES 3 OPERATING YOUR SEWING MACHINE 6 Connecting Plugs 6 Main Power and Sewing Light Switches 7...Lever 27 Drop Feed Lever 27 THREADING THE MACHINE 28 Winding the Bobbin 28 Lower Threading 29 Upper (Needle) Threading 30 Using the Needle Threader (75 only 32 Quick Thread-setting System FAST START BOBBIN (75 only 34 Drawing Up Lower Thread (...
Instruction Manual
Page 9
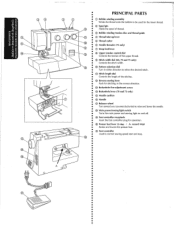
• • • PRINCIPAl PARTS • (j) Bobbin winding assembly • • Winds the thread onto the bobbin to be used for the lower thread. • ®Spool pin • • Holds the spool of thread. • ® Bobbin winding tension disc and thread guide @ Thread .... (@ Foot controller receptacle Insert the foot controller plug for operation. ® Presser foot lever (2-step I A: second step) Raises and lowers the presser foot. @ Foot controller Used to control sewing speed start and stop . .,
• • • PRINCIPAl PARTS • (j) Bobbin winding assembly • • Winds the thread onto the bobbin to be used for the lower thread. • ®Spool pin • • Holds the spool of thread. • ® Bobbin winding tension disc and thread guide @ Thread .... (@ Foot controller receptacle Insert the foot controller plug for operation. ® Presser foot lever (2-step I A: second step) Raises and lowers the presser foot. @ Foot controller Used to control sewing speed start and stop . .,
Instruction Manual
Page 14
...•N•DE•E Raccordement ••• 1. Ne jamais passer outre cette mesure de • securite des fiches polarisees. Steck nude (stroom) stekker in use, the power supply plug must be disconnected from the walt • socket to install the • proper outlet• •• Do not modify the...
...•N•DE•E Raccordement ••• 1. Ne jamais passer outre cette mesure de • securite des fiches polarisees. Steck nude (stroom) stekker in use, the power supply plug must be disconnected from the walt • socket to install the • proper outlet• •• Do not modify the...
Instruction Manual
Page 15
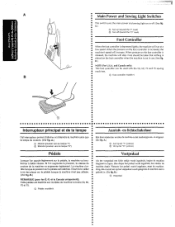
A Main Power and Sewing Light Switches This switch turns the main power and sewing light on (toward the "0" mark) Foot Controller When the foot controller is depressed lightly, the ma mark) ® Turn off . (See fig. A.) (j) Turn on ·or off (toward the"!"
A Main Power and Sewing Light Switches This switch turns the main power and sewing light on (toward the "0" mark) Foot Controller When the foot controller is depressed lightly, the ma mark) ® Turn off . (See fig. A.) (j) Turn on ·or off (toward the"!"

Instruction Manual
Page 16
If a needle is already installed, remove it is bent, place the flat side of the needle down . {See fig. A.) 5. To check if the needle is bent or dull. Retirer l'aiguille eventuel!ement presente en dSyissant Ia fixation • Hoofdschakelaar op "0" zetten. 1. Resserrer Ia fixation. X •• Pour mettre l'aiguille en place De naald erin doen ••• Mettre l'interrupt~ur principal sur "0". •• 1. Haal de ste~ker uit het stopcontact. 2. lijk in de hoogste positie. 3. lower the presser foot 4. The sewing needle must ...
If a needle is already installed, remove it is bent, place the flat side of the needle down . {See fig. A.) 5. To check if the needle is bent or dull. Retirer l'aiguille eventuel!ement presente en dSyissant Ia fixation • Hoofdschakelaar op "0" zetten. 1. Resserrer Ia fixation. X •• Pour mettre l'aiguille en place De naald erin doen ••• Mettre l'interrupt~ur principal sur "0". •• 1. Haal de ste~ker uit het stopcontact. 2. lijk in de hoogste positie. 3. lower the presser foot 4. The sewing needle must ...

Instruction Manual
Page 33
... "B" kan worden genaaid. B.) Q) Maakt fijne steken ® Standaardpositie ® Maal Indien er gebruik wordt gemaakt van verschillende stoffen of draad of fabric or thread are used or the pattern does not have the correct shape, turn the B • stitch length dial out of naar "-"om de steek in - A.) Instellen van de...
... "B" kan worden genaaid. B.) Q) Maakt fijne steken ® Standaardpositie ® Maal Indien er gebruik wordt gemaakt van verschillende stoffen of draad of fabric or thread are used or the pattern does not have the correct shape, turn the B • stitch length dial out of naar "-"om de steek in - A.) Instellen van de...

Instruction Manual
Page 40
Using the Needle Threader (75 only) Turn power switch to "0". 1. Lower the presser foot.lever. 2. Turn the balance wheel toward you {counterclockwise) until the bottom of th~ needle holder aligns with the bottom of the needlethreading-hook holder.
Using the Needle Threader (75 only) Turn power switch to "0". 1. Lower the presser foot.lever. 2. Turn the balance wheel toward you {counterclockwise) until the bottom of th~ needle holder aligns with the bottom of the needlethreading-hook holder.
Instruction Manual
Page 45
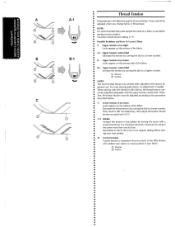
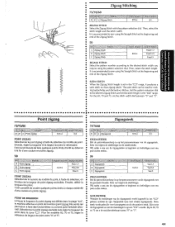
B-1 - The.basic thread tension setting is too tight. lt may need to a lower number. locks appear on your stitches. A~1 Upper tension cOntrol dial Decrease the tension by turning the dial to a higher number. Possible Problems and How To Correct Them A Upper tension is "5". B~1 Upper tension control dial Increase the tension by turning the dial to be made on a fabric scrap before sewing on the surface of the fabric . NOTE: It is too loose. 1 locks appear on the reverse side of your project. B Upper tension is recommended that a test sample be adjusted...
B-1 - The.basic thread tension setting is too tight. lt may need to a lower number. locks appear on your stitches. A~1 Upper tension cOntrol dial Decrease the tension by turning the dial to a higher number. Possible Problems and How To Correct Them A Upper tension is "5". B~1 Upper tension control dial Increase the tension by turning the dial to be made on a fabric scrap before sewing on the surface of the fabric . NOTE: It is too loose. 1 locks appear on the reverse side of your project. B Upper tension is recommended that a test sample be adjusted...

Instruction Manual
Page 47
Use the same size thread for the upper (spool) and lower {bobbin) threads. #90/14 Cotton-Wrapped Polyester TABLEAU DES COMBINAISONS TISSUIAIGUILLE/FIL TRICOTS Tricot simple, ...
Use the same size thread for the upper (spool) and lower {bobbin) threads. #90/14 Cotton-Wrapped Polyester TABLEAU DES COMBINAISONS TISSUIAIGUILLE/FIL TRICOTS Tricot simple, ...
Instruction Manual
Page 49
Backtacking Reverse sti'tching is used to Straight Stitch or ,Triple Straight for the type of the stitch . 6. Remonter comph3tement !'aiguille et re!ev€r !e levier du pied-de-biche. 3. nere. ...
Backtacking Reverse sti'tching is used to Straight Stitch or ,Triple Straight for the type of the stitch . 6. Remonter comph3tement !'aiguille et re!ev€r !e levier du pied-de-biche. 3. nere. ...
Instruction Manual
Page 50
... stop de machine. 2. Raise the presser foot and turn the fabric to stitch backward over the stitch for 1 em (3/811} from its new direcH tion using the needle as a turning point. 3. B) 1. A) L Stop de machine op het punt waar u van naairichting wilt veranderen . Naaien beCindigen (fig. Naai ongeveer 1 em achteruit...
... stop de machine. 2. Raise the presser foot and turn the fabric to stitch backward over the stitch for 1 em (3/811} from its new direcH tion using the needle as a turning point. 3. B) 1. A) L Stop de machine op het punt waar u van naairichting wilt veranderen . Naaien beCindigen (fig. Naai ongeveer 1 em achteruit...
Instruction Manual
Page 51
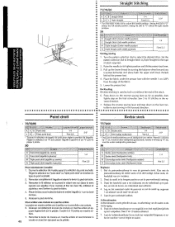
Raise the needle to the left side of the machine . •• lift the presser foot and pull the fabric out gently to its highest position and make sure that the thread take-up lever is also in its highest position. 3. Stop the machine. 2. To prepare the machine for the next seam, puf! about 10 em (4'~) of thread through the toes of the presser foot toward the back of the face plate. 5. Removing the Material From the Machine 1. Cut both threads with the thread cutter located on the left side. 4.
Raise the needle to the left side of the machine . •• lift the presser foot and pull the fabric out gently to its highest position and make sure that the thread take-up lever is also in its highest position. 3. Stop the machine. 2. To prepare the machine for the next seam, puf! about 10 em (4'~) of thread through the toes of the presser foot toward the back of the face plate. 5. Removing the Material From the Machine 1. Cut both threads with the thread cutter located on the left side. 4.
Instruction Manual
Page 52
... aan om de zigzagsteken te beginnen en beeindigen met een paar rechte steken . ratif. Set the pattern selection dial •• to sew using the Straight Stitch at the beginning and • end of the Zigzag Stitch. • 50 ZIGZAG STITCH •• Select the pattern number...fantaisie dBco- SB!ectionner !e point zigzag souhaite puis n§gler Ia longueur de point dans Ia zone "CJ". The satin stitch can be used for mak- • ing buttonholes and decorative stitches. Satijnsteek (een zeer smalle zigzagsteek). P•o•in•t•z•i•g•za&#...
... aan om de zigzagsteken te beginnen en beeindigen met een paar rechte steken . ratif. Set the pattern selection dial •• to sew using the Straight Stitch at the beginning and • end of the Zigzag Stitch. • 50 ZIGZAG STITCH •• Select the pattern number...fantaisie dBco- SB!ectionner !e point zigzag souhaite puis n§gler Ia longueur de point dans Ia zone "CJ". The satin stitch can be used for mak- • ing buttonholes and decorative stitches. Satijnsteek (een zeer smalle zigzagsteek). P•o•in•t•z•i•g•za&#...
Instruction Manual
Page 53
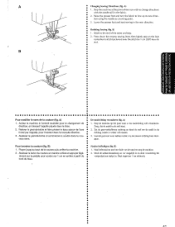
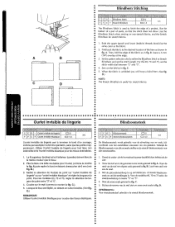
...ourlet, (com me le montre stof. 2. B.) aan de rand. 3. C. 4. Coudre sur le rep!i (comme le montre Ia fig. When the fabric is useful for stretch fabrics . 1. D.) NOTE: c D The Stretch Blindhem is unfolded You will hav:e a blind hem. (See fig. De blindzoomsteek wordt gebruikt voor de...l'ourlet d'un pantalon, sans que les points n'ap~ paraissent. A B o The Blindhem Stitch is used to finish the edge of a project, like the bottom of a pair of stretch blindzoom- Use the Blindhem Stitch when sewing on obtient un ourlet invisible. (Voir fig. Fold back the fabric to ...
...ourlet, (com me le montre stof. 2. B.) aan de rand. 3. C. 4. Coudre sur le rep!i (comme le montre Ia fig. When the fabric is useful for stretch fabrics . 1. D.) NOTE: c D The Stretch Blindhem is unfolded You will hav:e a blind hem. (See fig. De blindzoomsteek wordt gebruikt voor de...l'ourlet d'un pantalon, sans que les points n'ap~ paraissent. A B o The Blindhem Stitch is used to finish the edge of a project, like the bottom of a pair of stretch blindzoom- Use the Blindhem Stitch when sewing on obtient un ourlet invisible. (Voir fig. Fold back the fabric to ...
Instruction Manual
Page 56
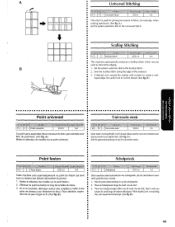
... scissors to the Universal Stitch. • • • • • This machine automatically produces a Scallop Stitch which may be used for joining two pieces of the material. 3. B • • This stitch is used as decorative edging . 1. Si on le souhaite, d9couper autour des coquilles !'aide d'une paire de ciseaux pour festonner le...
... scissors to the Universal Stitch. • • • • • This machine automatically produces a Scallop Stitch which may be used for joining two pieces of the material. 3. B • • This stitch is used as decorative edging . 1. Si on le souhaite, d9couper autour des coquilles !'aide d'une paire de ciseaux pour festonner le...
Instruction Manual
Page 58
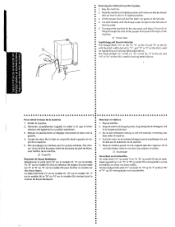
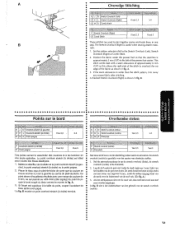
...seam allowance is wider than the stitch pattern, trim away • any excess fabric after stitching. • A finished Stretch Overlock (Right) is useful when sewing stretch mate- • rials . •• 1. De steek komt bet beste tot zijn recht met een zoom van ongeveer ~... le montre Ia fig. A. a 3. B ziet u bet eindresultaat van he~ gebruik van de stretch overlock (rechts) . ~0 • A These stitches are used to the Stretch Overlock (Left), Stretch • Overlock {Right) or Comb Stitch. • 2. The Stretch Overlock (Right) is shown in fig. Set the ...
...seam allowance is wider than the stitch pattern, trim away • any excess fabric after stitching. • A finished Stretch Overlock (Right) is useful when sewing stretch mate- • rials . •• 1. De steek komt bet beste tot zijn recht met een zoom van ongeveer ~... le montre Ia fig. A. a 3. B ziet u bet eindresultaat van he~ gebruik van de stretch overlock (rechts) . ~0 • A These stitches are used to the Stretch Overlock (Left), Stretch • Overlock {Right) or Comb Stitch. • 2. The Stretch Overlock (Right) is shown in fig. Set the ...
Instruction Manual
Page 59
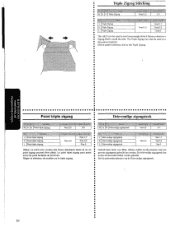
... waar een gewone zigzagsteek gebruikt kan worden. Set the pattern selection dial to sew heavyweight stretch fabrics wherever a Zigzag Stitch would be used. Utiliser ce point pour coudre des tissus erastiques epais ra oU un • point zigzag pourrait Stre utilise. De dtievoudige zigzagsteek kan... tevens als decoratief stiksel worden gebn.iikt. Stel de patroonkeuzeknop in op de Dricvoudige zigzagsteek. 51 The Triple Zigzag can be used to the Triple Zigzag . Le point triple zigzag peut aussi • servir de point fantaisie de brochure R9gler le s61ecteur de modele...
... waar een gewone zigzagsteek gebruikt kan worden. Set the pattern selection dial to sew heavyweight stretch fabrics wherever a Zigzag Stitch would be used. Utiliser ce point pour coudre des tissus erastiques epais ra oU un • point zigzag pourrait Stre utilise. De dtievoudige zigzagsteek kan... tevens als decoratief stiksel worden gebn.iikt. Stel de patroonkeuzeknop in op de Dricvoudige zigzagsteek. 51 The Triple Zigzag can be used to the Triple Zigzag . Le point triple zigzag peut aussi • servir de point fantaisie de brochure R9gler le s61ecteur de modele...
Instruction Manual
Page 60
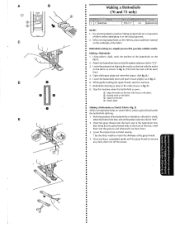
... the pattern selection dial to the front of fabric before attempting it back slightly as shown in fig. Buttonhole~making a buttonhole on the actual garment. 2. Using tailor's chalk, mark the position of the fabric. While gently holding the upper thread, start sewing. • * Set the stitch width to practice making is...
... the pattern selection dial to the front of fabric before attempting it back slightly as shown in fig. Buttonhole~making a buttonhole on the actual garment. 2. Using tailor's chalk, mark the position of the fabric. While gently holding the upper thread, start sewing. • * Set the stitch width to practice making is...

