

Instruction Manual
Page 2
Use this sewing machine only for its intended use ." Never operate this sewing machine if it has a damaged cord or plug, if it is intended for household use as contained in . Never drop or insert any object into water. Always use a bent needle. 13. Do not pull or push the fabric while stitching. Servicing double-insulated products (220V - 240V) In a double-insulated product, two systems of insulation are being administered. 8. Servicing a double-insulated product requires extreme care and knowledge of the system and should never be left unattended when plugged in...
Use this sewing machine only for its intended use ." Never operate this sewing machine if it has a damaged cord or plug, if it is intended for household use as contained in . Never drop or insert any object into water. Always use a bent needle. 13. Do not pull or push the fabric while stitching. Servicing double-insulated products (220V - 240V) In a double-insulated product, two systems of insulation are being administered. 8. Servicing a double-insulated product requires extreme care and knowledge of the system and should never be left unattended when plugged in...
Instruction Manual
Page 5
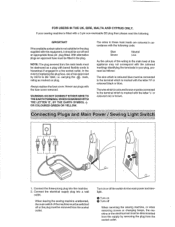
IMPORTANT If the available socket outlet is not suitable for the main power and sewlight. 0 Turn on plug. In the event of this equipment, it should be connected ·to BS 1362, i.e. Never use a fuse approved by removing the plug from the socket outlet. OR COLOURED GREEN OR YELLOW. - Connect the three-prong plug into a wall outlet. The wire which is marked with the fuse cover removed. FOR USERS IN THE UK, EIRE, MALTA AND CYPRUS ONLV. Always replace the fuse cover. WARNING: DO NOT CONNECT EITHER WIRE TO THE EARTH TERMINAL WHICH IS MARKED WITH THE LETTER 'E', ...
IMPORTANT If the available socket outlet is not suitable for the main power and sewlight. 0 Turn on plug. In the event of this equipment, it should be connected ·to BS 1362, i.e. Never use a fuse approved by removing the plug from the socket outlet. OR COLOURED GREEN OR YELLOW. - Connect the three-prong plug into a wall outlet. The wire which is marked with the fuse cover removed. FOR USERS IN THE UK, EIRE, MALTA AND CYPRUS ONLV. Always replace the fuse cover. WARNING: DO NOT CONNECT EITHER WIRE TO THE EARTH TERMINAL WHICH IS MARKED WITH THE LETTER 'E', ...

Instruction Manual
Page 6
Universal Stitching 48 Scallop Stitching 48 Patchworking 49 Overedge Stitching 50 Triple Zigzag Stitching 51 Zipper Inserting 61 Gathering 61 Darning 63 Appliques 64 Monogrammingand Embroidering 65 . . . MAINTENANCE . ·. : -' Changing the Bulb 67 Oiling 68 Cleaning 69 Performance Checklist 70 Repacking the machine 76 Straight Stitching 41 Zigzag Stitching 44 Blindhem Stitching 45 Shell hem Stitching 46 3-Step Zigzag Stitching 47 . USING ATTACHMENTS AND APPLICATIONS · . " . . . PRINCIPAL PARTS 1 ACCESSORIES 3 OPERATING YOUR SEWING ...
Universal Stitching 48 Scallop Stitching 48 Patchworking 49 Overedge Stitching 50 Triple Zigzag Stitching 51 Zipper Inserting 61 Gathering 61 Darning 63 Appliques 64 Monogrammingand Embroidering 65 . . . MAINTENANCE . ·. : -' Changing the Bulb 67 Oiling 68 Cleaning 69 Performance Checklist 70 Repacking the machine 76 Straight Stitching 41 Zigzag Stitching 44 Blindhem Stitching 45 Shell hem Stitching 46 3-Step Zigzag Stitching 47 . USING ATTACHMENTS AND APPLICATIONS · . " . . . PRINCIPAL PARTS 1 ACCESSORIES 3 OPERATING YOUR SEWING ...
Instruction Manual
Page 9
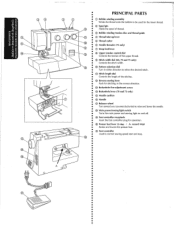
• • • PRINCIPAl PARTS • (j) Bobbin winding assembly • • Winds the thread onto the bobbin to be used for the lower thread. • ®Spool pin • • Holds the spool of thread. • ® Bobbin winding tension disc and thread guide @ Thread take-up lever ® Thread cutter ® Needle threader (75 only) IJ) Drop feed lever ® Upper tension control dial Controls the tension of the upper thread. ® Stitch width dial (60, 70 and 75 only) Controls the stitch width. (@ Pattern selection dial Turn in either direction to ...
• • • PRINCIPAl PARTS • (j) Bobbin winding assembly • • Winds the thread onto the bobbin to be used for the lower thread. • ®Spool pin • • Holds the spool of thread. • ® Bobbin winding tension disc and thread guide @ Thread take-up lever ® Thread cutter ® Needle threader (75 only) IJ) Drop feed lever ® Upper tension control dial Controls the tension of the upper thread. ® Stitch width dial (60, 70 and 75 only) Controls the stitch width. (@ Pattern selection dial Turn in either direction to ...
Instruction Manual
Page 14
and Canada only) • 2. Ne jamais passer outre cette mesure de • securite des fiches polarisees. Steck nude (stroom) stekker in de machine. When changing the light bulb or when the sewing machine is wider than the • other). Si malgre cela, il est toujours impossible de Ia •• brancher, veuillez contacter un etectricien pour qu'il vienne • remplacer Ia prise. U wordt aangeraden o~ bij bet wisselen van een naald~ spoel of lampje of electric shock, this plug is intended to •• fit in a polarized outlet in only one blade is not •&#...
and Canada only) • 2. Ne jamais passer outre cette mesure de • securite des fiches polarisees. Steck nude (stroom) stekker in de machine. When changing the light bulb or when the sewing machine is wider than the • other). Si malgre cela, il est toujours impossible de Ia •• brancher, veuillez contacter un etectricien pour qu'il vienne • remplacer Ia prise. U wordt aangeraden o~ bij bet wisselen van een naald~ spoel of lampje of electric shock, this plug is intended to •• fit in a polarized outlet in only one blade is not •&#...
Instruction Manual
Page 15
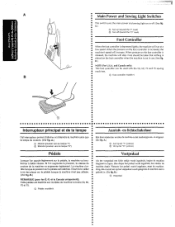
A.) (j) Turn on ·or off (toward the"!" mark) ® Turn off . (See fig. A Main Power and Sewing Light Switches This switch turns the main power and sewing light on (toward the "0" mark) Foot Controller When the foot controller is depressed lightly, the ma
A.) (j) Turn on ·or off (toward the"!" mark) ® Turn off . (See fig. A Main Power and Sewing Light Switches This switch turns the main power and sewing light on (toward the "0" mark) Foot Controller When the foot controller is depressed lightly, the ma

Instruction Manual
Page 16
A.) 5. The sewing needle must always be straight and sharp for smooth sewing. 0 ':-": ",-. .:'' , 1 2. A.) 5. Remove the power supply plug from the electrical outlet. 2. With the flat side toward the back, insert the new needle as far as shown in the illustration. (See fig. CD Coin Checking the Needle 8 • 1. To check if the needle is bent or dull. X •• Pour mettre l'aiguille en place De naald erin doen ••• Mettre l'interrupt~ur principal sur "0". •• 1. Zet de naaldhouder in tot hij tegen de naaldstopper aankomt ...
A.) 5. The sewing needle must always be straight and sharp for smooth sewing. 0 ':-": ",-. .:'' , 1 2. A.) 5. Remove the power supply plug from the electrical outlet. 2. With the flat side toward the back, insert the new needle as far as shown in the illustration. (See fig. CD Coin Checking the Needle 8 • 1. To check if the needle is bent or dull. X •• Pour mettre l'aiguille en place De naald erin doen ••• Mettre l'interrupt~ur principal sur "0". •• 1. Zet de naaldhouder in tot hij tegen de naaldstopper aankomt ...
Instruction Manual
Page 17
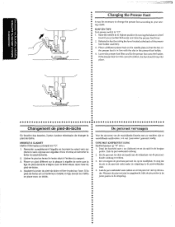
Raise the needle to "0" . • 1. Changement de pied-de-biche En fonction des besoins, il peut s'averer necessaire de changer le pied~de-biche. a 2. De persvoet vervangen Voor bet uitvoeren van de verschil!ende functies met uw machine, zijn er verschillende naaldvoeten, ook we! 'persvoeten' genoemd, nodig. Trek d~ persvoethendel omhoog. 2. Zet vervo!gens de gewenste persvoet los op de naaldplaat, en zorg dat de pin in de persvoet recht onder de uitsparing in de uitsparing. Wanneer de persvoetjuisi is aangebracht, klikt de pin precies in de juiste positie in de persvoethouder staat....
Raise the needle to "0" . • 1. Changement de pied-de-biche En fonction des besoins, il peut s'averer necessaire de changer le pied~de-biche. a 2. De persvoet vervangen Voor bet uitvoeren van de verschil!ende functies met uw machine, zijn er verschillende naaldvoeten, ook we! 'persvoeten' genoemd, nodig. Trek d~ persvoethendel omhoog. 2. Zet vervo!gens de gewenste persvoet los op de naaldplaat, en zorg dat de pin in de persvoet recht onder de uitsparing in de uitsparing. Wanneer de persvoetjuisi is aangebracht, klikt de pin precies in de juiste positie in de persvoethouder staat....
Instruction Manual
Page 18
To change your machine to remove it out. (See fig. A.} 0 Uft the bottom of the extension table up toward you. 8 Pull the extension table out to the free"arm style, lift up on garments. areas on the extension fable and pull it
To change your machine to remove it out. (See fig. A.} 0 Uft the bottom of the extension table up toward you. 8 Pull the extension table out to the free"arm style, lift up on garments. areas on the extension fable and pull it

Instruction Manual
Page 33
D 4 •• 3 Couture en points elastiques ••• selection d'un point elastique • Regier le s91ecteur de longueur de point sur ••" pour que le modele •• sE!Iectionne devienne un point etastique. (Voir fig. verandert het gekozen patroon in te stellen. (Zie fig. B.) Q) Maakt fijne steken ® Standaardpositie ® Maal If different types of fabric or thread are used or the pattern does not have the correct shape, turn the B • stitch length dial out of the allowable range . dien het patroon niet de juiste vonn heeft, ...
D 4 •• 3 Couture en points elastiques ••• selection d'un point elastique • Regier le s91ecteur de longueur de point sur ••" pour que le modele •• sE!Iectionne devienne un point etastique. (Voir fig. verandert het gekozen patroon in te stellen. (Zie fig. B.) Q) Maakt fijne steken ® Standaardpositie ® Maal If different types of fabric or thread are used or the pattern does not have the correct shape, turn the B • stitch length dial out of the allowable range . dien het patroon niet de juiste vonn heeft, ...

Instruction Manual
Page 34
peut etre necessaire de • r8gler 8galeme:nt Ia largeur du point. •• Les numeros indiques sur le sS:Iecteur repr€sen,ent Ia largeur du • point en mm. • PLUS LE CHIFFRE EST ELEVE, PLUS LE POINT SERA LARGE. •• G) se!ecteur de largeur de point •• REMARQUE: ' Steekbreedteknop (aileen 60,70 en 75) Afhankelijk van de gekozen steek dient soms de steekbreedte te worden ingesteld . De cijfers die op de knop gedrukt staan, geven de brecdte van de steek aan. Selecteur de largeur de point •• (modeles 60, 70 et 75 uniquement) ...
peut etre necessaire de • r8gler 8galeme:nt Ia largeur du point. •• Les numeros indiques sur le sS:Iecteur repr€sen,ent Ia largeur du • point en mm. • PLUS LE CHIFFRE EST ELEVE, PLUS LE POINT SERA LARGE. •• G) se!ecteur de largeur de point •• REMARQUE: ' Steekbreedteknop (aileen 60,70 en 75) Afhankelijk van de gekozen steek dient soms de steekbreedte te worden ingesteld . De cijfers die op de knop gedrukt staan, geven de brecdte van de steek aan. Selecteur de largeur de point •• (modeles 60, 70 et 75 uniquement) ...
Instruction Manual
Page 36
G) Bobbin winding tension disc ® Bobbi~ winding 2. While turning the bobbin clockwise, slide it over de horizontale klospen en voer de draad om het spanningsschijfje van de spoelwinder. When the machine stops, cut the thread, push the shaft to the fight. •• ® Spring • @Slit • 4. Arr6ter Ia machine • au bout de qyetques tours. •• 5. Plaats bet klosje garen over the bobbin wind- • ing shaft so that the shaft spring slides into the slit in om de draad een paar slagen om de spoei te winden. Plaats de spoel op het asje voor het ...
G) Bobbin winding tension disc ® Bobbi~ winding 2. While turning the bobbin clockwise, slide it over de horizontale klospen en voer de draad om het spanningsschijfje van de spoelwinder. When the machine stops, cut the thread, push the shaft to the fight. •• ® Spring • @Slit • 4. Arr6ter Ia machine • au bout de qyetques tours. •• 5. Plaats bet klosje garen over the bobbin wind- • ing shaft so that the shaft spring slides into the slit in om de draad een paar slagen om de spoei te winden. Plaats de spoel op het asje voor het ...
Instruction Manual
Page 37
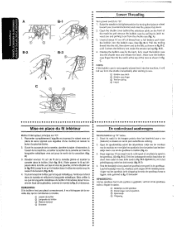
Holding the bobbin case by turning the balance wheel toward you (counterclockwise) and raise the presser foot !ever. 2. Draai de naald in fig. A) 3. geleidingsoog onder het drukveertje (fig. s'insere dans !'orifice de sortie sous !e Laat het hendeltje weer los, waarbij u moet zorgen dat de metalen positie~ ressort de tension (fig. 8-3). Bien veiller ce que Ia languette metamque du boitier s'introduise dans I . B-2, until it will fall out from a full bobbin and insert the bobbin into the bobbin case. (See fig. 8-1.) Pull the trailing thread into the m.;tchine, it...
Holding the bobbin case by turning the balance wheel toward you (counterclockwise) and raise the presser foot !ever. 2. Draai de naald in fig. A) 3. geleidingsoog onder het drukveertje (fig. s'insere dans !'orifice de sortie sous !e Laat het hendeltje weer los, waarbij u moet zorgen dat de metalen positie~ ressort de tension (fig. 8-3). Bien veiller ce que Ia languette metamque du boitier s'introduise dans I . B-2, until it will fall out from a full bobbin and insert the bobbin into the bobbin case. (See fig. 8-1.) Pull the trailing thread into the m.;tchine, it...

Instruction Manual
Page 38
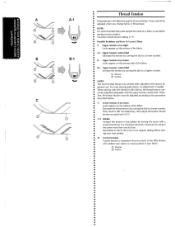
Pull up lever and around the upper tension control dial •• from front to back and pull out about 5 em (2 11 ) of thread as shown in fig. B.) While holding the thread as shbwn in fig. Bring the thread through both thread guides: the rear one first, then the front one. (See fig. NOTE: Incorrectly feeding the thread may cause it toward you and into the ey,elet. C, • pull it behind the thread guide. ® Thread guide 7. Guide the thread to the left so the thread picks up lever • 4. Bring the thread down and around •• to...
Pull up lever and around the upper tension control dial •• from front to back and pull out about 5 em (2 11 ) of thread as shown in fig. B.) While holding the thread as shbwn in fig. Bring the thread through both thread guides: the rear one first, then the front one. (See fig. NOTE: Incorrectly feeding the thread may cause it toward you and into the ey,elet. C, • pull it behind the thread guide. ® Thread guide 7. Guide the thread to the left so the thread picks up lever • 4. Bring the thread down and around •• to...

Instruction Manual
Page 40
Lower the presser foot.lever. 2. Turn the balance wheel toward you {counterclockwise) until the bottom of th~ needle holder aligns with the bottom of the needlethreading-hook holder. Using the Needle Threader (75 only) Turn power switch to "0". 1.
Lower the presser foot.lever. 2. Turn the balance wheel toward you {counterclockwise) until the bottom of th~ needle holder aligns with the bottom of the needlethreading-hook holder. Using the Needle Threader (75 only) Turn power switch to "0". 1.
Instruction Manual
Page 42
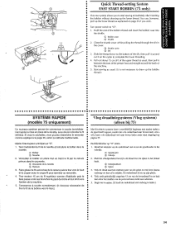
You can, however, pull up the bobbin • thread.) SYSTEME RAPIDE •• (modele 75 uniquement) a ••• Ce nouveau systeme permet de commencer coudre i.mm8diate- • ment aprSs Ia mise en place de !a canette, sans devoir remonter !e fit •• infSrieur. Close the shuttle cover while pulling the thread through the slit in the cover. ® Shuttle cover @Slit 3. Ot is not necessary to draw up the lower thread as explained on the cutter to "0". 1. CD Bobbin case ® Shuttle 2. Quick Thread-setting System FAST START BOBBIN (...
You can, however, pull up the bobbin • thread.) SYSTEME RAPIDE •• (modele 75 uniquement) a ••• Ce nouveau systeme permet de commencer coudre i.mm8diate- • ment aprSs Ia mise en place de !a canette, sans devoir remonter !e fit •• infSrieur. Close the shuttle cover while pulling the thread through the slit in the cover. ® Shuttle cover @Slit 3. Ot is not necessary to draw up the lower thread as explained on the cutter to "0". 1. CD Bobbin case ® Shuttle 2. Quick Thread-setting System FAST START BOBBIN (...

Instruction Manual
Page 43
With your left hand, hold the end of the presser foot. • The upper thread should pass between the toes of the upper thread. The upper •• thread should have caught the lower thread in a large loop . • 4. Raise the presser foot and the needle to its highest position. 3. With your right hand, turn the balance wheel toward you and ~he lower thread will come • up again to their highest positions. 2. Pull out about 15 em (6~') of both threads and place them toward you (counterclockwise) until the needle moves down and back up from the bobbin in a ...
With your left hand, hold the end of the presser foot. • The upper thread should pass between the toes of the upper thread. The upper •• thread should have caught the lower thread in a large loop . • 4. Raise the presser foot and the needle to its highest position. 3. With your right hand, turn the balance wheel toward you and ~he lower thread will come • up again to their highest positions. 2. Pull out about 15 em (6~') of both threads and place them toward you (counterclockwise) until the needle moves down and back up from the bobbin in a ...
Instruction Manual
Page 45
A~1 Upper tension cOntrol dial Decrease the tension by turning the dial to a lower number. B-1 - lt may need to be made on a fabric scrap before sewing on your stitches. B~1 Upper tension control dial Increase the tension by turning the dial to a higher number. Possible Problems and How To Correct Them A Upper tension is "5". locks appear on the reverse side of the fabric . NOTE: It is too loose. 1 locks appear on the surface of your project. --"] c A-1 - The.basic thread tension setting is too tight. Thread Tension Thread tension will affect the quality of the...
A~1 Upper tension cOntrol dial Decrease the tension by turning the dial to a lower number. B-1 - lt may need to be made on a fabric scrap before sewing on your stitches. B~1 Upper tension control dial Increase the tension by turning the dial to a higher number. Possible Problems and How To Correct Them A Upper tension is "5". locks appear on the reverse side of the fabric . NOTE: It is too loose. 1 locks appear on the surface of your project. --"] c A-1 - The.basic thread tension setting is too tight. Thread Tension Thread tension will affect the quality of the...

Instruction Manual
Page 47
Utiliser Ia meme tame de fil pour les fils inf8rieur (canette) et superieur (bobine). Polyester enrobe de eaton SSiectionner selon le tableau ci-dessus Ia tame de fil et le calibre d'aiguille adequats. 2. CHART OF SEWING FABRICS, NEEDLES AND THREAD COMBINATIONS KNITS Single knit, Double knit, jersey, Tricot NOTE: 1. Select the correct needle and "thread size from the above chart. 2. Use the same size thread for the upper (spool) and lower {bobbin) threads. #90/14 Cotton-Wrapped Polyester TABLEAU DES COMBINAISONS TISSUIAIGUILLE/FIL TRICOTS Tricot simple, double, jersey, ...
Utiliser Ia meme tame de fil pour les fils inf8rieur (canette) et superieur (bobine). Polyester enrobe de eaton SSiectionner selon le tableau ci-dessus Ia tame de fil et le calibre d'aiguille adequats. 2. CHART OF SEWING FABRICS, NEEDLES AND THREAD COMBINATIONS KNITS Single knit, Double knit, jersey, Tricot NOTE: 1. Select the correct needle and "thread size from the above chart. 2. Use the same size thread for the upper (spool) and lower {bobbin) threads. #90/14 Cotton-Wrapped Polyester TABLEAU DES COMBINAISONS TISSUIAIGUILLE/FIL TRICOTS Tricot simple, double, jersey, ...
Instruction Manual
Page 49
Pull up the .lower thread by turning the balance wheel toward you (counterclockwise) and place both the upper and lower threads behind the presser foot. 4. Press down on the foot controller. Tourner !e s€!ecteur de modele jusqu'a Ia selection du point souhait€ . Remonter le fil inf€rieur en toumant le volant vers soi (dans le sens oppose aux aigui!!es d'une montre) et tirer les deux fils, interieur et superieur, vers l'arriSre du pied-de-biche. Pour arreter une couture en marche arribre a a La piqOre en marche arriere sert arreter au consolider une couture. 6....
Pull up the .lower thread by turning the balance wheel toward you (counterclockwise) and place both the upper and lower threads behind the presser foot. 4. Press down on the foot controller. Tourner !e s€!ecteur de modele jusqu'a Ia selection du point souhait€ . Remonter le fil inf€rieur en toumant le volant vers soi (dans le sens oppose aux aigui!!es d'une montre) et tirer les deux fils, interieur et superieur, vers l'arriSre du pied-de-biche. Pour arreter une couture en marche arribre a a La piqOre en marche arriere sert arreter au consolider une couture. 6....