Manual
Page 2
...Instructions When using an electrical appliance, basic safety precautions should always be followed, including the following: Read all moving parts. Use only attachments, accessories and parts recommended by the manufacturer. 2 Do not use of the system and should a means for examination or repair....reduce the risk of insulation are damaged ► it is intended for servicing of grounding. See instructions for household use a proper BERNINA stitch plate. No grounding means is not intended for any openings on the product. SAVE THESE INSTRUCTIONS! 2 Class 1M LED ...
...Instructions When using an electrical appliance, basic safety precautions should always be followed, including the following: Read all moving parts. Use only attachments, accessories and parts recommended by the manufacturer. 2 Do not use of the system and should a means for examination or repair....reduce the risk of insulation are damaged ► it is intended for servicing of grounding. See instructions for household use a proper BERNINA stitch plate. No grounding means is not intended for any openings on the product. SAVE THESE INSTRUCTIONS! 2 Class 1M LED ...
Manual
Page 6
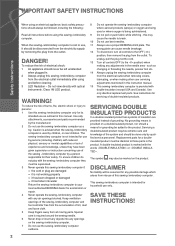
... 14 543 16 2 1 17 12 15 18 19 In plastic bag 1 4 bobbins 2 adjustable guides 3 wire threader for threading cording for bobbin play 4 tweezers 5 2 nets 6 cording attachment 7 magnifying glass adapter 8 small screwdriver, gray 9 touch pen 10 seam ripper 11 lint brush 12 multifunction tool 13 manual threader 14 spool disc small 15...
... 14 543 16 2 1 17 12 15 18 19 In plastic bag 1 4 bobbins 2 adjustable guides 3 wire threader for threading cording for bobbin play 4 tweezers 5 2 nets 6 cording attachment 7 magnifying glass adapter 8 small screwdriver, gray 9 touch pen 10 seam ripper 11 lint brush 12 multifunction tool 13 manual threader 14 spool disc small 15...
Manual
Page 11
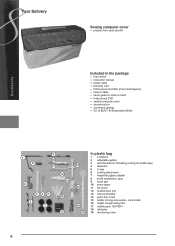
Sewing Computer 41 33 1 Bobbin cover 2 Stitch plate 3 Attachment base for special accessories 4 Presser foot 5 Needle clamp 6 Thread guide 7 Screen 8 Carrying handle 9 System Settings ‣ Setup button ‣ Tutorial button ‣ Creative Consultant button &#... 27 Pattern end button 40 28 Automatic thread cutter 29 Start/stop button 30 Quick reverse button 31 Special-accessories port 32 BSR connection 33 BERNINA Dual Feed 34 Handwheel 35 USB connection 36 PC connection 37 Foot control socket 38 Power switch on/off («I», «0») 39 Power...
Sewing Computer 41 33 1 Bobbin cover 2 Stitch plate 3 Attachment base for special accessories 4 Presser foot 5 Needle clamp 6 Thread guide 7 Screen 8 Carrying handle 9 System Settings ‣ Setup button ‣ Tutorial button ‣ Creative Consultant button &#... 27 Pattern end button 40 28 Automatic thread cutter 29 Start/stop button 30 Quick reverse button 31 Special-accessories port 32 BSR connection 33 BERNINA Dual Feed 34 Handwheel 35 USB connection 36 PC connection 37 Foot control socket 38 Power switch on/off («I», «0») 39 Power...
Manual
Page 12
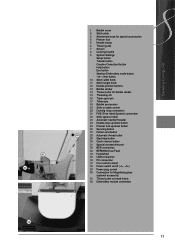
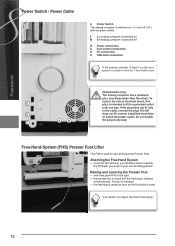
.... If it in a warm room for 1 hour before use. Free-Hand-System (FHS) Presser Foot Lifter The FHS is used to install the proper outlet. Attaching the Free Hand System ► insert into the opening; To reduce the risk of electrical shock, this plug is intended to the right ► the...
.... If it in a warm room for 1 hour before use. Free-Hand-System (FHS) Presser Foot Lifter The FHS is used to install the proper outlet. Attaching the Free Hand System ► insert into the opening; To reduce the risk of electrical shock, this plug is intended to the right ► the...
Manual
Page 17
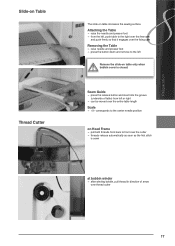
Attaching the Table ► raise the needle and presser foot ► from the left, push table to the right over the free-arm and push firmly ...
Attaching the Table ► raise the needle and presser foot ► from the left, push table to the right over the free-arm and push firmly ...

Manual
Page 20
... needle and presser foot ► turn power switch to «0» (off) Releasing the Presser Foot ► raise the clamping lever ► remove presser foot Attaching the Presser Foot ► guide the presser foot upwards over the cone ► touch the clamping lever down Turn the handwheel to lower the needle...
... needle and presser foot ► turn power switch to «0» (off) Releasing the Presser Foot ► raise the clamping lever ► remove presser foot Attaching the Presser Foot ► guide the presser foot upwards over the cone ► touch the clamping lever down Turn the handwheel to lower the needle...
Manual
Page 28
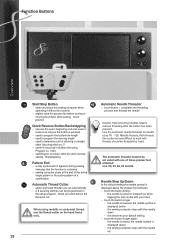
... = completes the threading process and threads the needle Double, triple and wing needles require manual threading after the button has been pressed. these presser feet attached: nos. 50, 55, 80, 85 and 86. Function Buttons Overview Start/Stop Button ► starts and stops the sewing computer when operating it without foot...
... = completes the threading process and threads the needle Double, triple and wing needles require manual threading after the button has been pressed. these presser feet attached: nos. 50, 55, 80, 85 and 86. Function Buttons Overview Start/Stop Button ► starts and stops the sewing computer when operating it without foot...
Manual
Page 38
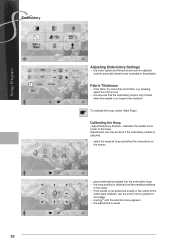
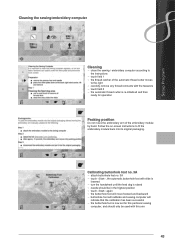
... to position it accurately ► touch until the selection menu appears ► the adjustment is saved Adjustments can be done if the embroidery module is attached. ► select the required hoop and follow the instructions on the screen ► place embroidery template into the embroidery hoop ► the hoop position is...
... to position it accurately ► touch until the selection menu appears ► the adjustment is saved Adjustments can be done if the embroidery module is attached. ► select the required hoop and follow the instructions on the screen ► place embroidery template into the embroidery hoop ► the hoop position is...
Manual
Page 43
Calibrating buttonhole foot no. 3A ► attach buttonhole foot no. 3A ► touch «Start», the automatic buttonhole foot with slide is lowered ► turn the handwheel until the feed dog ...
Calibrating buttonhole foot no. 3A ► attach buttonhole foot no. 3A ► touch «Start», the automatic buttonhole foot with slide is lowered ► turn the handwheel until the feed dog ...

Manual
Page 54
... and firm wovens; blind hems; shell edging in a zipper Double Overlock For all straight stitch work such as overcasting edges, attaching elastic and lace Super Stretch Stitch For highly elastic fabrics. overlock seam, flat joining seams Jersey Stitch For jersey fabrics; mending ... Most types of fabric; Highly elastic open seam for all fabrics; Gathering with shirring elastic. flat joining seam, visible seam, attaching elastic, decorative seam Sewn-out Zig-Zag Oversewing woven fabrics, reinforcing edges, decorative seam Honeycomb Stitch Most types of interlock and ...
... and firm wovens; blind hems; shell edging in a zipper Double Overlock For all straight stitch work such as overcasting edges, attaching elastic and lace Super Stretch Stitch For highly elastic fabrics. overlock seam, flat joining seams Jersey Stitch For jersey fabrics; mending ... Most types of fabric; Highly elastic open seam for all fabrics; Gathering with shirring elastic. flat joining seam, visible seam, attaching elastic, decorative seam Sewn-out Zig-Zag Oversewing woven fabrics, reinforcing edges, decorative seam Honeycomb Stitch Most types of interlock and ...
Manual
Page 66
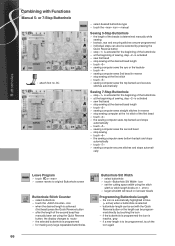
...; sewing computer sews straight stitches in blue (= active) when a buttonhole is selected ► buttonhole length can be set with Functions Manual 5- or 7-Step Buttonhole ► attach foot no. 3C ► select desired buttonhole type ► touch the «man» icon = manual Sewing 5-Step Buttonhole ► the length of the beads...
...; sewing computer sews straight stitches in blue (= active) when a buttonhole is selected ► buttonhole length can be set with Functions Manual 5- or 7-Step Buttonhole ► attach foot no. 3C ► select desired buttonhole type ► touch the «man» icon = manual Sewing 5-Step Buttonhole ► the length of the beads...

Manual
Page 70
just tap the foot control once to sew buttonhole again Stitch Counter Buttonhole ► attach foot no. 3C All Buttonhole Types Sewing the first bead ► sew first bead forwards, stop at required length ► press the Quick Reverse button ...
just tap the foot control once to sew buttonhole again Stitch Counter Buttonhole ► attach foot no. 3C All Buttonhole Types Sewing the first bead ► sew first bead forwards, stop at required length ► press the Quick Reverse button ...
Manual
Page 71
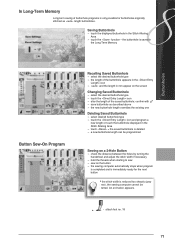
... Buttonholes Button Sew-On Program Recalling Saved Buttonhole ► select the desired buttonhole type ► the length of the saved buttonhole; An animation appears. ► attach foot no. 18 71
... Buttonholes Button Sew-On Program Recalling Saved Buttonhole ► select the desired buttonhole type ► the length of the saved buttonhole; An animation appears. ► attach foot no. 18 71
Manual
Page 72
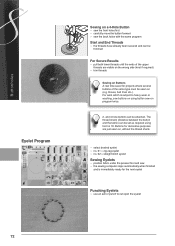
... 4-hole-buttons can be set as required using button sew-on program twice. 2- The thread shank (distance between the button and the fabric) can be attached. Buttonholes Eyelet Program 72 Sewing on a 4-Hole Button ► sew the front holes first ► carefully move the button forward ► sew the back holes...
... 4-hole-buttons can be set as required using button sew-on program twice. 2- The thread shank (distance between the button and the fabric) can be attached. Buttonholes Eyelet Program 72 Sewing on a 4-Hole Button ► sew the front holes first ► carefully move the button forward ► sew the back holes...
Manual
Page 89
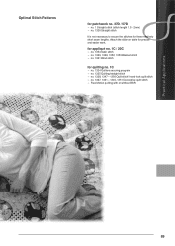
... Quilt stitch/ hand-look quilt stitch ► no . 1326 Straight stitch It is not necessary to secure the stitches for these relatively short seam lengths. Attach the slide-on table for precise and easier work. Optimal Stitch Patterns for patchwork no. 37D / 57D ► no. 1 Straight stitch (stitch length 1.5 - 2mm) ►...
... Quilt stitch/ hand-look quilt stitch ► no . 1326 Straight stitch It is not necessary to secure the stitches for these relatively short seam lengths. Attach the slide-on table for precise and easier work. Optimal Stitch Patterns for patchwork no. 37D / 57D ► no. 1 Straight stitch (stitch length 1.5 - 2mm) ►...
Manual
Page 92
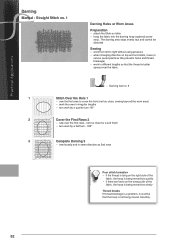
... by a quarter turn -90° 2 Cover the First Rows 2 ► sew over the fabric ► Darning foot no . 1 Darning Holes or Worn Areas Preparation ► attach the Slide-on the wrong side of the fabric, the hoop is being moved too slowly Thread breaks If thread breakage is a problem, it could...
... by a quarter turn -90° 2 Cover the First Rows 2 ► sew over the fabric ► Darning foot no . 1 Darning Holes or Worn Areas Preparation ► attach the Slide-on the wrong side of the fabric, the hoop is being moved too slowly Thread breaks If thread breakage is a problem, it could...
Manual
Page 108
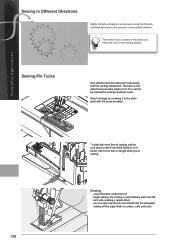
...on the Free Hand System, so it doesn't fall on a piece of the fabric you 're sewing. The tube on collars, cuffs and tucks Attach it simply by screwing it to be sewn using the Directional-Sewing function and practical or decorative stitches. Decorative Applications Sewing in Different Directions Highly... sewing raised pin tucks. Test-sew first on the floor or tangle while you intend to use the pin tuck attachment for a beautiful scallop off the edge finish on the attachment provides ample room for a cord to the stitch plate with the screw provided. 108 To help with the cording...
...on the Free Hand System, so it doesn't fall on a piece of the fabric you 're sewing. The tube on collars, cuffs and tucks Attach it simply by screwing it to be sewn using the Directional-Sewing function and practical or decorative stitches. Decorative Applications Sewing in Different Directions Highly... sewing raised pin tucks. Test-sew first on the floor or tangle while you intend to use the pin tuck attachment for a beautiful scallop off the edge finish on the attachment provides ample room for a cord to the stitch plate with the screw provided. 108 To help with the cording...
Manual
Page 109
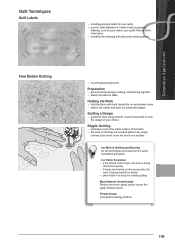
... stitch patterns Decorative Applications Free Motion Quilting ► for all freehand quilt work Preparation ► pin and baste top layer, batting, and backing together ► attach the slide-on the same Free Motion principles. Thread breaks Inconsistent feeding of fabric. 109
... stitch patterns Decorative Applications Free Motion Quilting ► for all freehand quilt work Preparation ► pin and baste top layer, batting, and backing together ► attach the slide-on the same Free Motion principles. Thread breaks Inconsistent feeding of fabric. 109

Manual
Page 111
... ‣ removing sole: press both buttons (see arrows) on each side of the foot ‣ slide the sole down the groove at an angle ‣ attaching the sole: slide the sole up in the groove until it clicks into place ► Presser Foot Pressure may be reduced depending on the fabric... type and thickness ► attach the BSR Presser Foot to the sewing computer and plug the cable in the outlet provided ► the «BSR» screen opens automatically ►...
... ‣ removing sole: press both buttons (see arrows) on each side of the foot ‣ slide the sole down the groove at an angle ‣ attaching the sole: slide the sole up in the groove until it clicks into place ► Presser Foot Pressure may be reduced depending on the fabric... type and thickness ► attach the BSR Presser Foot to the sewing computer and plug the cable in the outlet provided ► the «BSR» screen opens automatically ►...
Manual
Page 115
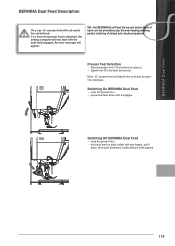
... foot is attached, the sewing computer will appear. Switching On BERNINA Dual Feed ► raise the presser foot ► press dual feed down , then push backward, slowly letting it slide upward 115 An error message will not start with the dual feed engaged. With the BERNINA Dual Feed ...171;D» presser feet are fed simultaneously, the even feeding enabling perfect matching of fabric are listed in the enclosed accessories catalogue. BERNINA Dual Feed BERNINA Dual Feed Description Only use «D» presser feet with two fingers, pull it down until it engages Switching Off...
... foot is attached, the sewing computer will appear. Switching On BERNINA Dual Feed ► raise the presser foot ► press dual feed down , then push backward, slowly letting it slide upward 115 An error message will not start with the dual feed engaged. With the BERNINA Dual Feed ...171;D» presser feet are fed simultaneously, the even feeding enabling perfect matching of fabric are listed in the enclosed accessories catalogue. BERNINA Dual Feed BERNINA Dual Feed Description Only use «D» presser feet with two fingers, pull it down until it engages Switching Off...


