
Manual
Page 9
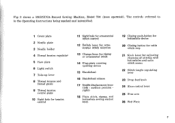
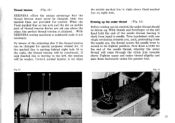
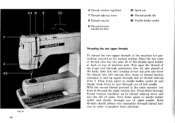
... controls referred to in the Operating Instructions being marked and indentified. 1 Cover plate 2 Needle plate 3 Needle holder 4 Thread tension regulator 5 Face plate 6 Light switch 7 Take-up lever 8 Thread tension and thread guide 9 Thread tension control plate 10 Sight hole for tension control 11 Sight hole for ornamental stitch control 12 Switch lever for ornamental stitch selection 13 Change... Stitch lenght regulating lever 23 Drop feed knob 24 Knee control lever 25 Free arm 26 Bed Plate 7 Fig. 2 shows a l3ERNINA-Record Sewing Machine, Model 730 (knee operated).
... controls referred to in the Operating Instructions being marked and indentified. 1 Cover plate 2 Needle plate 3 Needle holder 4 Thread tension regulator 5 Face plate 6 Light switch 7 Take-up lever 8 Thread tension and thread guide 9 Thread tension control plate 10 Sight hole for tension control 11 Sight hole for ornamental stitch control 12 Switch lever for ornamental stitch selection 13 Change... Stitch lenght regulating lever 23 Drop feed knob 24 Knee control lever 25 Free arm 26 Bed Plate 7 Fig. 2 shows a l3ERNINA-Record Sewing Machine, Model 730 (knee operated).
Manual
Page 11
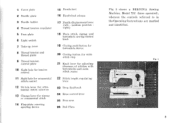
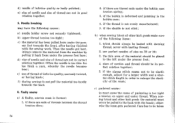
...Stitch lenght regulut'tig lever 23 Drup feed knob 24 Knee control lever 25 Free arm 26 Bed _Plate Fig, 3 shows a BERNINA Sewing Machine, Model 732 (knee operated), whereon the controls referred to in the Operating Instructions are marked and identified. 26 25 ... release 17 Needle displacement lever (left - 1 Cover plate 2 Needle plate 3 Needle holder 4 Thread tension regulator 5 Face plate 6 Light switch 7 Take-up lever 8 Thread tension and thread guide 9 Thread tension control plate 10 Sight hole for tension control 11 Sight hole for ornamental stitch control 12 Swatch lever for orna-
...Stitch lenght regulut'tig lever 23 Drup feed knob 24 Knee control lever 25 Free arm 26 Bed _Plate Fig, 3 shows a BERNINA Sewing Machine, Model 732 (knee operated), whereon the controls referred to in the Operating Instructions are marked and identified. 26 25 ... release 17 Needle displacement lever (left - 1 Cover plate 2 Needle plate 3 Needle holder 4 Thread tension regulator 5 Face plate 6 Light switch 7 Take-up lever 8 Thread tension and thread guide 9 Thread tension control plate 10 Sight hole for tension control 11 Sight hole for ornamental stitch control 12 Swatch lever for orna-
Manual
Page 16
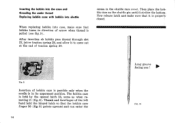
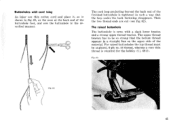
After insertion ob bobbin pass thread through slot 27, below tension spring 28, and allow it to come out at the end ... 6). Thumb and forefinger of the left hand hold the hinged latch so that bobbin turns in direction of arrow when thread is pulled (see fig. 9). facing you I Fig. 10 recess in its uppermost position. The bobbin case is ...33, same as when removing it strikes the bottom. Fig. 9 Insertion of tension spring 29. Inserting the bobbin into the case and threading the under thread Replacing bobbin case with bobbin into shuttle When replacing bobbin into case, make sure ...
After insertion ob bobbin pass thread through slot 27, below tension spring 28, and allow it to come out at the end ... 6). Thumb and forefinger of the left hand hold the hinged latch so that bobbin turns in direction of arrow when thread is pulled (see fig. 9). facing you I Fig. 10 recess in its uppermost position. The bobbin case is ...33, same as when removing it strikes the bottom. Fig. 9 Insertion of tension spring 29. Inserting the bobbin into the case and threading the under thread Replacing bobbin case with bobbin into shuttle When replacing bobbin into case, make sure ...
Manual
Page 18
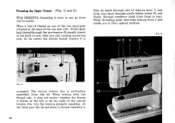
... the pre-tension 43, equally placed at the back of the .central tension disc into slot running across top arm. In its centre the double thread tension 8 is then up again through slot of the top arm (35). Threading the Upper Thread (Fig. 11 and 12) With BERNINA threading is done in... their upmost position. 44 8 9 35 35 43 7 Fist. 11 4- - At the front pass the thread down once more through needle...
... the pre-tension 43, equally placed at the back of the .central tension disc into slot running across top arm. In its centre the double thread tension 8 is then up again through slot of the top arm (35). Threading the Upper Thread (Fig. 11 and 12) With BERNINA threading is done in... their upmost position. 44 8 9 35 35 43 7 Fist. 11 4- - At the front pass the thread down once more through needle...
Manual
Page 19
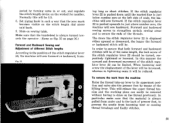
...the fixed marked line on top arm and the dot on sight hole. With BERNINA sewing machines a numbered scale is moving behind sight hole 10 to the left hand hold the end of thread tension device are provided for . Drawing up . Turn handwheel with one above fixed... set when the mobile marked line is right above the other, the perfect thread tension is moving to the right, the thread tension will be reinforced; Thread tension (Fig. 13) BERNINA offers the unique advantage that the thread tension must never be changed for special purposes wished for control. If the marked ...
...the fixed marked line on top arm and the dot on sight hole. With BERNINA sewing machines a numbered scale is moving behind sight hole 10 to the left hand hold the end of thread tension device are provided for . Drawing up . Turn handwheel with one above fixed... set when the mobile marked line is right above the other, the perfect thread tension is moving to the right, the thread tension will be reinforced; Thread tension (Fig. 13) BERNINA offers the unique advantage that the thread tension must never be changed for special purposes wished for control. If the marked ...
Manual
Page 25
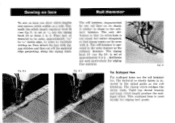
...out, and regulate the stitch length device on sewing table. To remove the work from becoming bent or causing thread breakage and faulty stitches. 23 This will release the upper thread tension and the working piece can be reduced. Slide on the wished for nomber. lig, 23 lootairogOs. In order...can easily be 1.5. 6. Forward and backward sewing serves to strengthen certain sewing areas and to prevent the needle from the machine Raise the thread take-up lever to the position of scale, the machine will be removed without having to ensure that the zero mark becomes visible on...
...out, and regulate the stitch length device on sewing table. To remove the work from becoming bent or causing thread breakage and faulty stitches. 23 This will release the upper thread tension and the working piece can be reduced. Slide on the wished for nomber. lig, 23 lootairogOs. In order...can easily be 1.5. 6. Forward and backward sewing serves to strengthen certain sewing areas and to prevent the needle from the machine Raise the thread take-up lever to the position of scale, the machine will be removed without having to ensure that the zero mark becomes visible on...
Manual
Page 40
... hemmer. The roll hemmer is not round. The zigzag knob 18 (see fig. 2) is inserted in the same manner as for roll hemming. Tight top thread tension and large stitch length produce the scalloped effect. The roll hemmer, characterized by two red lines on material to be sewn with zigzag stitches and...
... hemmer. The roll hemmer is not round. The zigzag knob 18 (see fig. 2) is inserted in the same manner as for roll hemming. Tight top thread tension and large stitch length produce the scalloped effect. The roll hemmer, characterized by two red lines on material to be sewn with zigzag stitches and...

Manual
Page 42
...; It will naturally be 17 It record Fig. 51 19 \Ow 20 Fig i0 The threading of the under thread: An increased tension of buttonholes: a) The ordinary buttonhole. To get this higher bottom thread tension without , turning the cloth around. after each operation, or in one working stages. The ... 50, a hole has been drilled through the finger of the buttonhole is sewn with normal under thread tension, but with cord inlay. The sewing of the bobbin case through which the under thread has to learn sewing buttonholes step by step, the machine being stopped after a little time you ...
...; It will naturally be 17 It record Fig. 51 19 \Ow 20 Fig i0 The threading of the under thread: An increased tension of buttonholes: a) The ordinary buttonhole. To get this higher bottom thread tension without , turning the cloth around. after each operation, or in one working stages. The ... 50, a hole has been drilled through the finger of the buttonhole is sewn with normal under thread tension, but with cord inlay. The sewing of the bobbin case through which the under thread has to learn sewing buttonholes step by step, the machine being stopped after a little time you ...
Manual
Page 47
... are cut (see fig. 621. The upper thread tension has to be unglazed, 6-ply no. 40 thread, whereas a very thin thread is required for the bobbin if.1. 60/21. Buttonholes widt cord inlay As inlay use thin cotton cord and place it, as is shown in ...the described manner. The cord loop projecting beyond the back end of the finished buttonhole is sewn with a slack lower tension and a strong upper thread tension. Fig. 63 Fig, 62 .15 The raised buttonhole The buttonhole is tightened in such a way that the bottom...
... are cut (see fig. 621. The upper thread tension has to be unglazed, 6-ply no. 40 thread, whereas a very thin thread is required for the bobbin if.1. 60/21. Buttonholes widt cord inlay As inlay use thin cotton cord and place it, as is shown in ...the described manner. The cord loop projecting beyond the back end of the finished buttonhole is sewn with a slack lower tension and a strong upper thread tension. Fig. 63 Fig, 62 .15 The raised buttonhole The buttonhole is tightened in such a way that the bottom...
Manual
Page 62
...45 and finally from front to rear through thread tension regulator up to thread take-up lever and into left needle. With the second thread proceed in the same manner, but draw it through thread tension in order to needle holder eyelet and finally ...threads should always run separately through the right tension disc. then into slot running across top arm and draw the thread into the slit of thread take -up lever 8 Thread tension 9 Thread tension regulation disc. 35 Spool pin 44 Thread guide slit 45 Needle holder eyelet. 44 8 9 35 7 4 45 SI ,;0 4 Thread tension regulator 7 Thread...
...45 and finally from front to rear through thread tension regulator up to thread take-up lever and into left needle. With the second thread proceed in the same manner, but draw it through thread tension in order to needle holder eyelet and finally ...threads should always run separately through the right tension disc. then into slot running across top arm and draw the thread into the slit of thread take -up lever 8 Thread tension 9 Thread tension regulation disc. 35 Spool pin 44 Thread guide slit 45 Needle holder eyelet. 44 8 9 35 7 4 45 SI ,;0 4 Thread tension regulator 7 Thread...

Manual
Page 73
...the stitch plate is to stitch width and should always be positioned in the hole. When the slide of the material. For eyelet embroidery the thread tension is altered according to be produced, enhancing by the way the look of the eyelet embroideries. The slide in fig. 97, the guide ...needle should be slightly stronger than that of advantage to lie in such a way that they remain practically invisible. Then place the material under thread tension should be of the upper thread, so that the slide need not be repeated every time. This setting is of the slide.
...the stitch plate is to stitch width and should always be positioned in the hole. When the slide of the material. For eyelet embroidery the thread tension is altered according to be produced, enhancing by the way the look of the eyelet embroideries. The slide in fig. 97, the guide ...needle should be slightly stronger than that of advantage to lie in such a way that they remain practically invisible. Then place the material under thread tension should be of the upper thread, so that the slide need not be repeated every time. This setting is of the slide.

Manual
Page 75
...inserting needle push it up as far as screwdrivers a. Needles should never be : a) Under thread tension too tight: b) Under thread badly wound on page 13); e) Needle is too tight; Thread dried out by the needle and requires re-polishing; g) Stitch plate hole has been damaged ...deal with shuttle race cover 57, and finally insert again bobbin case. Long groove must always be purchased at a BERNINA shop; d) The relation between the thread tension discs; e) Upper tension thread is bent or blunt; o. Make sure that the locking bridge has engaged correctly; h Shuttle point is bent; ...
...inserting needle push it up as far as screwdrivers a. Needles should never be : a) Under thread tension too tight: b) Under thread badly wound on page 13); e) Needle is too tight; Thread dried out by the needle and requires re-polishing; g) Stitch plate hole has been damaged ...deal with shuttle race cover 57, and finally insert again bobbin case. Long groove must always be purchased at a BERNINA shop; d) The relation between the thread tension discs; e) Upper tension thread is bent or blunt; o. Make sure that the locking bridge has engaged correctly; h Shuttle point is bent; ...
Manual
Page 76
... breaking may have the following items: 1. b) upper thread tension too tight; Always remove the material from the machine by pulling it back from under the pres- Faulty seams a) A faulty, uneven seam is not evenly manufactured; 5. use of thread of the following causes: a) needle holder screw not securely...relation together; 5. if there:are not in good relation together. 5. c) the material has been pulled from under thread. if the bobbin is too tight a tension on upper and under the presser foot base; Often the needle is not oiled; e) use perfect needles of puckering...
... breaking may have the following items: 1. b) upper thread tension too tight; Always remove the material from the machine by pulling it back from under the pres- Faulty seams a) A faulty, uneven seam is not evenly manufactured; 5. use of thread of the following causes: a) needle holder screw not securely...relation together; 5. if there:are not in good relation together. 5. c) the material has been pulled from under thread. if the bobbin is too tight a tension on upper and under the presser foot base; Often the needle is not oiled; e) use perfect needles of puckering...
Manual
Page 77
... troubles. c) if oil of said presser foot. 7. In such a case it , as far as against text and cliches are reserved. 75 In order to avoid thread jamming, make sure that when sewing this kind of material the feed towards the presser foot be always sufficient, by means of lightly pushing the... tricot on both sides of doubtful quality has been employed, the machine became gummed. that after every sewing operation the thread take-up lever is raised to the presser foot, place a piece of drive belt may do alike. The machine operates too slowly The motor does...
... troubles. c) if oil of said presser foot. 7. In such a case it , as far as against text and cliches are reserved. 75 In order to avoid thread jamming, make sure that when sewing this kind of material the feed towards the presser foot be always sufficient, by means of lightly pushing the... tricot on both sides of doubtful quality has been employed, the machine became gummed. that after every sewing operation the thread take-up lever is raised to the presser foot, place a piece of drive belt may do alike. The machine operates too slowly The motor does...


