User Guide
Page 5
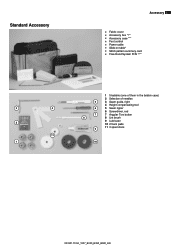
Standard Accessory Accessory 5 █ Fabric cover █ Accessory box */** █ Accessory case *** █ Foot control █ Power cable █ Slide-on table* █ Stitch pattern summary card █ Free-Hand System FHS */** 1 5 bobbins (one of them in the bobbin case) 2 Selection of needles 5 3 Seam guide, right 4 Height compensating tool 3 4 6 5 Seam ripper 6 Screwdriver, red 7 7 Angular Torx button 8 8 Lint brush 2 9 Lubricator 10 2 foam pads 9 11 3 spool discs 11 1 10 033301.70.04_1007_B330_B350_B380_EN
Standard Accessory Accessory 5 █ Fabric cover █ Accessory box */** █ Accessory case *** █ Foot control █ Power cable █ Slide-on table* █ Stitch pattern summary card █ Free-Hand System FHS */** 1 5 bobbins (one of them in the bobbin case) 2 Selection of needles 5 3 Seam guide, right 4 Height compensating tool 3 4 6 5 Seam ripper 6 Screwdriver, red 7 7 Angular Torx button 8 8 Lint brush 2 9 Lubricator 10 2 foam pads 9 11 3 spool discs 11 1 10 033301.70.04_1007_B330_B350_B380_EN

User Guide
Page 9
...the proper outlet. 9 28 27 29 18 31 32 33 34 35 36 Preparation - To reduce the risk of the sewing computer 9 30 37 38 1 Bobbin cover 2 Stitch plate 3 Attachment base for special accessory 4 LED sewing light 5 Quick reverse button 6 Start/Stop button 7 Thread take-up cover 8 Thread ... 13 Pattern end button 14 Mirror image button */** 15 Stitch length buttons 16 Needle position buttons 17 Stitch width buttons 18 Bobbin winder device 19 Thread cutter on bobbin winder 20 Memory buttons 21 Alphabet button 22 Stitch selection buttons 23 #-button (hash button) 24 «clr» (clear...
...the proper outlet. 9 28 27 29 18 31 32 33 34 35 36 Preparation - To reduce the risk of the sewing computer 9 30 37 38 1 Bobbin cover 2 Stitch plate 3 Attachment base for special accessory 4 LED sewing light 5 Quick reverse button 6 Start/Stop button 7 Thread take-up cover 8 Thread ... 13 Pattern end button 14 Mirror image button */** 15 Stitch length buttons 16 Needle position buttons 17 Stitch width buttons 18 Bobbin winder device 19 Thread cutter on bobbin winder 20 Memory buttons 21 Alphabet button 22 Stitch selection buttons 23 #-button (hash button) 24 «clr» (clear...

User Guide
Page 12
... arrow, take thread through the thread guide and around the pre-tension stud █ then proceed as mentioned above Insert the bobbin so that the thread runs clockwise. 12 Preparation - diameter of thread spool determines disc size █ following the direction of the spring. ...The bobbin must turn power switch on (to «I») █ place empty bobbin on spindle █ place thread on vertical spool pin then, following the direction of the arrow take thread ...
... arrow, take thread through the thread guide and around the pre-tension stud █ then proceed as mentioned above Insert the bobbin so that the thread runs clockwise. 12 Preparation - diameter of thread spool determines disc size █ following the direction of the spring. ...The bobbin must turn power switch on (to «I») █ place empty bobbin on spindle █ place thread on vertical spool pin then, following the direction of the arrow take thread ...
User Guide
Page 13
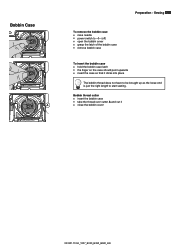
... as the loose end is just the right length to «0» (off) █ open the bobbin cover █ grasp the latch of the bobbin case █ remove bobbin case To insert the bobbin case █ hold the bobbin case latch █ the finger on the case should point upwards █ insert the case so...
... as the loose end is just the right length to «0» (off) █ open the bobbin cover █ grasp the latch of the bobbin case █ remove bobbin case To insert the bobbin case █ hold the bobbin case latch █ the finger on the case should point upwards █ insert the case so...

User Guide
Page 15
... must not be twisted together Threading the Triple Needle █ two thread spools and one full bobbin are needed █ place one thread spool on horizontal spool pin A █ place second thread spool and the bobbin, separated by a spool disc, on vertical spool pin (both spools have to turn in the same...
... must not be twisted together Threading the Triple Needle █ two thread spools and one full bobbin are needed █ place one thread spool on horizontal spool pin A █ place second thread spool and the bobbin, separated by a spool disc, on vertical spool pin (both spools have to turn in the same...
User Guide
Page 18
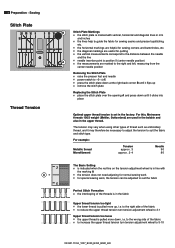
... to the distance between the needle and the line A █ needle insertion point is position 0 (center needle position) █ the measurements are used in the bobbin and also in the factory. For this, Metrosene threads 100/2 weight (Mettler, Switzerland) are marked to the right and left, measuring from the center needle...
... to the distance between the needle and the line A █ needle insertion point is position 0 (center needle position) █ the measurements are used in the bobbin and also in the factory. For this, Metrosene threads 100/2 weight (Mettler, Switzerland) are marked to the right and left, measuring from the center needle...

User Guide
Page 36
... following appears on the screen: 1 Buttonhole number 2 Buttonhole symbol (blinks) 2 3 Presser foot indicator 1 3 A Thread tension for sewing buttonholes █ thread the bobbin thread through the finger A of the bobbin case = the bobbin thread tension is a little tighter █ this gives the beads on program For buttons with 2 and 4 holes Keyhole buttonhole Heavy weight...
... following appears on the screen: 1 Buttonhole number 2 Buttonhole symbol (blinks) 2 3 Presser foot indicator 1 3 A Thread tension for sewing buttonholes █ thread the bobbin thread through the finger A of the bobbin case = the bobbin thread tension is a little tighter █ this gives the beads on program For buttons with 2 and 4 holes Keyhole buttonhole Heavy weight...
User Guide
Page 41
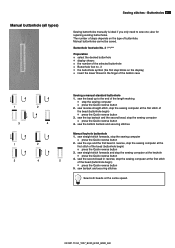
...; press the Quick reverse button 4. Manual buttonholes cannot be saved. sew straight-stitch forwards and stop the sewing computer at the first stitch of the bobbin case 1 3 1 3 2 4 2 4 5 Sewing a manual standard buttonhole 1. The number of steps depends on the display) █ insert the lower thread in reverse, stop the sewing computer at...
...; press the Quick reverse button 4. Manual buttonholes cannot be saved. sew straight-stitch forwards and stop the sewing computer at the first stitch of the bobbin case 1 3 1 3 2 4 2 4 5 Sewing a manual standard buttonhole 1. The number of steps depends on the display) █ insert the lower thread in reverse, stop the sewing computer at...
User Guide
Page 42
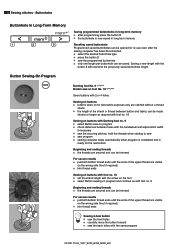
...are stitched without a thread shank █ the length of the upper thread are secured and can be trimmed For secure results █ pull both bobbin thread ends until the ends of the upper thread are visible on the wrong side (knot if required) █ trim thread ends Sewing on ...foot no. 9 █ select Button sew-on program █ check distances between button and fabric) can be trimmed For secure results █ pull both bobbin thread ends until the ends of the shank (= thread between holes with 2 or 4 holes. Sewing on buttons █ buttons sewn on for the next button...
...are stitched without a thread shank █ the length of the upper thread are secured and can be trimmed For secure results █ pull both bobbin thread ends until the ends of the upper thread are visible on the wrong side (knot if required) █ trim thread ends Sewing on ...foot no. 9 █ select Button sew-on program █ check distances between button and fabric) can be trimmed For secure results █ pull both bobbin thread ends until the ends of the shank (= thread between holes with 2 or 4 holes. Sewing on buttons █ buttons sewn on for the next button...

User Guide
Page 43
... long stitch █ for all fabrics and work at the beginning and end of the stitch █ sew one stitch; Test sewing █ the bobbin thread must come through to the required length of a seam. hold threads when starting to sew █ pull work from behind to the right side... █ 1 stitch is visible (bobbin thread) █ 1 stitch is easier to prevent the layers from slipping Basting █ position work █ when pivoting make sure that the fabric does ...
... long stitch █ for all fabrics and work at the beginning and end of the stitch █ sew one stitch; Test sewing █ the bobbin thread must come through to the required length of a seam. hold threads when starting to sew █ pull work from behind to the right side... █ 1 stitch is visible (bobbin thread) █ 1 stitch is easier to prevent the layers from slipping Basting █ position work █ when pivoting make sure that the fabric does ...

User Guide
Page 44
...race █ run the sewing computer for a short time without thread to prevent oil soiling your work Disconnect plug from electrical outlet █ remove the bobbin case █ push the release lever to the left █ close the hook race cover and secure with a damp cloth. 44 Cleaning, maintenance Cleaning... and the sewing computer Wipe with the locking lever, the locking pin must engage █ check by turning the handwheel █ insert the bobbin case Lubricating █ power switch to «0» (off ) █ pull out plug from the socket before cleaning or lubricating!
...race █ run the sewing computer for a short time without thread to prevent oil soiling your work Disconnect plug from electrical outlet █ remove the bobbin case █ push the release lever to the left █ close the hook race cover and secure with a damp cloth. 44 Cleaning, maintenance Cleaning... and the sewing computer Wipe with the locking lever, the locking pin must engage █ check by turning the handwheel █ insert the bobbin case Lubricating █ power switch to «0» (off ) █ pull out plug from the socket before cleaning or lubricating!

User Guide
Page 45
...spring █ Sewing computer fails to run or runs slowly Repair █ Reduce/increase upper thread tension █ Use new, high-quality needle (BERNINA) █ The flat side of the shank must be able to identify and remedy faults by a specialized dealer █ Use new needle &#...screw █ Fold a piece of the thread tension █ Check upper and lower thread █ Carefully remove any thread remnants from under the bobbin case spring Fault Cause Uneven stitch formation █ Upper thread too tight/too slack █ Needle blunt or bent, poor-quality needle █ Needle...
...spring █ Sewing computer fails to run or runs slowly Repair █ Reduce/increase upper thread tension █ Use new, high-quality needle (BERNINA) █ The flat side of the shank must be able to identify and remedy faults by a specialized dealer █ Use new needle &#...screw █ Fold a piece of the thread tension █ Check upper and lower thread █ Carefully remove any thread remnants from under the bobbin case spring Fault Cause Uneven stitch formation █ Upper thread too tight/too slack █ Needle blunt or bent, poor-quality needle █ Needle...

User Guide
Page 47
...; Darning █ Needle stopp █ Pattern end B Balance █ Buttonholes █ Decorative stitches Basting Blind stitch █ Practical stitch █ Presser foot Bobbin █ Removing/inserting the bobbin █ Winding Bobbin case █ Removing/inserting Button sew-on program Buttonhole █ 4-steps █ 5-steps █ Automatic █ Balance █ Buttonhole type █ Cutting...
...; Darning █ Needle stopp █ Pattern end B Balance █ Buttonholes █ Decorative stitches Basting Blind stitch █ Practical stitch █ Presser foot Bobbin █ Removing/inserting the bobbin █ Winding Bobbin case █ Removing/inserting Button sew-on program Buttonhole █ 4-steps █ 5-steps █ Automatic █ Balance █ Buttonhole type █ Cutting...

User Guide
Page 48
48 Index H Handwheel Hem █ Blind hem High compensation tool I Inserting a bobbin L LED sewing light Lettering size Long Term Memory Lubricating M Main power switch Maintenance and troubleshooting █ Cleaning █ Maintenance █ Troubleshooting Manual threading █ Double ...
48 Index H Handwheel Hem █ Blind hem High compensation tool I Inserting a bobbin L LED sewing light Lettering size Long Term Memory Lubricating M Main power switch Maintenance and troubleshooting █ Cleaning █ Maintenance █ Troubleshooting Manual threading █ Double ...

User Guide
Page 49
... 9, 25 5 9, 11 9, 25 36, 46 46 26 25 46 30, 46 46 24 18 46 30 26 8-9 25 46 Thread cutter █ For bobbin thread █ For bobbin winder █ On Head Frame Thread path/Thread guides Thread take up cover Thread tension Triple Needle Triple Straight Stitch Troubleshooting U Upper thread █...
... 9, 25 5 9, 11 9, 25 36, 46 46 26 25 46 30, 46 46 24 18 46 30 26 8-9 25 46 Thread cutter █ For bobbin thread █ For bobbin winder █ On Head Frame Thread path/Thread guides Thread take up cover Thread tension Triple Needle Triple Straight Stitch Troubleshooting U Upper thread █...


