
Manual
Page 2
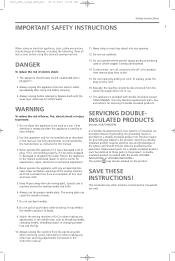
... when making any opening. 12. Keep fingers away from the electricity supply when not in this overlock sewing machine. 11. Always use outdoors. Always unplug the machine from accumulation of grounding. Read all moving parts. Never operate this manual. 3. Do not unplug ...13. DANGER To reduce the risk of double insulated products. Do not pull or push fabric while stitching. This appliance is being used by qualified service personnel. SERVICING DOUBLEINSULATED PRODUCTS (except USA/CANADA) In a double-insulated product, two systems of insulation are being administered...
... when making any opening. 12. Keep fingers away from the electricity supply when not in this overlock sewing machine. 11. Always use outdoors. Always unplug the machine from accumulation of grounding. Read all moving parts. Never operate this manual. 3. Do not unplug ...13. DANGER To reduce the risk of double insulated products. Do not pull or push fabric while stitching. This appliance is being used by qualified service personnel. SERVICING DOUBLEINSULATED PRODUCTS (except USA/CANADA) In a double-insulated product, two systems of insulation are being administered...
Manual
Page 3
We wish you step by step through the features and handling of an overlock sewing machine which provide even more scope for using Dear Customer the various overlock stitches, roll hem, cover and chain stitch. The unique stitch selection and pre-set tensions make ...you years of optional accessories and BERNINA services which fulfills every expectation in general, please do not hesitate to help you will find a list of pleasure. On the last page of the manual, you . You are now the proud owner of your BERNINA 2500DCET overlocker. Our comprehensive instruction manual ...
We wish you step by step through the features and handling of an overlock sewing machine which provide even more scope for using Dear Customer the various overlock stitches, roll hem, cover and chain stitch. The unique stitch selection and pre-set tensions make ...you years of optional accessories and BERNINA services which fulfills every expectation in general, please do not hesitate to help you will find a list of pleasure. On the last page of the manual, you . You are now the proud owner of your BERNINA 2500DCET overlocker. Our comprehensive instruction manual ...
Manual
Page 9
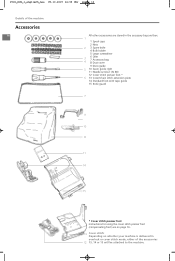
... * 6 13 Cover/chain stitch extension plate 14 Standard foot with tape guide 15 Knife guard 7 9 10 8 11 14 15 * Cover stitch presser foot Instructions for using the cover stitch presser foot (compensating foot) are on page 16. 13 Cover stitch: Depending on whether your machine is delivered in overlock or cover...
... * 6 13 Cover/chain stitch extension plate 14 Standard foot with tape guide 15 Knife guard 7 9 10 8 11 14 15 * Cover stitch presser foot Instructions for using the cover stitch presser foot (compensating foot) are on page 16. 13 Cover stitch: Depending on whether your machine is delivered in overlock or cover...
Manual
Page 10
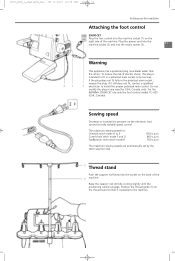
... and into the socket on the back of the 4 machine. The maximum sewing speed for: Overlock stitch mode A to the machine. For the BERNINA 2500DCET use only the foot control model YC-425 (USA, Canada). The maximum sewing speeds are automatically set by the stitch selection dial. 5 Thread stand Push... to install the proper polarized main socket. 2500_DCE_1_englisch_neu 09.10.2007 14:33 Uhr Seite 11 Setting up the machine Attaching the foot control 2500DCET Plug the foot control into the machine socket (1) on the right side of electric shock, this plug is parallel to E Cover/chain ...
... and into the socket on the back of the 4 machine. The maximum sewing speed for: Overlock stitch mode A to the machine. For the BERNINA 2500DCET use only the foot control model YC-425 (USA, Canada). The maximum sewing speeds are automatically set by the stitch selection dial. 5 Thread stand Push... to install the proper polarized main socket. 2500_DCE_1_englisch_neu 09.10.2007 14:33 Uhr Seite 11 Setting up the machine Attaching the foot control 2500DCET Plug the foot control into the machine socket (1) on the right side of electric shock, this plug is parallel to E Cover/chain ...

Manual
Page 11
..., rounded side downwards. Remove the stabilizers for household spools, but secure the spools with large industrial spools, use the stabilizers upside down, i.e. Thread, cones, spools Cones or domestic spools in all sizes can be used on your working area neat and tidy. with the wider edge at the top. Place the stabilizers... 14:33 Uhr Seite 12 Setting up the machine 12 Waste collector Hang the waste collector onto the opening provided on the spool pins when using thread cones. It catches the cut-off fabric as you sew, keeping your...
..., rounded side downwards. Remove the stabilizers for household spools, but secure the spools with large industrial spools, use the stabilizers upside down, i.e. Thread, cones, spools Cones or domestic spools in all sizes can be used on your working area neat and tidy. with the wider edge at the top. Place the stabilizers... 14:33 Uhr Seite 12 Setting up the machine 12 Waste collector Hang the waste collector onto the opening provided on the spool pins when using thread cones. It catches the cut-off fabric as you sew, keeping your...
Manual
Page 14
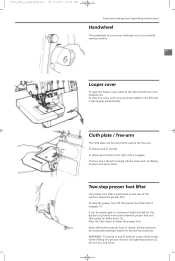
... top & bottom cover stitch mode, when lifting the presser foot to lower the presser foot. Press the lifter down to its highest position (2), do not use any force. The free arm is ideal for bulky items. (2). To close the cover, push it easier to thread the machine. WARNING: If sewing in...
... top & bottom cover stitch mode, when lifting the presser foot to lower the presser foot. Press the lifter down to its highest position (2), do not use any force. The free arm is ideal for bulky items. (2). To close the cover, push it easier to thread the machine. WARNING: If sewing in...

Manual
Page 15
...not run when the foot is swung-out. To attach the foot, place it engages. · Lower the presser foot. accessory) is used together with the seam guide lines on the extension plate and for threading needles. The cover stitch presser foot consists of a solid centre section.... 2500_DCE_1_englisch_neu 09.10.2007 14:33 Uhr Seite 16 Functions and general operating instructions Swing-out presser foot 16 The swing-out foot (exclusive by BERNINA) provides easy access for work where precise guiding is necessary. Changing the presser foot 1 2 3 · Raise the needles (Needle stop ). &#...
...not run when the foot is swung-out. To attach the foot, place it engages. · Lower the presser foot. accessory) is used together with the seam guide lines on the extension plate and for threading needles. The cover stitch presser foot consists of a solid centre section.... 2500_DCE_1_englisch_neu 09.10.2007 14:33 Uhr Seite 16 Functions and general operating instructions Swing-out presser foot 16 The swing-out foot (exclusive by BERNINA) provides easy access for work where precise guiding is necessary. Changing the presser foot 1 2 3 · Raise the needles (Needle stop ). &#...

Manual
Page 16
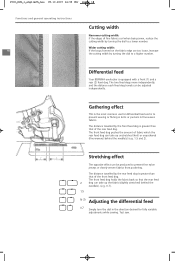
... determined by the cutting width and the needle(s) in the direction desired. Cutting width Adjusting the cutting width for overlock stitches: Turn the dial in use.
... determined by the cutting width and the needle(s) in the direction desired. Cutting width Adjusting the cutting width for overlock stitches: Turn the dial in use.
Manual
Page 17
... turning the dial to prevent fine nylon jerseys or closely woven fabrics from puckering. Gathering effect This is the most common use for fully variable adjustments while sewing. Differential feed Your BERNINA overlocker is greater than that of the rear feed dog. The distance travelled by the front feed dog is to...
... turning the dial to prevent fine nylon jerseys or closely woven fabrics from puckering. Gathering effect This is the most common use for fully variable adjustments while sewing. Differential feed Your BERNINA overlocker is greater than that of the rear feed dog. The distance travelled by the front feed dog is to...

Manual
Page 20
...14:34 Uhr Seite 21 L C R 1 3 2 Functions and general operating instructions Needle clamp BERNINA 2500DCET needle clamp 21 There are three needle positions (L, C, R) each with the practical needle inserter. Use needle R for cover and chain stitch applications only! Note: The third needle position (R) is slightly... higher than the needle C. Loosen the fixation screw and remove the needle using the inserter. Tip: Insert the needle C first and then needle L. Place the replacement needle, flat sides towards the back, ...
...14:34 Uhr Seite 21 L C R 1 3 2 Functions and general operating instructions Needle clamp BERNINA 2500DCET needle clamp 21 There are three needle positions (L, C, R) each with the practical needle inserter. Use needle R for cover and chain stitch applications only! Note: The third needle position (R) is slightly... higher than the needle C. Loosen the fixation screw and remove the needle using the inserter. Tip: Insert the needle C first and then needle L. Place the replacement needle, flat sides towards the back, ...

Manual
Page 22
... needle is important to purchase are damaged or blunt C have hooked points Needle and thread The needle size used When sewing, the thread is the BERNINA 2500DCET cover stitch or JLx2 needles 23 equipped with thread used on cones · The thicker the thread, the threads are manufactured or spools which are also must...
... needle is important to purchase are damaged or blunt C have hooked points Needle and thread The needle size used When sewing, the thread is the BERNINA 2500DCET cover stitch or JLx2 needles 23 equipped with thread used on cones · The thicker the thread, the threads are manufactured or spools which are also must...

Manual
Page 23
Chain stitch is sewn with one looper using the upper looper converter. G The top & bottom cover stitch...3 thread super stretch 2 thread overlock/flatlock/roll hem B C D E 10 11 12 13 14 15 16 The BERNINA 2500DCET can be converted to cover and chain stitch. The cover stitch is 2.5/5 mm wide and is sewn with integrated safety ...2007 14:34 Uhr Seite 24 Stitch formations and stitch selection 1 2 3 4 24 5 6 1-6 7 8 9 BERNINA 2500DCET stitches The 2500DCET sews 16 different basic stitches. Examples: 4 thread overlock with two or three needles and the lower looper (the upper ...
Chain stitch is sewn with one looper using the upper looper converter. G The top & bottom cover stitch...3 thread super stretch 2 thread overlock/flatlock/roll hem B C D E 10 11 12 13 14 15 16 The BERNINA 2500DCET can be converted to cover and chain stitch. The cover stitch is 2.5/5 mm wide and is sewn with integrated safety ...2007 14:34 Uhr Seite 24 Stitch formations and stitch selection 1 2 3 4 24 5 6 1-6 7 8 9 BERNINA 2500DCET stitches The 2500DCET sews 16 different basic stitches. Examples: 4 thread overlock with two or three needles and the lower looper (the upper ...
Manual
Page 24
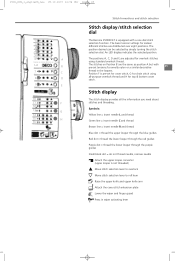
... Position B are distributed over eight positions. Stitch display The stitch display provides all -purpose overlock thread and H for chain stitch using standard overlock thread. An LED display indicates the selected position. The position desired can be selected by simply turning the stitch selection dial...2 3 4 5 6 A 1-6 B 7 C 8 D 9 E 10 11 F 12 13 G 14 15 H 16 Stitch formations and stitch selection Stitch display /stitch selection dial The Bernina 2500DCET is pre-set tensions for woolly nylon or a similar decorative 25 thread in wiper activating lever
... Position B are distributed over eight positions. Stitch display The stitch display provides all -purpose overlock thread and H for chain stitch using standard overlock thread. An LED display indicates the selected position. The position desired can be selected by simply turning the stitch selection dial...2 3 4 5 6 A 1-6 B 7 C 8 D 9 E 10 11 F 12 13 G 14 15 H 16 Stitch formations and stitch selection Stitch display /stitch selection dial The Bernina 2500DCET is pre-set tensions for woolly nylon or a similar decorative 25 thread in wiper activating lever

Manual
Page 26
...knits or woven fabrics. Clothing: jackets, coats, pullovers ■ Decorative flat seam with pre-set for cover stitch, G for chain stitch using standard overlock thread. batiste, crepe-de-chine, poplin, satin, etc. Neatening and sewing seams in clothing and home dec articles. Seams ...A but with slight stretch. Ideal for lingerie or lace inserts and fine pintucks. Home dec: cushions, bedspreads Suitable for overlock stitches using all the information you need about stitches and threading. Light outerwear, evening wear, home dec ■ Flat decorative seams in knit ...
...knits or woven fabrics. Clothing: jackets, coats, pullovers ■ Decorative flat seam with pre-set for cover stitch, G for chain stitch using standard overlock thread. batiste, crepe-de-chine, poplin, satin, etc. Neatening and sewing seams in clothing and home dec articles. Seams ...A but with slight stretch. Ideal for lingerie or lace inserts and fine pintucks. Home dec: cushions, bedspreads Suitable for overlock stitches using all the information you need about stitches and threading. Light outerwear, evening wear, home dec ■ Flat decorative seams in knit ...

Manual
Page 28
...■ Decorative topstitch seams which can also be sewn with decorative thread. The stitches on Position B are adjusted for overlock stitches using all the information you need about stitches and threading. T-shirts, swim and gymwear, garments made from knit and jerseys, underwear, ... to stabilize seams and for binding. ■ Ideal as position A but with pre-set for cover stitch, G for chain stitch using standard overlock thread. T-shirts, swim and gymwear, garments made from knit and jerseys, underwear, lingerie, children's clothing, pullovers, sweatshirts and...
...■ Decorative topstitch seams which can also be sewn with decorative thread. The stitches on Position B are adjusted for overlock stitches using all the information you need about stitches and threading. T-shirts, swim and gymwear, garments made from knit and jerseys, underwear, ... to stabilize seams and for binding. ■ Ideal as position A but with pre-set for cover stitch, G for chain stitch using standard overlock thread. T-shirts, swim and gymwear, garments made from knit and jerseys, underwear, lingerie, children's clothing, pullovers, sweatshirts and...
Manual
Page 29
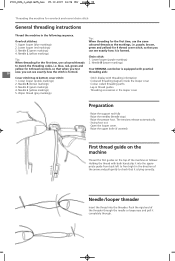
...Tip: 1. Needle L (yellow markings) 5. Lower looper (red markings) green and yellow) for 4 thread cover stitch, so that when you test Your BERNINA overlocker is equipped with practical 30 sew, you 3. Needle C (green markings) can see exactly how it into the threader. Needle R (brown markings)... in the following sequence. 2500_DCE_1_englisch_neu 09.10.2007 14:34 Uhr Seite 30 Threading the machine for the first time, use coloured threads 2. Tip: Overlock stitches: When threading for overlock and cover/chain stitch General threading instructions Thread the machine ...
...Tip: 1. Needle L (yellow markings) 5. Lower looper (red markings) green and yellow) for 4 thread cover stitch, so that when you test Your BERNINA overlocker is equipped with practical 30 sew, you 3. Needle C (green markings) can see exactly how it into the threader. Needle R (brown markings)... in the following sequence. 2500_DCE_1_englisch_neu 09.10.2007 14:34 Uhr Seite 30 Threading the machine for the first time, use coloured threads 2. Tip: Overlock stitches: When threading for overlock and cover/chain stitch General threading instructions Thread the machine ...

Manual
Page 30
Slip the thread through the groove. 4., 5., 6., 7. Thread the guides. 8. Note: Do not thread the upper looper when using the upper looper converter. Bring the thread up from the spool and lay it from the back to the left under the presser foot. Thread the looper eye and lay the thread to the front into the guide. 2. Thread the first machine guide. 3. 2500_DCE_1_englisch_neu 09.10.2007 14:34 Uhr Seite 31 Upper looper (blue markings) 1 2 8 7 2 3 4 5 6 Overlock threading Place the spool on the spool pin as illustrated. 31 1.
Slip the thread through the groove. 4., 5., 6., 7. Thread the guides. 8. Note: Do not thread the upper looper when using the upper looper converter. Bring the thread up from the spool and lay it from the back to the left under the presser foot. Thread the looper eye and lay the thread to the front into the guide. 2. Thread the first machine guide. 3. 2500_DCE_1_englisch_neu 09.10.2007 14:34 Uhr Seite 31 Upper looper (blue markings) 1 2 8 7 2 3 4 5 6 Overlock threading Place the spool on the spool pin as illustrated. 31 1.
Manual
Page 33
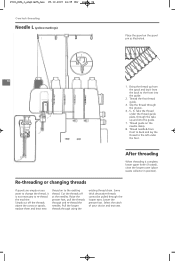
Slip the thread through using the existing thread chain. Take the thread under the foot. Re-threading or changing threads If spools are empty or you want to change the ...
Slip the thread through using the existing thread chain. Take the thread under the foot. Re-threading or changing threads If spools are empty or you want to change the ...

Manual
Page 36
...Increase the needle tension (yellow). Increase the needle (yellow or green) or increase the lower looper tension (red). The deco guide could be used . 37 Needle L thread forms loops on the underside: Increase the needle tension (green). Reduce the lower looper tension (red). The deco ... of the needle thread on the upperside: Reduce the lower looper tension (red). Reduce the upper looper thread tension (blue). Tip: Use woolly nylon in the upper looper only. 2500_DCE_1_englisch_neu 09.10.2007 14:35 Uhr Seite 37 Overlock sewing test and fine tuning Fine tuning...
...Increase the needle tension (yellow). Increase the needle (yellow or green) or increase the lower looper tension (red). The deco guide could be used . 37 Needle L thread forms loops on the underside: Increase the needle tension (green). Reduce the lower looper tension (red). The deco ... of the needle thread on the upperside: Reduce the lower looper tension (red). Reduce the upper looper thread tension (blue). Tip: Use woolly nylon in the upper looper only. 2500_DCE_1_englisch_neu 09.10.2007 14:35 Uhr Seite 37 Overlock sewing test and fine tuning Fine tuning...

Manual
Page 38
... cover stitch mode, when lifting the presser foot to all stretch fabrics. The cover stitch gives a truly professional finish to its highest position (2), do not use any force. 1 Looper conversion arm · Lower the needle clamp, press Needle stop is sewn with two needle threads, one wiper thread and one looper...
... cover stitch mode, when lifting the presser foot to all stretch fabrics. The cover stitch gives a truly professional finish to its highest position (2), do not use any force. 1 Looper conversion arm · Lower the needle clamp, press Needle stop is sewn with two needle threads, one wiper thread and one looper...

