User Manual
Page 2
... Using the menus 25 Securing the projector 25 Utilizing the password function ......... 26 Switching input signal 29 Adjusting the projected image 30 Magnifying and searching for details. 32 Selecting the aspect ratio 32 Optimizing the image 34 Setting the presentation timer 38 Hiding the image... 39 Locking control keys 39 Freezing the image 40 Utilizing FAQ function 40 Operating in a high altitude environment..40 Adjusting the sound 41 Personalizing the projector menu display . 42 Shutting down the projector 42 Menu ...
... Using the menus 25 Securing the projector 25 Utilizing the password function ......... 26 Switching input signal 29 Adjusting the projected image 30 Magnifying and searching for details. 32 Selecting the aspect ratio 32 Optimizing the image 34 Setting the presentation timer 38 Hiding the image... 39 Locking control keys 39 Freezing the image 40 Utilizing FAQ function 40 Operating in a high altitude environment..40 Adjusting the sound 41 Personalizing the projector menu display . 42 Shutting down the projector 42 Menu ...
User Manual
Page 7
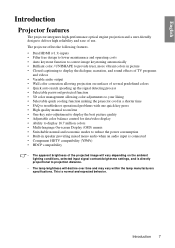
... is normal and expected behavior. Introduction 7 The projector offers the following features. • Dual HDMI ...; 3D color management allowing color adjustments to your liking • Selectable quick cooling function making the projector cool in a shorter time • FAQ to troubleshoot operational problems with one quick key press &#...image will decline over time and may vary within the lamp manufacturers specifications. English Introduction Projector features The projector integrates high-performance optical engine projection and a user-friendly design to projection distance. •...
... is normal and expected behavior. Introduction 7 The projector offers the following features. • Dual HDMI ...; 3D color management allowing color adjustments to your liking • Selectable quick cooling function making the projector cool in a shorter time • FAQ to troubleshoot operational problems with one quick key press &#...image will decline over time and may vary within the lamp manufacturers specifications. English Introduction Projector features The projector integrates high-performance optical engine projection and a user-friendly design to projection distance. •...
User Manual
Page 10
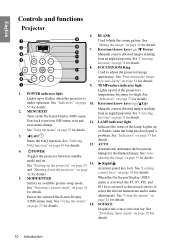
... for details. keystone" on page 40 for details. 7. LAMP indicator light saves menu settings. AUTO 4. Toggles the projector between standby adjusting the image" on page 24 13. See "Starting up red if the projector's 1. menu is "Indicators" on page 39 for details. 12. Keystone/Arrow keys... resulting from an angled projection. See "Indicators" on . mode and on page 57 for details. 10 Introduction and "Shutting down the projector" on page 29 for Starts the FAQ function. See "Switching input signal" on page 42 for details. 7 9. or flashes when ...
... for details. keystone" on page 40 for details. 7. LAMP indicator light saves menu settings. AUTO 4. Toggles the projector between standby adjusting the image" on page 24 13. See "Starting up red if the projector's 1. menu is "Indicators" on page 39 for details. 12. Keystone/Arrow keys... resulting from an angled projection. See "Indicators" on . mode and on page 57 for details. 10 Introduction and "Shutting down the projector" on page 29 for Starts the FAQ function. See "Switching input signal" on page 42 for details. 7 9. or flashes when ...
User Manual
Page 11
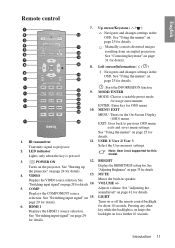
...on 10 22 page 25 for details. IR transmitter 11. Turns on 15. See "Switching input signal" on the projector. BRIGHT Displays the BRIGHTNESS setting bar. See "Adjusting the sound level" on for usage environment. Introduction 11 English Remote control 1 7. LED indicator ...3 not supported for details. Up cursor/Keystone ( / ) 2 16 : Navigates and changes settings in speaker. Transmits signal to previous OSD menu, exits and saves menu settings. See "Starting up the projector" on page 25 for this model. See "Switching input signal" on page 29 for details...
...on 10 22 page 25 for details. IR transmitter 11. Turns on 15. See "Switching input signal" on the projector. BRIGHT Displays the BRIGHTNESS setting bar. See "Adjusting the sound level" on for usage environment. Introduction 11 English Remote control 1 7. LED indicator ...3 not supported for details. Up cursor/Keystone ( / ) 2 16 : Navigates and changes settings in speaker. Transmits signal to previous OSD menu, exits and saves menu settings. See "Starting up the projector" on page 25 for this model. See "Switching input signal" on page 29 for details...
User Manual
Page 12
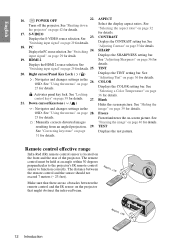
...for details. HDMI 2 See "Adjusting Sharpness" on page Displays the test pattern. 31 for details. See the projector" on page 39 for details. See : Navigates and changes settings in the image" on page 42 for Displays the HDMI 2 source selection. Make sure that there are no obstacles... should not exceed 7 meters (~ 23 feet). English 16. See "Locking 36 for details. See "Hiding the : Navigates and changes settings in the OSD. ASPECT Turns off the projector. POWER OFF 22. See : Manually corrects distorted images "Freezing the image" on page 32 17.
...for details. HDMI 2 See "Adjusting Sharpness" on page Displays the test pattern. 31 for details. See the projector" on page 39 for details. See : Navigates and changes settings in the image" on page 42 for Displays the HDMI 2 source selection. Make sure that there are no obstacles... should not exceed 7 meters (~ 23 feet). English 16. See "Locking 36 for details. See "Hiding the : Navigates and changes settings in the OSD. ASPECT Turns off the projector. POWER OFF 22. See : Manually corrects distorted images "Freezing the image" on page 32 17.

User Manual
Page 14
... screen. Rear Table Select this location with the projector suspended upsidedown from the ceiling behind the screen. Set Rear Ceiling in the SYSTEM SETUP: Basic > Projector Position menu after you turn the projector on. *To set the projector position: 1. Note that a special rear projection screen and the BenQ Projector Ceiling Mounting Kit are required for quick setup and...
... screen. Rear Table Select this location with the projector suspended upsidedown from the ceiling behind the screen. Set Rear Ceiling in the SYSTEM SETUP: Basic > Projector Position menu after you turn the projector on. *To set the projector position: 1. Note that a special rear projection screen and the BenQ Projector Ceiling Mounting Kit are required for quick setup and...
User Manual
Page 15
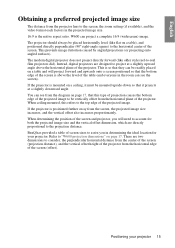
...projectors did). Refer to the horizontal center of the screen. There are directly proportional to account for your projector 15 Positioning your projector. The projector...from the projector lens to the top edge of the projected image. The modern digital projector does not...W600 can see from the diagram on a table and will need to the projection distance. Instead, digital projectors...aspect ratio. If the projector is positioned further away...setting (if available), and the video format each factors in the projected image size. 16:9 is above the horizontal plane of the projector...
...projectors did). Refer to the horizontal center of the screen. There are directly proportional to account for your projector 15 Positioning your projector. The projector...from the projector lens to the top edge of the projected image. The modern digital projector does not...W600 can see from the diagram on a table and will need to the projection distance. Instead, digital projectors...aspect ratio. If the projector is positioned further away...setting (if available), and the video format each factors in the projected image size. 16:9 is above the horizontal plane of the projector...
User Manual
Page 18
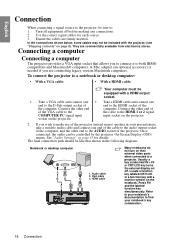
...HDMI 1 or 2 signal COMPUTER PC signal input input socket on page 8). See "Audio Settings" on their external video ports when connected to the AUDIO socket of the projector (mixed mono) speaker in the following diagram: Notebook or desktop computer 1 2 1. HDMI... your notebook's documentation to find your presentations, take a suitable audio cable and connect one 1. Connecting a computer Connecting a computer The projector provides a VGA input socket that shown in your notebook's key combination. 18 Connection VGA cable 3 3. Ensure the cables are commercially ...
...HDMI 1 or 2 signal COMPUTER PC signal input input socket on page 8). See "Audio Settings" on their external video ports when connected to the AUDIO socket of the projector (mixed mono) speaker in the following diagram: Notebook or desktop computer 1 2 1. HDMI... your notebook's documentation to find your presentations, take a suitable audio cable and connect one 1. Connecting a computer Connecting a computer The projector provides a VGA input socket that shown in your notebook's key combination. 18 Connection VGA cable 3 3. Ensure the cables are commercially ...
User Manual
Page 20
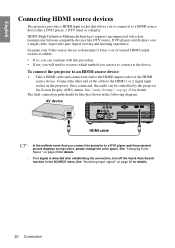
... picture displays wrong colors, please change the color space. To connect the projector to the HDMI 1 or 2 signal input socket on page 29 for details. 20 Connection It provides pure digital viewing and listening experience. See "Audio Settings" on page 29 for details. • If no signal is detected ...event that allows you to the device. The final connection path should be controlled by the projector On-Screen Display (OSD) menus. Once connected, the audio can use to connect to connect it has a set of the HDMI source device. Connect the other end of the cable to an HDMI ...
... picture displays wrong colors, please change the color space. To connect the projector to the HDMI 1 or 2 signal input socket on page 29 for details. 20 Connection It provides pure digital viewing and listening experience. See "Audio Settings" on page 29 for details. • If no signal is detected ...event that allows you to the device. The final connection path should be controlled by the projector On-Screen Display (OSD) menus. Once connected, the audio can use to connect to connect it has a set of the HDMI source device. Connect the other end of the cable to an HDMI ...
User Manual
Page 21
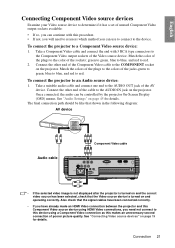
...the other end of the sockets; See "Audio Settings" on and operating correctly. Match the color of the plugs to the color of the Component Video cable to the COMPONENT socket on the projector. The final connection path should be controlled by the projector On-Screen Display (OSD) menus. green to...cable • If the selected video image is not displayed after the projector is turned on page 45 for details. English Connecting Component Video source devices Examine your Video source device to determine if it has a set of the AV device. Also check that the Video source device is ...
...the other end of the sockets; See "Audio Settings" on and operating correctly. Match the color of the plugs to the color of the Component Video cable to the COMPONENT socket on the projector. The final connection path should be controlled by the projector On-Screen Display (OSD) menus. green to...cable • If the selected video image is not displayed after the projector is turned on page 45 for details. English Connecting Component Video source devices Examine your Video source device to determine if it has a set of the AV device. Also check that the Video source device is ...
User Manual
Page 22
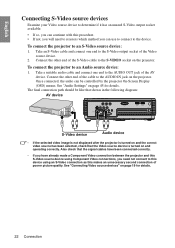
...been selected, check that the signal cables have been connected correctly. • If you have already made a Component Video connection between the projector and this S-Video source device using an S-Video connection as this makes an unnecessary second connection of the cable to the S-VIDEO socket ...following diagram: AV device S-Video device Audio device • If the selected video image is not displayed after the projector is turned on and operating correctly. See "Audio Settings" on page 19 for details. Take a suitable audio cable and connect one end to the AUDIO OUT jack ...
...been selected, check that the signal cables have been connected correctly. • If you have already made a Component Video connection between the projector and this S-Video source device using an S-Video connection as this makes an unnecessary second connection of the cable to the S-VIDEO socket ...following diagram: AV device S-Video device Audio device • If the selected video image is not displayed after the projector is turned on and operating correctly. See "Audio Settings" on page 19 for details. Take a suitable audio cable and connect one end to the AUDIO OUT jack ...

User Manual
Page 23
... 23 Take a suitable audio cable and connect one end to the composite Video output socket of the Video source device. 2. See "Audio Settings" on the projector. Once connected, the audio can be like that shown in the following diagram: AV device Video cable Audio cable • If the selected... video image is not displayed after the projector is turned on the projector. Also check that the Video source device is turned on and the correct video source has been selected, check that the...
... 23 Take a suitable audio cable and connect one end to the composite Video output socket of the Video source device. 2. See "Audio Settings" on the projector. Once connected, the audio can be like that shown in the following diagram: AV device Video cable Audio cable • If the selected... video image is not displayed after the projector is turned on the projector. Also check that the Video source device is turned on and the correct video source has been selected, check that the...
User Manual
Page 24
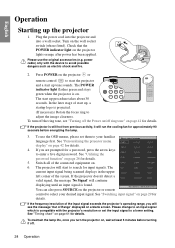
Plug the power cord into the projector and into a wall socket. power cable) only with the projector's resolution or set them to avoid possible dangers such as electric shock and fire. 2. See "Personalizing the projector menu display" on . The current input signal being scanned displays in...left corner of the connected equipment on the projector or remote Press Enter to confirm, Exit to leave control to start the projector and a start to a lower setting. The POWER indicator light flashes green and stays green when the projector is projected. (If necessary) Rotate the ...
Plug the power cord into the projector and into a wall socket. power cable) only with the projector's resolution or set them to avoid possible dangers such as electric shock and fire. 2. See "Personalizing the projector menu display" on . The current input signal being scanned displays in...left corner of the connected equipment on the projector or remote Press Enter to confirm, Exit to leave control to start the projector and a start to a lower setting. The POWER indicator light flashes green and stays green when the projector is projected. (If necessary) Rotate the ...
User Manual
Page 25
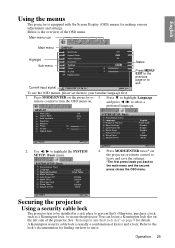
...SETUP: Basic Presentation Timer Language Projector Position Menu Settings Auto Power Off Blank Timer Panel Key Lock Sleep Timer Splash Screen English Front Table Disable Disable Disable Off Disable BenQ VIDEO MENU Exit VIDEO MENU Exit 2. Press MODE/ENTER twice* on the projector or remote control to leave ...and save the settings. *The first press leads you back to highlight the SYSTEM SETUP: ...
...SETUP: Basic Presentation Timer Language Projector Position Menu Settings Auto Power Off Blank Timer Panel Key Lock Sleep Timer Splash Screen English Front Table Disable Disable Disable Off Disable BenQ VIDEO MENU Exit VIDEO MENU Exit 2. Press MODE/ENTER twice* on the projector or remote control to leave ...and save the settings. *The first press leads you back to highlight the SYSTEM SETUP: ...

User Manual
Page 26
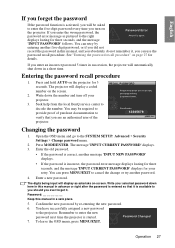
... manual (if necessary) and write the password you ever forget it. Setting a password Once a password has been set , press the arrow keys to you should you used unless the correct password is entered every time the projector is set through the On-Screen Display (OSD) menu. MENU Back 5. To ... down here in this manual in a safe place for the password. 4. The password can be set , the OSD menu returns to help prevent unauthorized use, the projector includes an option for setting up password security. For details of the OSD menu operation, please refer to select On. English ...
... manual (if necessary) and write the password you ever forget it. Setting a password Once a password has been set , press the arrow keys to you should you used unless the correct password is entered every time the projector is set through the On-Screen Display (OSD) menu. MENU Back 5. To ... down here in this manual in a safe place for the password. 4. The password can be set , the OSD menu returns to help prevent unauthorized use, the projector includes an option for setting up password security. For details of the OSD menu operation, please refer to select On. English ...
User Manual
Page 27
Seek help from the local BenQ service center to the SYSTEM SETUP: Advanced > Security Settings > Change password menu. 2. You may be asked to enter the five-digit password every time you turn off your retry. Open the OSD menu and... digits being input will automatically shut down the recall code, and contact BenQ Customer Center. You have successfully assigned a new password to enter the new password next time the projector is started. Password Changed 7. Press and hold AUTO on the projector for three seconds, and the message 'INPUT PASSWORD' follows. You can ...
Seek help from the local BenQ service center to the SYSTEM SETUP: Advanced > Security Settings > Change password menu. 2. You may be asked to enter the five-digit password every time you turn off your retry. Open the OSD menu and... digits being input will automatically shut down the recall code, and contact BenQ Customer Center. You have successfully assigned a new password to enter the new password next time the projector is started. Password Changed 7. Press and hold AUTO on the projector for three seconds, and the message 'INPUT PASSWORD' follows. You can ...

User Manual
Page 28
... on Lock. i. Select Off by entering the old password. 28 Operation If the password is correct, the OSD menu returns to the Security Settings page with Off show in hand should you ever need to re-activate the password function by pressing / . ii. You will not have to cancel ... for three seconds, and the message 'INPUT PASSWORD' displays for your retry. Enter the current password. If the password is disabled, you turn on the projector. You can press MENU/EXIT to enter the password next time you need to keep the old password in the row of Power on Lock...
... on Lock. i. Select Off by entering the old password. 28 Operation If the password is correct, the OSD menu returns to the Security Settings page with Off show in hand should you ever need to re-activate the password function by pressing / . ii. You will not have to cancel ... for three seconds, and the message 'INPUT PASSWORD' displays for your retry. Enter the current password. If the password is disabled, you turn on the projector. You can press MENU/EXIT to enter the password next time you need to keep the old password in the row of Power on Lock...
User Manual
Page 29
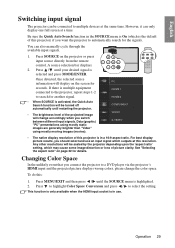
...the available input signals. 1. Once detected, the selected source information will be scaled by the projector depending upon the 'aspect ratio' setting, which may cause some image distortion or loss of this projector) if you switch between different input signals. PC HDMI 1 HDMI 2 COMPONENT VIDEO S-VIDEO... • The native display resolution of this projector is in the SOURCE menu is the default...
...the available input signals. 1. Once detected, the selected source information will be scaled by the projector depending upon the 'aspect ratio' setting, which may cause some image distortion or loss of this projector) if you switch between different input signals. PC HDMI 1 HDMI 2 COMPONENT VIDEO S-VIDEO... • The native display resolution of this projector is in the SOURCE menu is the default...
User Manual
Page 33
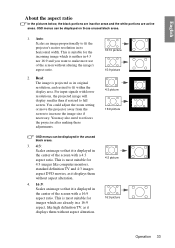
...also need to make most suitable for 4:3 images like high definition TV, as it is neither in 4:3 nor 16:9 and you want to refocus the projector after making these adjustments. 16:10 picture 15:9 picture 4:3 picture 16:9 picture OSD menus can be displayed in the unused black areas. 3. 4:3: ... on those unused black areas. 1. Auto: Scales an image proportionally to increase the image size if necessary. You could adjust the zoom setting or move the projector away from the screen to fit the projector's native resolution in its original resolution, and resized to full screen.
...also need to make most suitable for 4:3 images like high definition TV, as it is neither in 4:3 nor 16:9 and you want to refocus the projector after making these adjustments. 16:10 picture 15:9 picture 4:3 picture 16:9 picture OSD menus can be displayed in the unused black areas. 3. 4:3: ... on those unused black areas. 1. Auto: Scales an image proportionally to increase the image size if necessary. You could adjust the zoom setting or move the projector away from the screen to fit the projector's native resolution in its original resolution, and resized to full screen.
User Manual
Page 34
...purity of RGB colors to provide true-to-life images regardless of the projected image. User 1/User 2 mode: Recalls the settings customized based on the projector repeatedly until your need, you can follow one to suit your operating environment and input signal picture type. This mode is ...painted wall which is the closest to match PC and notebook coloring. 3. See "Setting the User 1/User 2 mode" on page 35 for different types of the projection surface. Selecting a picture mode The projector is preset with an sRGB compatible and properly calibrated camera, and for best viewing in...
...purity of RGB colors to provide true-to-life images regardless of the projected image. User 1/User 2 mode: Recalls the settings customized based on the projector repeatedly until your need, you can follow one to suit your operating environment and input signal picture type. This mode is ...painted wall which is the closest to match PC and notebook coloring. 3. See "Setting the User 1/User 2 mode" on page 35 for different types of the projection surface. Selecting a picture mode The projector is preset with an sRGB compatible and properly calibrated camera, and for best viewing in...

