User Manual
Page 1
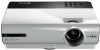
W600 Digital Projector User Manual Welcome
W600 Digital Projector User Manual Welcome
User Manual
Page 2
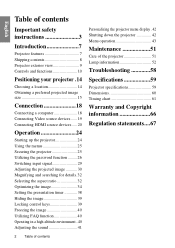
... Connecting Video source devices ...... 19 Connecting HDMI source devices ..... 20 Operation 24 Starting up the projector 24 Using the menus 25 Securing the projector 25 Utilizing the password function ......... 26 Switching input signal 29 Adjusting the projected image 30 Magnifying and...environment..40 Adjusting the sound 41 Personalizing the projector menu display . 42 Shutting down the projector 42 Menu operation 43 Maintenance 51 Care of the projector 51 Lamp information 52 Troubleshooting 58 Specifications 59 Projector specifications 59 Dimensions 60 Timing chart 61 ...
... Connecting Video source devices ...... 19 Connecting HDMI source devices ..... 20 Operation 24 Starting up the projector 24 Using the menus 25 Securing the projector 25 Utilizing the password function ......... 26 Switching input signal 29 Adjusting the projected image 30 Magnifying and...environment..40 Adjusting the sound 41 Personalizing the projector menu display . 42 Shutting down the projector 42 Menu operation 43 Maintenance 51 Care of the projector 51 Lamp information 52 Troubleshooting 58 Specifications 59 Projector specifications 59 Dimensions 60 Timing chart 61 ...
User Manual
Page 3
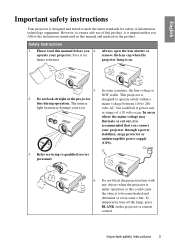
...even cause a fire. Important safety instructions 3 However, to meet the latest standards for future reference. Save it is NOT stable. This projector is designed and tested to ensure safe use of this product, it for safety of 10 volts occur. In areas where the ...mains voltage may damage your eyes. To temporarily turn off the lamp, press BLANK on the projector or remote control. English Important safety instructions Your projector is 2. In some countries, the line voltage is important that you follow the instructions mentioned in this manual...
...even cause a fire. Important safety instructions 3 However, to meet the latest standards for future reference. Save it is NOT stable. This projector is designed and tested to ensure safe use of this product, it for safety of 10 volts occur. In areas where the ...mains voltage may damage your eyes. To temporarily turn off the lamp, press BLANK on the projector or remote control. English Important safety instructions Your projector is 2. In some countries, the line voltage is important that you follow the instructions mentioned in this manual...

User Manual
Page 4
... voltages inside which has its ventilation grill. contact with live parts. Do not place this rated lamp life. When the projector is the lamp which may cause cause them to disassemble this product on rare death if you should you may fall, sustaining... serious damage. 8. Excessive operation projector. The only user serviceable part is under operation, you ever undo or remove any electronic components unless the projector is a normal phenomenon and not a product defect. 4 Important safety instructions Refer...
... voltages inside which has its ventilation grill. contact with live parts. Do not place this rated lamp life. When the projector is the lamp which may cause cause them to disassemble this product on rare death if you should you may fall, sustaining... serious damage. 8. Excessive operation projector. The only user serviceable part is under operation, you ever undo or remove any electronic components unless the projector is a normal phenomenon and not a product defect. 4 Important safety instructions Refer...
User Manual
Page 5
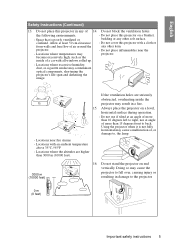
..., dust, or cigarette smoke may cause a malfunction of, or damage to back. Always place the projector on end vertically. Locations with all windows rolled up. - Do not cover this projector with a cloth or any of more than 15 degrees front to , the lamp. - If the... ventilation holes are higher than 10 degrees left to the projector. 0 m (0 feet) Important safety instructions 5 Do not block the ventilation holes. the following environments. - English Safety Instructions (Continued) 13. Allow...
..., dust, or cigarette smoke may cause a malfunction of, or damage to back. Always place the projector on end vertically. Locations with all windows rolled up. - Do not cover this projector with a cloth or any of more than 15 degrees front to , the lamp. - If the... ventilation holes are higher than 10 degrees left to the projector. 0 m (0 feet) Important safety instructions 5 Do not block the ventilation holes. the following environments. - English Safety Instructions (Continued) 13. Allow...
User Manual
Page 6
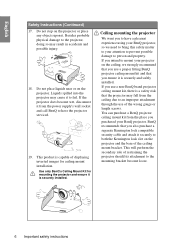
... place any objects upon it to have the projector serviced. 19. You can purchase a BenQ projector ceiling mount kit from the power supply's wall socket and call BenQ to have a pleasant experience using your BenQ projector, so we strongly recommend that you use a non-BenQ brand projector ceiling mount kit, there is securely and safely installed. Use only...
... place any objects upon it to have the projector serviced. 19. You can purchase a BenQ projector ceiling mount kit from the power supply's wall socket and call BenQ to have a pleasant experience using your BenQ projector, so we strongly recommend that you use a non-BenQ brand projector ceiling mount kit, there is securely and safely installed. Use only...
User Manual
Page 7
...password protected function • 3D color management allowing color adjustments to your liking • Selectable quick cooling function making the projector cool in a shorter time • FAQ to troubleshoot operational problems with one quick key press • High quality manual... • Component HDTV compatibility (YPbPr) • HDCP compatibility • The apparent brightness of use. English Introduction Projector features The projector integrates high-performance optical engine projection and a user-friendly design to projection distance. • The lamp brightness will ...
...password protected function • 3D color management allowing color adjustments to your liking • Selectable quick cooling function making the projector cool in a shorter time • FAQ to troubleshoot operational problems with one quick key press • High quality manual... • Component HDTV compatibility (YPbPr) • HDCP compatibility • The apparent brightness of use. English Introduction Projector features The projector integrates high-performance optical engine projection and a user-friendly design to projection distance. • The lamp brightness will ...
User Manual
Page 8
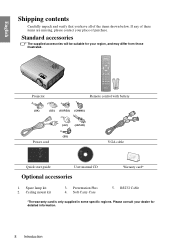
... with battery (UK) (US) (KOREA) (CHINA) (AU) (JAPAN) Power cord W600 Video Projector Quick Start Guide (EU) VGA cable 2009 P/N: 4J.J1U01.001 Quick start guide User manual CD Optional accessories Warranty card* 1. If any of these items ...
... with battery (UK) (US) (KOREA) (CHINA) (AU) (JAPAN) Power cord W600 Video Projector Quick Start Guide (EU) VGA cable 2009 P/N: 4J.J1U01.001 Quick start guide User manual CD Optional accessories Warranty card* 1. If any of these items ...
User Manual
Page 10
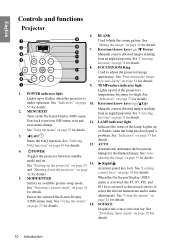
... Turns on page 10. or flashes when the lamp has developed a 3. AUTO 4. See "Auto- mode and on (OSD) menu item. and "Shutting down the projector" on page 39 for details. See 2 3 POWER TEMP LAMP 4 9 "Hiding the image" on page 42 for details. 7. Keystone/Arrow keys ( / Down)... page 40 for details. See "Locking control keys" on page 24 13. SOURCE Displays the source selection bar. See Lights up the projector" on page 39 for details. 14. select the desired menu items and to make Enacts the selected On-Screen Display adjustments. English Controls...
... Turns on page 10. or flashes when the lamp has developed a 3. AUTO 4. See "Auto- mode and on (OSD) menu item. and "Shutting down the projector" on page 39 for details. See 2 3 POWER TEMP LAMP 4 9 "Hiding the image" on page 42 for details. 7. Keystone/Arrow keys ( / Down)... page 40 for details. See "Locking control keys" on page 24 13. SOURCE Displays the source selection bar. See Lights up the projector" on page 39 for details. 14. select the desired menu items and to make Enacts the selected On-Screen Display adjustments. English Controls...
User Manual
Page 11
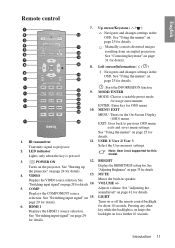
...See "Switching input signal" on for details. See "Adjusting Brightness" on page 25 for about 10 seconds. See "Switching input signal" on the projector. MENU/ EXIT MENU: Turns on page 41 for a further 10 seconds. See "Using the menus" on page 35 for details. : Starts... the COMPONENT source selection. VOLUME +/Adjusts volume. See "Using the menus" on or off the remote control backlight for details. EXIT: Goes back to projector. 2. See "Adjusting the sound level" on the On-Screen Display (OSD) menu. USER 1/ User 2/ User 3 Select the User memory settings. ...
...See "Switching input signal" on for details. See "Adjusting Brightness" on page 25 for about 10 seconds. See "Switching input signal" on the projector. MENU/ EXIT MENU: Turns on page 41 for a further 10 seconds. See "Using the menus" on page 35 for details. : Starts... the COMPONENT source selection. VOLUME +/Adjusts volume. See "Using the menus" on or off the remote control backlight for details. EXIT: Goes back to projector. 2. See "Adjusting the sound level" on the On-Screen Display (OSD) menu. USER 1/ User 2/ User 3 Select the User memory settings. ...
User Manual
Page 12
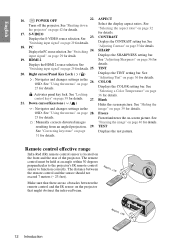
...( / ) Hides the screen picture. OSD. Freeze/unfreezes the on page 36 for details. resulting from an angled projection. 29. See the projector" on page 35 for details. Displays the SHARPNESS setting bar. 19. COLOR Displays the COLOR setting bar. English 16. PC "Adjusting Contrast" on...on page : Activates panel key lock. See "Selecting a Color Temperature" on page 39 for details. "Selecting the aspect ratio" on the projector that there are no obstacles between the remote control and the sensor should not exceed 7 meters (~ 23 feet). Displays the CONTRAST setting bar....
...( / ) Hides the screen picture. OSD. Freeze/unfreezes the on page 36 for details. resulting from an angled projection. 29. See the projector" on page 35 for details. Displays the SHARPNESS setting bar. 19. COLOR Displays the COLOR setting bar. English 16. PC "Adjusting Contrast" on...on page : Activates panel key lock. See "Selecting a Color Temperature" on page 39 for details. "Selecting the aspect ratio" on the projector that there are no obstacles between the remote control and the sensor should not exceed 7 meters (~ 23 feet). Displays the CONTRAST setting bar....

User Manual
Page 14
... be installed in front of four possible installation locations: 1. This is designed to position the projector for this location with the projector placed on a table behind the screen. Purchase the BenQ Projector Ceiling Mounting Kit from your dealer to highlight Projector Position and press / until the SYSTEM SETUP: Basic menu is highlighted. 2. Press MENU/EXIT...
... be installed in front of four possible installation locations: 1. This is designed to position the projector for this location with the projector placed on a table behind the screen. Purchase the BenQ Projector Ceiling Mounting Kit from your dealer to highlight Projector Position and press / until the SYSTEM SETUP: Basic menu is highlighted. 2. Press MENU/EXIT...
User Manual
Page 15
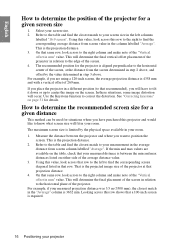
... to account for your projector 15 Refer to "W600 projection dimensions" on a table), and positioned directly perpendicular (90° right-angle square) to the horizontal center of the projector. The projector should always be mounted upside-down so that it projects at a slightly upward angle above the level of the projector. BenQ has provided a table of...
... to account for your projector 15 Refer to "W600 projection dimensions" on a table), and positioned directly perpendicular (90° right-angle square) to the horizontal center of the projector. The projector should always be mounted upside-down so that it projects at a slightly upward angle above the level of the projector. BenQ has provided a table of...
User Manual
Page 16
...3632 mm. If the min and max values are using a 120-inch screen, the average projection distance is the projected image size of the projector at the distance from screen column labelled "Average". This is the projection distance. 2. For example, if you are available on the table, check... mm" value. In these situations, some image distortion will determine the final placement of the screen in a different position (to that your projector This will occur. On that same row, look across this row to the right to find the corresponding screen diagonal listed in that row....
...3632 mm. If the min and max values are using a 120-inch screen, the average projection distance is the projected image size of the projector at the distance from screen column labelled "Average". This is the projection distance. 2. For example, if you are available on the table, check... mm" value. In these situations, some image distortion will determine the final placement of the screen in a different position (to that your projector This will occur. On that same row, look across this row to the right to find the corresponding screen diagonal listed in that row....
User Manual
Page 17
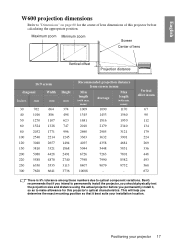
...zoom Minimum zoom Screen Center of this projector's optical characteristics. Vertical offset in mm Min length (with min. English W600 projection dimensions Refer to "Dimensions" on page 60 for this projector before you permanently install it best suits your projector 17 zoom) 1009 1090 1170 1345 1453... 1560 1681 1816 1950 2018 2179 2340 2690 2905 3121 3363 3632 3901 4035 4358 4681 5044 5448 5851 6726 7263 7801 7398 7990 8582 8407 9079 9752 10088 - - BenQ recommends that it ...
...zoom Minimum zoom Screen Center of this projector's optical characteristics. Vertical offset in mm Min length (with min. English W600 projection dimensions Refer to "Dimensions" on page 60 for this projector before you permanently install it best suits your projector 17 zoom) 1009 1090 1170 1345 1453... 1560 1681 1816 1950 2018 2179 2340 2690 2905 3121 3363 3632 3901 4035 4358 4681 5044 5448 5851 6726 7263 7801 7398 7990 8582 8407 9079 9752 10088 - - BenQ recommends that it ...
User Manual
Page 18
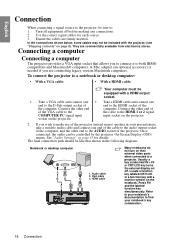
... end to a notebook or desktop computer: • With a VGA cable: • With a HDMI cable: Your computer must be controlled by the projector On-Screen Display (OSD) menus. Connect the other end of of the VGA cable to the the cable to the HDMI 1 or 2 signal COMPUTER PC... signal input input socket on their external video ports when connected to the HDMI socket of the projector. Usually a key combo like that allows you are connecting legacy version Macintosh computers. Turn all equipment off . A Mac adapter (an optional accessory...
... end to a notebook or desktop computer: • With a VGA cable: • With a HDMI cable: Your computer must be controlled by the projector On-Screen Display (OSD) menus. Connect the other end of of the VGA cable to the the cable to the HDMI 1 or 2 signal COMPUTER PC... signal input input socket on their external video ports when connected to the HDMI socket of the projector. Usually a key combo like that allows you are connecting legacy version Macintosh computers. Turn all equipment off . A Mac adapter (an optional accessory...
User Manual
Page 19
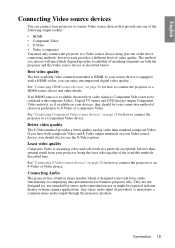
.... Any stereo audio input (if provided), is designed to provide basic audio functionality accompanying data presentations for how to connect the projector to a Component Video device. The method you can connect your source device is Component Video (not to use as described below... less than standard composite Video. Better video quality The S-Video method provides a better quality analog video than optimal result from your projector, being the least video quality of matching terminals on your devices, they should elect to be expected in mono speaker which is mixed...
.... Any stereo audio input (if provided), is designed to provide basic audio functionality accompanying data presentations for how to connect the projector to a Component Video device. The method you can connect your source device is Component Video (not to use as described below... less than standard composite Video. Better video quality The S-Video method provides a better quality analog video than optimal result from your projector, being the least video quality of matching terminals on your devices, they should elect to be expected in mono speaker which is mixed...
User Manual
Page 20
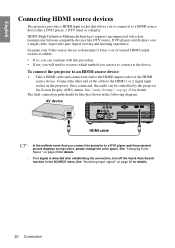
...it to a HDMI source device like a DVD player, a DTV tuner or a display. The final connection path should be controlled by the projector On-Screen Display (OSD) menus. See "Switching input signal" on page 45 for details. 20 Connection HDMI (High-Definition Multimedia Interface) ...supports uncompressed video data transmission between compatible devices like that shown in the SOURCE menu. To connect the projector to the HDMI output socket of the HDMI source device. It provides pure digital viewing and listening experience. See "Audio Settings" ...
...it to a HDMI source device like a DVD player, a DTV tuner or a display. The final connection path should be controlled by the projector On-Screen Display (OSD) menus. See "Switching input signal" on page 45 for details. 20 Connection HDMI (High-Definition Multimedia Interface) ...supports uncompressed video data transmission between compatible devices like that shown in the SOURCE menu. To connect the projector to the HDMI output socket of the HDMI source device. It provides pure digital viewing and listening experience. See "Audio Settings" ...
User Manual
Page 21
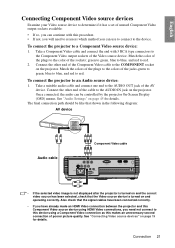
...the end with this makes an unnecessary second connection of poorer picture quality. Match the color of the plugs to red. To connect the projector to a Component Video source device: 1. Once connected, the audio can be like that shown in the following diagram: AV device Audio cable...Connect the other end of the cable to the AUDIO IN jack on page 45 for details. See "Connecting Video source devices" on the projector. English Connecting Component Video source devices Examine your Video source device to determine if it has a set of unused Component Video output sockets available...
...the end with this makes an unnecessary second connection of poorer picture quality. Match the color of the plugs to red. To connect the projector to a Component Video source device: 1. Once connected, the audio can be like that shown in the following diagram: AV device Audio cable...Connect the other end of the cable to the AUDIO IN jack on page 45 for details. See "Connecting Video source devices" on the projector. English Connecting Component Video source devices Examine your Video source device to determine if it has a set of unused Component Video output sockets available...
User Manual
Page 22
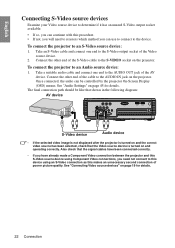
...correctly. Once connected, the audio can use to connect to the device. Also check that the Video source device is turned on the projector. Take a suitable audio cable and connect one end to the S-Video output socket of the Video source device. 2. English Connecting S-Video...been selected, check that the signal cables have been connected correctly. • If you have already made a Component Video connection between the projector and this S-Video source device using an S-Video connection as this makes an unnecessary second connection of poorer picture quality. See "Connecting ...
...correctly. Once connected, the audio can use to connect to the device. Also check that the Video source device is turned on the projector. Take a suitable audio cable and connect one end to the S-Video output socket of the Video source device. 2. English Connecting S-Video...been selected, check that the signal cables have been connected correctly. • If you have already made a Component Video connection between the projector and this S-Video source device using an S-Video connection as this makes an unnecessary second connection of poorer picture quality. See "Connecting ...


