
User Manual
Page 1
W500 LCD Projector Home Entertainment Series User Manual Welcome
W500 LCD Projector Home Entertainment Series User Manual Welcome

User Manual
Page 2
...12 Replacing the remote control batteries 13 Remote control effective range 13 Positioning your projector 14 Choosing a location 14 Obtaining a preferred projected picture size 15 How to determine the position of the projector for a given screen size 15 How to determine the recommended screen size for... a HDMI device 20 Connecting a Component-Video source device 21 Connecting an S-video or a composite Video source device 22 Using the projector 23 Start up ...23 Utilizing the password function 24 Setting a password ...24 If you forget the password 24 Entering the password recall...
...12 Replacing the remote control batteries 13 Remote control effective range 13 Positioning your projector 14 Choosing a location 14 Obtaining a preferred projected picture size 15 How to determine the position of the projector for a given screen size 15 How to determine the recommended screen size for... a HDMI device 20 Connecting a Component-Video source device 21 Connecting an S-video or a composite Video source device 22 Using the projector 23 Start up ...23 Utilizing the password function 24 Setting a password ...24 If you forget the password 24 Entering the password recall...

User Manual
Page 3
...32 Operating in a high altitude environment 33 Searching for details on the projected image 33 Creating your own startup screen 33 Personalizing the projector menu display 34 Turning the power off 34 Menus ...35 On Screen Display (OSD) structure 35 Using the menus 36 Picture--Basic ...menu 38 System Setup menu 39 Advanced Setup menu 40 Information menu 41 Maintenance ...42 Care of the projector 42 Cleaning the lens ...42 Storing the projector 42 Transporting the projector 42 Cleaning and replacing the dust filter 42 Lamp Information 44 Calculation of lamp hour 44 Replacing the...
...32 Operating in a high altitude environment 33 Searching for details on the projected image 33 Creating your own startup screen 33 Personalizing the projector menu display 34 Turning the power off 34 Menus ...35 On Screen Display (OSD) structure 35 Using the menus 36 Picture--Basic ...menu 38 System Setup menu 39 Advanced Setup menu 40 Information menu 41 Maintenance ...42 Care of the projector 42 Cleaning the lens ...42 Storing the projector 42 Transporting the projector 42 Cleaning and replacing the dust filter 42 Lamp Information 44 Calculation of lamp hour 44 Replacing the...

User Manual
Page 4
English Indicators ...47 Troubleshooting 49 Specifications ...50 Projector specifications 50 Optical ...50 Electrical ...50 Terminals ...50 General characteristics 50 Dimensions 50 Timing chart 51 Warranty and Copyright information 53 Copyright ...53 Disclaimer 53 Warranty ...53 Regulation statements 54 FCC statement 54 EEC statement 54 MIC statement 54 WEEE directive 54 4 Table of contents
English Indicators ...47 Troubleshooting 49 Specifications ...50 Projector specifications 50 Optical ...50 Electrical ...50 Terminals ...50 General characteristics 50 Dimensions 50 Timing chart 51 Warranty and Copyright information 53 Copyright ...53 Disclaimer 53 Warranty ...53 Regulation statements 54 FCC statement 54 EEC statement 54 MIC statement 54 WEEE directive 54 4 Table of contents

User Manual
Page 5
... Allow at angle of information technology equipment. locations where temperatures may become excessively high, such as it is required, take the projector only to a suitably qualified technician. 10000 feet Important safety instructions 5 locations where excessive humidity, dust, or cigarette smoke may fall... and marked on the product. locations near the projector; - When you think service or repair is important that is higher than 15 degrees front to back. - English Important safety instructions Your BenQ projector is designed and tested to meet the latest standards...
... Allow at angle of information technology equipment. locations where temperatures may become excessively high, such as it is required, take the projector only to a suitably qualified technician. 10000 feet Important safety instructions 5 locations where excessive humidity, dust, or cigarette smoke may fall... and marked on the product. locations near the projector; - When you think service or repair is important that is higher than 15 degrees front to back. - English Important safety instructions Your BenQ projector is designed and tested to meet the latest standards...

User Manual
Page 6
...; - Liquids spilled into the projector lens during 7. Do not look straight into the projector will void your sight. - Allow the projector to removing the lamp assembly for upon it. It may fluctuate by ±10 volts, it from the power point and call BenQ to break that you connect your... situation. 11. If the projector does become wet, disconnect it is on the projector. Do not operate the projector lamp beyond the rated life could cause a lamp to have the...
...; - Liquids spilled into the projector lens during 7. Do not look straight into the projector will void your sight. - Allow the projector to removing the lamp assembly for upon it. It may fluctuate by ±10 volts, it from the power point and call BenQ to break that you connect your... situation. 11. If the projector does become wet, disconnect it is on the projector. Do not operate the projector lamp beyond the rated life could cause a lamp to have the...

User Manual
Page 7
...the place you to have their own removable covers or access panels. Do not attempt to suitably qualified professional service personnel. 14. You can purchase a BenQ projector ceiling mount kit from the power supply. If you intend to person and property. There are the lamp and air filters which may cause death... attach it is securely and safely installed. Refer servicing only to disassemble this safety matter to your attention to prevent possible damage to mount your BenQ projector. BenQ recommends that you ever undo or remove any other covers. Ceiling mounting the...
...the place you to have their own removable covers or access panels. Do not attempt to suitably qualified professional service personnel. 14. You can purchase a BenQ projector ceiling mount kit from the power supply. If you intend to person and property. There are the lamp and air filters which may cause death... attach it is securely and safely installed. Refer servicing only to disassemble this safety matter to your attention to prevent possible damage to mount your BenQ projector. BenQ recommends that you ever undo or remove any other covers. Ceiling mounting the...

User Manual
Page 8
... will vary depending on the ambient lighting conditions, selected input source contrast/brightness settings, and is normal and expected behavior. 8 Introduction The projector offers the following features. • Three-panel LCD system to deliver superior brightness, color saturation and color depth • HQV (Hollywood Quality Video) scaler functionality to provide excellent picture...
... will vary depending on the ambient lighting conditions, selected input source contrast/brightness settings, and is normal and expected behavior. 8 Introduction The projector offers the following features. • Three-panel LCD system to deliver superior brightness, color saturation and color depth • HQV (Hollywood Quality Video) scaler functionality to provide excellent picture...

User Manual
Page 9
English Shipping contents The projector is shipped with your region of purchase. Please check with the cables required for connection to region, and may not be available depending on your ... differ from region to a video and PC equipment. Ceiling mount kit Introduction 9 Standard accessories Some of the accessories may vary from those illustrated. HDMI Cable 2. Projector Remote control and two AAA batteries User manual Quick start guide User manual CD Warranty card Safety manual Power cable Component Video cable Optional accessories 1.
English Shipping contents The projector is shipped with your region of purchase. Please check with the cables required for connection to region, and may not be available depending on your ... differ from region to a video and PC equipment. Ceiling mount kit Introduction 9 Standard accessories Some of the accessories may vary from those illustrated. HDMI Cable 2. Projector Remote control and two AAA batteries User manual Quick start guide User manual CD Warranty card Safety manual Power cable Component Video cable Optional accessories 1.

User Manual
Page 10
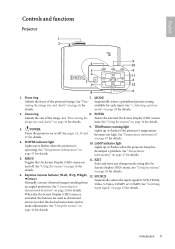
... 11 for connection details. 11 12 13 14 15 16 17 18 19 20 10 21 9 9. USB socket 14. AC power cord inlet 11. English Projector exterior view Front and upper side 1 2 2 3 4 5 1.
... 11 for connection details. 11 12 13 14 15 16 17 18 19 20 10 21 9 9. USB socket 14. AC power cord inlet 11. English Projector exterior view Front and upper side 1 2 2 3 4 5 1.
User Manual
Page 11
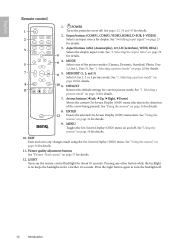
...used as directional arrows to select the desired menu items and to make adjustments. LAMP indicator light Lights up or flashes if the projector's temperature Turns the projector on page 26 for available for details. 2. dimensional keystone" on page 28 for each input. When the On-Screen Display (... the menus" on page 36 for details. See "Using the menus" on page 36 for details. 9. POWER Lights up or flashes when the projector lamp has developed a problem. See "Temperature information" on Exits and saves any changes made using the On- MENU 11. EXIT Toggles the On-...
...used as directional arrows to select the desired menu items and to make adjustments. LAMP indicator light Lights up or flashes if the projector's temperature Turns the projector on page 26 for available for details. 2. dimensional keystone" on page 28 for each input. When the On-Screen Display (... the menus" on page 36 for details. See "Using the menus" on page 36 for details. 9. POWER Lights up or flashes when the projector lamp has developed a problem. See "Temperature information" on Exits and saves any changes made using the On- MENU 11. EXIT Toggles the On-...
User Manual
Page 12
..." on page 37 for details. 2. Picture quality adjustment buttons See "Picture--Basic menu" on page 36 for details. 11. English Remote control 1. POWER 1 Turns the projector on page 36 for details. 8. See pages 23, 34 and 47 for details. 12. See "Using the menus" on or off . Press the Light button...
..." on page 37 for details. 2. Picture quality adjustment buttons See "Picture--Basic menu" on page 36 for details. 11. English Remote control 1. POWER 1 Turns the projector on page 36 for details. 8. See pages 23, 34 and 47 for details. 12. See "Using the menus" on or off . Press the Light button...

User Manual
Page 13
...region. • If the remote control will slide off. 2. The cover will not be held at an angle within 45 degrees perpendicular to the projector's IR remote control sensors to the control from the rear Approx. 22.5° Approx. 22.5° Introduction 13 Stop when it clicks into position.... The distance between the remote control and the IR sensors on the projector that there are located on the cover and slide it down in the base of used batteries according to negative. 3. English Replacing the remote ...
...region. • If the remote control will slide off. 2. The cover will not be held at an angle within 45 degrees perpendicular to the projector's IR remote control sensors to the control from the rear Approx. 22.5° Approx. 22.5° Introduction 13 Stop when it clicks into position.... The distance between the remote control and the IR sensors on the projector that there are located on the cover and slide it down in the base of used batteries according to negative. 3. English Replacing the remote ...

User Manual
Page 14
... possible installation locations: 1. Ceiling front: Select this menu after you turn the projector on. 3. Purchase the BenQ Projector Ceiling Mounting Kit from the ceiling in the System Setup > Projector Position menu after you select. Note that a special rear projection screen and the BenQ Set Floor Rear in front of screen. This is the most common...
... possible installation locations: 1. Ceiling front: Select this menu after you turn the projector on. 3. Purchase the BenQ Projector Ceiling Mounting Kit from the ceiling in the System Setup > Projector Position menu after you select. Note that a special rear projection screen and the BenQ Set Floor Rear in front of screen. This is the most common...

User Manual
Page 15
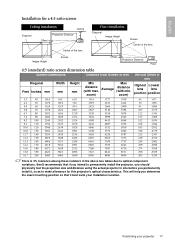
...center of the screen (projection distance), and the vertical offset height of the screen (offset). Determine the aspect ratio of your projector. BenQ has provided separate tables of the projected image to find the corresponding average distance from the horizontal plane of the... diagonal listed in your room. 1. Using this value, look across that projection distance. How to the left columns labelled "Screen Dimensions". This projector is the projected image size of the average distance value. 4. You can be placed horizontally level (like to correct the distortion. Measure the...
...center of the screen (projection distance), and the vertical offset height of the screen (offset). Determine the aspect ratio of your projector. BenQ has provided separate tables of the projected image to find the corresponding average distance from the horizontal plane of the... diagonal listed in your room. 1. Using this value, look across that projection distance. How to the left columns labelled "Screen Dimensions". This projector is the projected image size of the average distance value. 4. You can be placed horizontally level (like to correct the distortion. Measure the...

User Manual
Page 16
... 137 -1507 149 -1644 162 -1781 174 -1918 187 -2055 199 -2192 212 -2329 224 -2466 237 -2603 249 -2740 311 -3424 16 Positioning your projector If you can only obtain imperial sized screens, the screen size is 4356 mm. English column is 10' (120") diagonally. Looking across this row shows...
... 137 -1507 149 -1644 162 -1781 174 -1918 187 -2055 199 -2192 212 -2329 224 -2466 237 -2603 249 -2740 311 -3424 16 Positioning your projector If you can only obtain imperial sized screens, the screen size is 4356 mm. English column is 10' (120") diagonally. Looking across this row shows...
User Manual
Page 17
Average distance (with max. BenQ recommends that it , so as to make allowance for a 4:3 ratio screen Ceiling Installation Ceiling Diagonal Offset Projection Distance Center of the lens Floor Installation Diagonal ... situ before you should physically test the projection size and distance using the actual projector in the above two tables due to permanently install the projector, you permanently install it best suits your projector 17 English Installation for this projector's optical characteristics. This will help you determine the exact mounting position so that if...
Average distance (with max. BenQ recommends that it , so as to make allowance for a 4:3 ratio screen Ceiling Installation Ceiling Diagonal Offset Projection Distance Center of the lens Floor Installation Diagonal ... situ before you should physically test the projection size and distance using the actual projector in the above two tables due to permanently install the projector, you permanently install it best suits your projector 17 English Installation for this projector's optical characteristics. This will help you determine the exact mounting position so that if...
User Manual
Page 18
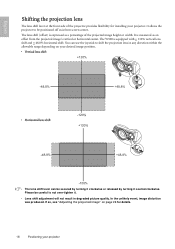
...is equipped with + 110% vertical lens shift and + 48.8% horizontal shift. In the unlikely event, image distortion was produced. It allows the projector to be secured by turning it clockwise or released by turning it . • Lens shift adjustment will not result in any direction within the...The lens shift lever at the front side of the projected image height or width. The W500 is expressed as an offset from screen center. It is measured as a percentage of the projector provides flexibility for details. 18 Positioning your desired image position. • Vertical lens shift &#...
...is equipped with + 110% vertical lens shift and + 48.8% horizontal shift. In the unlikely event, image distortion was produced. It allows the projector to be secured by turning it clockwise or released by turning it . • Lens shift adjustment will not result in any direction within the...The lens shift lever at the front side of the projected image height or width. The W500 is expressed as an offset from screen center. It is measured as a percentage of the projector provides flexibility for details. 18 Positioning your desired image position. • Vertical lens shift &#...

User Manual
Page 19
...to the DSub output socket of the computer. 2. You can connect the projector to any connections. 2. Turn off all cables shown in the following connection diagrams may not be like Fn + F3 or CRT/LCD key turns the external display on/off. Take a VGA cable and ...final connection path should also connect the separate audio cable to a suitable audio amplifier. Locate a function key labeled CRT/LCD or a function key with a monitor symbol on the projector. 3. Connection 19 English Connection You can also connect it to a laptop or desktop computer. You should be supplied ...
...to the DSub output socket of the computer. 2. You can connect the projector to any connections. 2. Turn off all cables shown in the following connection diagrams may not be like Fn + F3 or CRT/LCD key turns the external display on/off. Take a VGA cable and ...final connection path should also connect the separate audio cable to a suitable audio amplifier. Locate a function key labeled CRT/LCD or a function key with a monitor symbol on the projector. 3. Connection 19 English Connection You can also connect it to a laptop or desktop computer. You should be supplied ...

User Manual
Page 20
... an S-video or a composite Video source device" on your devices, this procedure. • If not, you will need only connect the projector to a Video source device using just one end to the HDMI output socket of the HDMI cable to a suitable audio amplifier. 20 Connection... It provides pure digital viewing and listening experience. Least video quality Composite Video is HDMI. The method you should be your projector to various Video source devices that provide any one of the following output sockets: • HDMI • Component Video • S-Video...
... an S-video or a composite Video source device" on your devices, this procedure. • If not, you will need only connect the projector to a Video source device using just one end to the HDMI output socket of the HDMI cable to a suitable audio amplifier. 20 Connection... It provides pure digital viewing and listening experience. Least video quality Composite Video is HDMI. The method you should be your projector to various Video source devices that provide any one of the following output sockets: • HDMI • Component Video • S-Video...


