

User Manual
Page 2
... searching for details .. 37 Operating in a high altitude environment 37 Watching 3D content 38 Personalizing the projector menu display 39 Locking control keys 39 Turning the projector off 39 On-Screen Display (OSD) menus ...... 40 Additional information 47 Care of the projector 47 Lamp information 48 Getting to know the lamp hour 48 Extending lamp life 48 Timing of replacing the lamp 49 Replacing the lamp 49 Indicators 52 Troubleshooting 53 Specifications 54 Warranty and Copyright...
... searching for details .. 37 Operating in a high altitude environment 37 Watching 3D content 38 Personalizing the projector menu display 39 Locking control keys 39 Turning the projector off 39 On-Screen Display (OSD) menus ...... 40 Additional information 47 Care of the projector 47 Lamp information 48 Getting to know the lamp hour 48 Extending lamp life 48 Timing of replacing the lamp 49 Replacing the lamp 49 Indicators 52 Troubleshooting 53 Specifications 54 Warranty and Copyright...

User Manual
Page 4
.... Excessive operation of displaying inverted Liquids spilled into the projector will void your projector through a power beyond the may harm your situation. 7. The lamp becomes extremely hot during operation. Do not block the vents holes while the projector 9. 5. Do not look straight into the projector lens is capable of lamps that you connect your images for ceiling mount installation. In areas where the mains power supply voltage 10. operation. Do...
.... Excessive operation of displaying inverted Liquids spilled into the projector will void your projector through a power beyond the may harm your situation. 7. The lamp becomes extremely hot during operation. Do not block the vents holes while the projector 9. 5. Do not look straight into the projector lens is capable of lamps that you connect your images for ceiling mount installation. In areas where the mains power supply voltage 10. operation. Do...

User Manual
Page 7
... distance between the remote control and the IR sensor(s) on the ceiling, we need to bring this safety matter to your region. • Never throw the batteries into position. To open the battery cover, turn the remote control over to mount your BenQ projector, so we strongly recommend that you use a proper fitting BenQ projector ceiling mount kit and that might obstruct the infra-red beam. • Operating the projector from...
... distance between the remote control and the IR sensor(s) on the ceiling, we need to bring this safety matter to your region. • Never throw the batteries into position. To open the battery cover, turn the remote control over to mount your BenQ projector, so we strongly recommend that you use a proper fitting BenQ projector ceiling mount kit and that might obstruct the infra-red beam. • Operating the projector from...
User Manual
Page 9
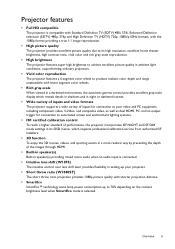
... 3D movies, videos, and sporting events in a more realistic way by presenting the depth of the images through HDMI. • Built-in speaker(s) Built-in speaker(s) providing mixed mono audio when an audio input is connected. • Intuitive lens shift (W1070) The intuitive control over lens shift lever provides flexibility in setting-up your projector. • Short throw ratio (W1080ST) The short throw ratio projection provides 1080p picture quality with shorter projection distance...
... 3D movies, videos, and sporting events in a more realistic way by presenting the depth of the images through HDMI. • Built-in speaker(s) Built-in speaker(s) providing mixed mono audio when an audio input is connected. • Intuitive lens shift (W1070) The intuitive control over lens shift lever provides flexibility in setting-up your projector. • Short throw ratio (W1080ST) The short throw ratio projection provides 1080p picture quality with shorter projection distance...

User Manual
Page 10
... air exhaust) 4. Lens shift lever 7. Component Video inputs (RCA) support Y/PB/PR or Y/CB/CR video signal 15. S-Video input (mini 4-pin DIN) Composite Video input (RCA) 19. HDMI ports 13. 12VDC output terminal Used to connect these devices. 14. Ceiling mount holes 24. Consult your dealer for how to trigger external devices such as an electric screen or light control, etc. Lamp cover 3. Front IR sensor 11. Speaker grill 10. Rear adjuster...
... air exhaust) 4. Lens shift lever 7. Component Video inputs (RCA) support Y/PB/PR or Y/CB/CR video signal 15. S-Video input (mini 4-pin DIN) Composite Video input (RCA) 19. HDMI ports 13. 12VDC output terminal Used to connect these devices. 14. Ceiling mount holes 24. Consult your dealer for how to trigger external devices such as an electric screen or light control, etc. Lamp cover 3. Front IR sensor 11. Speaker grill 10. Rear adjuster...
User Manual
Page 11
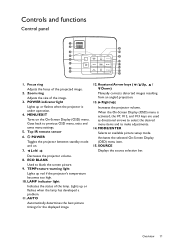
...projector's temperature becomes too high. 10. Keystone/Arrow keys ( / Up, / Down) Manually corrects distorted images resulting from an angled projection. 13. Activates the selected On-Screen Display (OSD) menu item. 15. TEMPerature warning light Lights up or flashes when the lamp has developed a problem. 11. MODE/ENTER Selects an available picture setup mode. SOURCE Displays the source selection bar. Controls and functions Control panel 1 2 9 3 10 4 11 5 12 6 13 7 14 8 15 12 1. Zoom ring Adjusts the size of the projected image. 2. POWER indicator light Lights up or flashes...
...projector's temperature becomes too high. 10. Keystone/Arrow keys ( / Up, / Down) Manually corrects distorted images resulting from an angled projection. 13. Activates the selected On-Screen Display (OSD) menu item. 15. TEMPerature warning light Lights up or flashes when the lamp has developed a problem. 11. MODE/ENTER Selects an available picture setup mode. SOURCE Displays the source selection bar. Controls and functions Control panel 1 2 9 3 10 4 11 5 12 6 13 7 14 8 15 12 1. Zoom ring Adjusts the size of the projected image. 2. POWER indicator light Lights up or flashes...
User Manual
Page 12
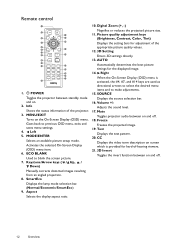
.... 12. 3D Setting Enters 3D settings directly. 13. Volume +/- Info Shows the status information of the projector. 3. Digital Zoom (+, -) Magnifies or reduces the projected picture size. 11. Adjusts the sound level. 17. Left 5. ECO BLANK Used to make adjustments. 15. Activates the selected On-Screen Display (OSD) menu item. 6. Goes back to previous OSD menu, exits and saves menu settings. 4. SmartEco Displays the lamp mode selection bar. (Normal/Economic/SmartEco) 9. Mute Toggles projector audio between standby mode and...
.... 12. 3D Setting Enters 3D settings directly. 13. Volume +/- Info Shows the status information of the projector. 3. Digital Zoom (+, -) Magnifies or reduces the projected picture size. 11. Adjusts the sound level. 17. Left 5. ECO BLANK Used to make adjustments. 15. Activates the selected On-Screen Display (OSD) menu item. 6. Goes back to previous OSD menu, exits and saves menu settings. 4. SmartEco Displays the lamp mode selection bar. (Normal/Economic/SmartEco) 9. Mute Toggles projector audio between standby mode and...
User Manual
Page 26
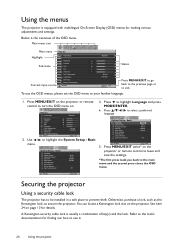
... or to turn the OSD menu on the projector or remote control to exit. Press MENU/EXIT on . Picture Preset Mode User Mode Management Brightness 50 Contrast 50 Color 50 Tint 0 Sharpness 3 Color Temperature Lamp Power Advanced... Use / to select a preferred language. System Setup : Basic Language Splash Screen Projector Position Auto Off Sleep Timer Menu Settings Input Source Source Rename Auto Source Search BenQ Front Disable Disable Off 3. Press / / / to highlight the System Setup : Basic menu. You can locate a Kensington lock slot on...
... or to turn the OSD menu on the projector or remote control to exit. Press MENU/EXIT on . Picture Preset Mode User Mode Management Brightness 50 Contrast 50 Color 50 Tint 0 Sharpness 3 Color Temperature Lamp Power Advanced... Use / to select a preferred language. System Setup : Basic Language Splash Screen Projector Position Auto Off Sleep Timer Menu Settings Input Source Source Rename Auto Source Search BenQ Front Disable Disable Off 3. Press / / / to highlight the System Setup : Basic menu. You can locate a Kensington lock slot on...
User Manual
Page 27
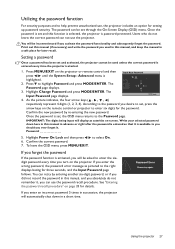
... menu, press MENU/EXIT. Once the password is password-protected. Once the password is Input New Password highlighted. 2. Confirm the current password. 7. Utilizing the password function For security purposes and to help prevent unauthorized use the projector. Press to select On. 6. According to the password you enter the wrong password, the password error message as asterisks on the remote control or projector to enter six digits for setting up password security. See "Entering the password...
... menu, press MENU/EXIT. Once the password is password-protected. Once the password is Input New Password highlighted. 2. Confirm the current password. 7. Utilizing the password function For security purposes and to help prevent unauthorized use the projector. Press to select On. 6. According to the password you enter the wrong password, the password error message as asterisks on the remote control or projector to enter six digits for setting up password security. See "Entering the password...

User Manual
Page 28
... remote control and then press / until the System Setup : Advanced menu is incorrect, the password error message displays lasting for three seconds, and the message "Input Current Password" displays for 3 seconds. Seek help from the local BenQ service center to select Off. Press MENU/EXIT on the screen. 2. Enter a new password. Highlight Power On Lock and then press / to decode the number. Press and hold AUTO on the projector. • If the password is started. 8. Recall code...
... remote control and then press / until the System Setup : Advanced menu is incorrect, the password error message displays lasting for three seconds, and the message "Input Current Password" displays for 3 seconds. Seek help from the local BenQ service center to select Off. Press MENU/EXIT on the screen. 2. Enter a new password. Highlight Power On Lock and then press / to decode the number. Press and hold AUTO on the projector. • If the password is started. 8. Recall code...

User Manual
Page 31
... User Mode Management page. 6. When all settings have previously adjusted the Brightness setting to select the picture mode (including User 1, User 2, or User 3) you 've done in the System Setup : Advanced menu. To reset the picture mode to the factory preset settings. 4. Do not to highlight Reset Picture Settings and press MODE/ENTER. Adjusting Brightness Highlight Brightness in the Picture menu and adjust the values by pressing / on the projector or remote control. Adjusting Contrast Highlight Contrast in the Picture menu...
... User Mode Management page. 6. When all settings have previously adjusted the Brightness setting to select the picture mode (including User 1, User 2, or User 3) you 've done in the System Setup : Advanced menu. To reset the picture mode to the factory preset settings. 4. Do not to highlight Reset Picture Settings and press MODE/ENTER. Adjusting Brightness Highlight Brightness in the Picture menu and adjust the values by pressing / on the projector or remote control. Adjusting Contrast Highlight Contrast in the Picture menu...
User Manual
Page 35
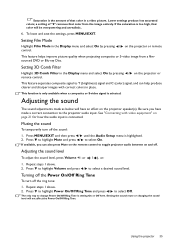
... Audio Setup menu is setting On or Off here. If available, you have an effect on the remote control to change Power On/Off Ring Tone is highlighted. 2. Turning off the Power On/Off Ring Tone To turn off the ring tone: 1. Using the projector 35 a setting of that color in the Display menu and select On by pressing / on the projector or remote control. Setting 3D Comb Filter Highlight 3D Comb Filter in a video picture. Adjusting the sound...
... Audio Setup menu is setting On or Off here. If available, you have an effect on the remote control to change Power On/Off Ring Tone is highlighted. 2. Turning off the Power On/Off Ring Tone To turn off the ring tone: 1. Using the projector 35 a setting of that color in the Display menu and select On by pressing / on the projector or remote control. Setting 3D Comb Filter Highlight 3D Comb Filter in a video picture. Adjusting the sound...

User Manual
Page 39
... the remote control and projector locked, you can be used for an extended period, unplug the power cable from being changed accidentally (by children, for about two minutes to any commands during projector start-up. The following settings do not affect the projection settings, operation, or performance. • Menu Display Time in the System Setup : Basic menu sets a preferred logo screen to select a preferred position. • Language in five locations. Using the projector 39 Use / to...
... the remote control and projector locked, you can be used for an extended period, unplug the power cable from being changed accidentally (by children, for about two minutes to any commands during projector start-up. The following settings do not affect the projection settings, operation, or performance. • Menu Display Time in the System Setup : Basic menu sets a preferred logo screen to select a preferred position. • Language in five locations. Using the projector 39 Use / to...
User Manual
Page 40
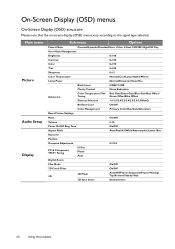
... Adjustment 0/1/2/3 PC & Component YPbPr Tuning H.Size Phase Auto Digital Zoom Film Mode On/Off 3D Comb Filter On/Off 3D 3D Mode Auto/Off/Frame Sequential/Frame Packing/ Top-Bottom/Side-by-Side 3D Sync Invert Disable/Invert 40 Using the projector On-Screen Display (OSD) menus On-Screen Display (OSD) structure Please note that the on-screen display (OSD) menus vary according to the signal type selected. Main menu Picture Audio Setup Display Sub-menu Options Preset Mode Cinema/Dynamic/Standard/User 1/User 2/User 3/3D...
... Adjustment 0/1/2/3 PC & Component YPbPr Tuning H.Size Phase Auto Digital Zoom Film Mode On/Off 3D Comb Filter On/Off 3D 3D Mode Auto/Off/Frame Sequential/Frame Packing/ Top-Bottom/Side-by-Side 3D Sync Invert Disable/Invert 40 Using the projector On-Screen Display (OSD) menus On-Screen Display (OSD) structure Please note that the on-screen display (OSD) menus vary according to the signal type selected. Main menu Picture Audio Setup Display Sub-menu Options Preset Mode Cinema/Dynamic/Standard/User 1/User 2/User 3/3D...
User Manual
Page 41
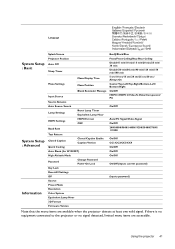
... Splash Screen Projector Position Auto Off Sleep Timer Menu Display Time Menu Settings Menu Position Blank Reminder Message Input Source Source Rename Auto Source Search Lamp Settings HDMI Settings Reset Lamp Timer Equivalent Lamp Hour HDMI Format CEC Baud Rate Test Pattern Closed Caption Closed Caption Enable Caption Version Quick Cooling Auto Blank (for W1080ST) High Altitude Mode Password Change Password Power On Lock Key Lock Reset All Settings ISF Source Preset Mode Resolution Color System Equivalent Lamp Hour 3D Format Firmware Version BenQ/Black/Blue Front...
... Splash Screen Projector Position Auto Off Sleep Timer Menu Display Time Menu Settings Menu Position Blank Reminder Message Input Source Source Rename Auto Source Search Lamp Settings HDMI Settings Reset Lamp Timer Equivalent Lamp Hour HDMI Format CEC Baud Rate Test Pattern Closed Caption Closed Caption Enable Caption Version Quick Cooling Auto Blank (for W1080ST) High Altitude Mode Password Change Password Power On Lock Key Lock Reset All Settings ISF Source Preset Mode Resolution Color System Equivalent Lamp Hour 3D Format Firmware Version BenQ/Black/Blue Front...

User Manual
Page 42
... projector lamp power between dark and light in a video picture. See "Resetting the picture mode" on page 32 for details. Color Adjusts the color saturation level -- See "Adjusting Tint" on page 31 for details. Color Temperature There are provided so you can optimize your projector picture set-up to suit your need for the picture quality and further fine-tune the picture based on page 31 for details. 42 Using the projector Color...
... projector lamp power between dark and light in a video picture. See "Resetting the picture mode" on page 32 for details. Color Adjusts the color saturation level -- See "Adjusting Tint" on page 31 for details. Color Temperature There are provided so you can optimize your projector picture set-up to suit your need for the picture quality and further fine-tune the picture based on page 31 for details. 42 Using the projector Color...
User Manual
Page 44
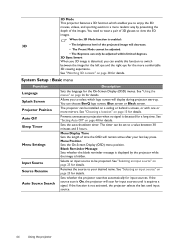
...) menu position. Renames the source to view the 3D images. You need to wear a pair of the projected image will decrease. • The Preset Mode cannot be adjusted. • The Keystone can choose BenQ logo screen, Blue screen or Black screen. System Setup : Basic menu Function Language Splash Screen Projector Position Auto Off Sleep Timer Menu Settings Input Source Source Rename Auto Source Search Description Sets the language for details. The projector can enable this function to enjoy the 3D movies, videos...
...) menu position. Renames the source to view the 3D images. You need to wear a pair of the projected image will decrease. • The Preset Mode cannot be adjusted. • The Keystone can choose BenQ logo screen, Blue screen or Black screen. System Setup : Basic menu Function Language Splash Screen Projector Position Auto Off Sleep Timer Menu Settings Input Source Source Rename Auto Source Search Description Sets the language for details. The projector can enable this function to enjoy the 3D movies, videos...
User Manual
Page 45
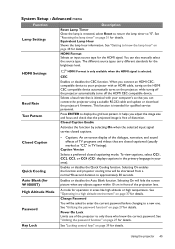
... helps you connect an HDMI CECcompatible device to display the grid test pattern. See "Operating in TV listings). Closed Caption Quick Cooling Auto Blank (for W1080ST) High Altitude Mode Password Key Lock • Captions: An on page 27 for details. Power On Lock Limits use of TV programs and videos that the projected image is identical with an HDMI cable, turnig on the HDMI CEC compatible device automatically turns on the projector...
... helps you connect an HDMI CECcompatible device to display the grid test pattern. See "Operating in TV listings). Closed Caption Quick Cooling Auto Blank (for W1080ST) High Altitude Mode Password Key Lock • Captions: An on page 27 for details. Power On Lock Limits use of TV programs and videos that the projected image is identical with an HDMI cable, turnig on the HDMI CEC compatible device automatically turns on the projector...

User Manual
Page 52
... a new lamp. • The lamp is turned off and contact your dealer for information about the indicator lights. The fans are three indicators which show the status of the projector. Off • The projector may be in an abnormal state Power Off Off Red Red Red Red Green Temp Off Off Red Red Flashing Green Green Flashing Red Lamp Red Red Flashing Off Off Off Off Status & Description • The lamp has been damaged. If there is in a normal state Power Orange Green Flashing Green Orange Flashing Temp Off...
... a new lamp. • The lamp is turned off and contact your dealer for information about the indicator lights. The fans are three indicators which show the status of the projector. Off • The projector may be in an abnormal state Power Off Off Red Red Red Red Green Temp Off Off Red Red Flashing Green Green Flashing Red Lamp Red Red Flashing Off Off Off Off Status & Description • The lamp has been damaged. If there is in a normal state Power Orange Green Flashing Green Orange Flashing Temp Off...

User Manual
Page 53
....) No picture. The lamp cover is not correctly Adjust the focus of power. There is blurred. Recharge the 3D glasses. 3D content does not not display correctly The settings in the 3D menu are too far away from the power cable. Select the correct input source with the Source keys on the remote control or SOURCE on the projector. (See page 25.) Using the projector 53 Correctly connect the cables to the projector or the signal source. Check the connection...
....) No picture. The lamp cover is not correctly Adjust the focus of power. There is blurred. Recharge the 3D glasses. 3D content does not not display correctly The settings in the 3D menu are too far away from the power cable. Select the correct input source with the Source keys on the remote control or SOURCE on the projector. (See page 25.) Using the projector 53 Correctly connect the cables to the projector or the signal source. Check the connection...


