

User Manual
Page 2
...with this publication may be used ." Do not cover the power adapter with your monitor Power Safety • The AC plug isolates this publication and to service the power adapter. ii Disclaimer BenQ Corporation makes no service parts inside a carrying case. • Connect the power ...75mm2 or H05VVH2-F2 3G 0.75mm2) shall be reproduced, transmitted, transcribed, stored in a retrieval system or translated into any person of BenQ Corporation to notify any language or computer language, in malfunction and/or danger. • Allow adequate ventilation around the adapter when using ...
...with this publication may be used ." Do not cover the power adapter with your monitor Power Safety • The AC plug isolates this publication and to service the power adapter. ii Disclaimer BenQ Corporation makes no service parts inside a carrying case. • Connect the power ...75mm2 or H05VVH2-F2 3G 0.75mm2) shall be reproduced, transmitted, transcribed, stored in a retrieval system or translated into any person of BenQ Corporation to notify any language or computer language, in malfunction and/or danger. • Allow adequate ventilation around the adapter when using ...

User Manual
Page 3
... to ensure that consumers make informed green choices at http://csr.BenQ.com/ for servicing. Care And Cleaning • Cleaning. Check out BenQ's CSR Website at purchase. BenQ ecoFACTS BenQ has been dedicated to achieve a low-carbon society. ecoFACTS about VW2220 iii Clean the LCD monitor surface with the ultimate goal to the design and development...
... to ensure that consumers make informed green choices at http://csr.BenQ.com/ for servicing. Care And Cleaning • Cleaning. Check out BenQ's CSR Website at purchase. BenQ ecoFACTS BenQ has been dedicated to achieve a low-carbon society. ecoFACTS about VW2220 iii Clean the LCD monitor surface with the ultimate goal to the design and development...

User Manual
Page 4
... Care And Cleaning ...iii Servicing ...iii BenQ ecoFACTS ...iii Getting started ...1 Getting to know your monitor 3 Front view ...3 Back view ...3 How to assemble your monitor hardware 4 How to detach the stand base ...6 Getting the most from your BenQ monitor 7 How to install the monitor on a new computer 8 How to upgrade the monitor on an existing computer 9 How...
... Care And Cleaning ...iii Servicing ...iii BenQ ecoFACTS ...iii Getting started ...1 Getting to know your monitor 3 Front view ...3 Back view ...3 How to assemble your monitor hardware 4 How to detach the stand base ...6 Getting the most from your BenQ monitor 7 How to install the monitor on a new computer 8 How to upgrade the monitor on an existing computer 9 How...
User Manual
Page 5
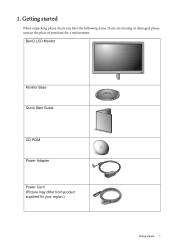
BenQ LCD Monitor Monitor Base Quick Start Guide CD-ROM Power Adapter Power Cord (Picture may differ from product supplied for a replacement. Getting started When unpacking please check you have the following items. If any are missing or damaged, please contact the place of purchase for your region.) Getting started 1 1.
BenQ LCD Monitor Monitor Base Quick Start Guide CD-ROM Power Adapter Power Cord (Picture may differ from product supplied for a replacement. Getting started When unpacking please check you have the following items. If any are missing or damaged, please contact the place of purchase for your region.) Getting started 1 1.
User Manual
Page 6
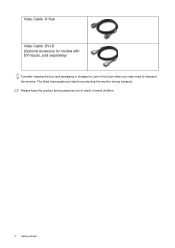
Always keep the product and accessories out of reach of small children. 2 Getting started The fitted foam packing is ideal for use in the future when you may need to transport the monitor. Video Cable: D-Sub Video Cable: DVI-D (Optional accessory for models with DVI inputs, sold separately) Consider keeping the box and packaging in storage for protecting the monitor during transport.
Always keep the product and accessories out of reach of small children. 2 Getting started The fitted foam packing is ideal for use in the future when you may need to transport the monitor. Video Cable: D-Sub Video Cable: DVI-D (Optional accessory for models with DVI inputs, sold separately) Consider keeping the box and packaging in storage for protecting the monitor during transport.
User Manual
Page 7
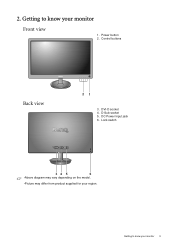
Power button 2. Lock switch 34 5 6 •Above diagram may vary depending on the model. •Picture may differ from product supplied for your monitor 3 D-Sub socket 5. Getting to know your region. Control buttons Back view 21 3. DVI-D socket 4. DC Power Input jack 6. 2. Getting to know your monitor Front view 1.
Power button 2. Lock switch 34 5 6 •Above diagram may vary depending on the model. •Picture may differ from product supplied for your monitor 3 D-Sub socket 5. Getting to know your region. Control buttons Back view 21 3. DVI-D socket 4. DC Power Input jack 6. 2. Getting to know your monitor Front view 1.

User Manual
Page 8
...the glass or damage the LCD substrate voiding your desk will scratch or damage the monitor surround and controls. Protect the monitor and screen by clearing a flat open area on the power to the monitor until instructed to check that they have properly engaged. Orient and align the stand base... socket with the end of the stand arm, then push them back apart to do so. 1. Carefully lift the monitor, turn -on your monitor hardware You should position the monitor and angle the screen to minimize unwanted reflections from other light sources. -5O ~ +15O 4 How to the...
...the glass or damage the LCD substrate voiding your desk will scratch or damage the monitor surround and controls. Protect the monitor and screen by clearing a flat open area on the power to the monitor until instructed to check that they have properly engaged. Orient and align the stand base... socket with the end of the stand arm, then push them back apart to do so. 1. Carefully lift the monitor, turn -on your monitor hardware You should position the monitor and angle the screen to minimize unwanted reflections from other light sources. -5O ~ +15O 4 How to the...

User Manual
Page 9
... the power button on the rear of the cable (at the end without the ferrite filter) to prevent the plugs from product supplied for your monitor hardware 5 To extend the service life of the D-Sub cable (at the end with the ferrite filter) to the computer video socket. Tighten... the ferrite filter) to prevent the plugs from accidently falling out during use. Turn on the computer too, and follow the instructions in your BenQ monitor on the power. Connect the power cable to assemble your region. The video cable included in Section 4: Getting the most from your package and...
... the power button on the rear of the cable (at the end without the ferrite filter) to prevent the plugs from product supplied for your monitor hardware 5 To extend the service life of the D-Sub cable (at the end with the ferrite filter) to the computer video socket. Tighten... the ferrite filter) to prevent the plugs from accidently falling out during use. Turn on the computer too, and follow the instructions in your BenQ monitor on the power. Connect the power cable to assemble your region. The video cable included in Section 4: Getting the most from your package and...
User Manual
Page 10
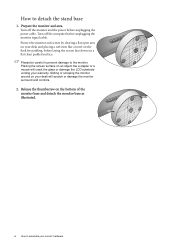
... screen by clearing a flat open area on a flat clean padded surface. Turn off the monitor and the power before unplugging the power cable. Release the thumbscrew on the bottom of the monitor base and detach the monitor base as illustrated. 6 How to assemble your desk and placing a soft item like a stapler or a mouse... will crack the glass or damage the LCD substrate voiding your desk will scratch or damage the monitor surround and controls. 2. Please be careful to prevent damage to detach the stand base 1. Sliding or scraping the...
... screen by clearing a flat open area on a flat clean padded surface. Turn off the monitor and the power before unplugging the power cable. Release the thumbscrew on the bottom of the monitor base and detach the monitor base as illustrated. 6 How to assemble your desk and placing a soft item like a stapler or a mouse... will crack the glass or damage the LCD substrate voiding your desk will scratch or damage the monitor surround and controls. 2. Please be careful to prevent damage to detach the stand base 1. Sliding or scraping the...

User Manual
Page 11
...step instructions for either case however, the very next time you require a User Name and Password to login to successfully install the BenQ LCD Monitor driver software. If you turn on as an Administrator or as a member of Microsoft Windows you are using, and whether you are... security access requirements, network policy settings may prevent you from your new BenQ color LCD flat screen monitor, you to your BenQ LCD Monitor will launch its Found New Hardware wizard. Getting the most from your BenQ monitor To gain the most from installing software on your Windows computer, you ...
...step instructions for either case however, the very next time you require a User Name and Password to login to successfully install the BenQ LCD Monitor driver software. If you turn on as an Administrator or as a member of Microsoft Windows you are using, and whether you are... security access requirements, network policy settings may prevent you from your new BenQ color LCD flat screen monitor, you to your BenQ LCD Monitor will launch its Found New Hardware wizard. Getting the most from your BenQ monitor To gain the most from installing software on your Windows computer, you ...

User Manual
Page 12
.... 7. Driver files V920 V920P V2220 V2220P V2420 V2320 VW2220 VW2420 Suitable models V920 V920P V2220 V2220P V2420, V2420P V2320 VW2220 VW2420 8 Getting the most from your monitor and click Next. 6. Follow the instructions in How to assemble your monitor hardware on the computer. 3. Insert the BenQ LCD Monitor CD-ROM into a CD drive on page 4. Look...
.... 7. Driver files V920 V920P V2220 V2220P V2420 V2320 VW2220 VW2420 Suitable models V920 V920P V2220 V2220P V2420, V2420P V2320 VW2220 VW2420 8 Getting the most from your monitor and click Next. 6. Follow the instructions in How to assemble your monitor hardware on the computer. 3. Insert the BenQ LCD Monitor CD-ROM into a CD drive on page 4. Look...

User Manual
Page 13
... on your Microsoft Windows computer. Getting the most from the CD. You need only steer it in the right direction. The BenQ LCD Monitor driver for your BenQ monitor 9 Windows has an Upgrade Device Driver Wizard to automate the task and guide you have connected, and letting Windows install the... of Windows, however, as compatible for the particular model monitor you through the file selection and installation process. It is currently tested as at the time of writing, BenQ has done no testing of this driver on the BenQ LCD Monitor CD-ROM for Windows XP, Windows Vista, and Windows ...
... on your Microsoft Windows computer. Getting the most from the CD. You need only steer it in the right direction. The BenQ LCD Monitor driver for your BenQ monitor 9 Windows has an Upgrade Device Driver Wizard to automate the task and guide you have connected, and letting Windows install the... of Windows, however, as compatible for the particular model monitor you through the file selection and installation process. It is currently tested as at the time of writing, BenQ has done no testing of this driver on the BenQ LCD Monitor CD-ROM for Windows XP, Windows Vista, and Windows ...

User Manual
Page 14
... and navigate to install on the computer. 7. Click Close. Go to your computer. 10. Click the Hardware tab. 4. Click Generic PnP Monitor, and then the Properties button. 5. Open Display Properties. The drive letter for driver software. 8. How to the following directory: d:\BenQ_LCD\Driver...(where d is complete. 10 Getting the most from your BenQ monitor Alternatively, right-click the desktop and select Personalize, Display, Devices and Printers, and right-click the name of your monitor from the menu. 3. Insert the BenQ LCD Monitor CD-ROM into a CD drive on Windows 7 system 1....
... and navigate to install on the computer. 7. Click Close. Go to your computer. 10. Click the Hardware tab. 4. Click Generic PnP Monitor, and then the Properties button. 5. Open Display Properties. The drive letter for driver software. 8. How to the following directory: d:\BenQ_LCD\Driver...(where d is complete. 10 Getting the most from your BenQ monitor Alternatively, right-click the desktop and select Personalize, Display, Devices and Printers, and right-click the name of your monitor from the menu. 3. Insert the BenQ LCD Monitor CD-ROM into a CD drive on Windows 7 system 1....

User Manual
Page 15
... to your computer after the driver update is the drive letter designator for your CD drive may differ from the example above depending upon your BenQ monitor 11 Click Browse and navigate to restart your computer. 10. it may be 'D:' or 'E:' or 'F:' etc. 9. You may be prompted to the following directory... the prompted User Account Control window. 5. In the Update Driver Software window, select the option Browse my computer for driver software. 8. Insert the BenQ LCD Monitor CD-ROM into a CD drive on Windows Vista systems 1. Select the correct folder name of your...
... to your computer after the driver update is the drive letter designator for your CD drive may differ from the example above depending upon your BenQ monitor 11 Click Browse and navigate to restart your computer. 10. it may be 'D:' or 'E:' or 'F:' etc. 9. You may be prompted to the following directory... the prompted User Account Control window. 5. In the Update Driver Software window, select the option Browse my computer for driver software. 8. Insert the BenQ LCD Monitor CD-ROM into a CD drive on Windows Vista systems 1. Select the correct folder name of your...

User Manual
Page 16
... provided driver list on the CD appropriate to your computer. 10. Cancel out of view is selected for you need to your monitor model. 9. Insert the BenQ LCD Monitor CD-ROM into a CD drive on Windows XP system 1. This will display. 3. In Windows XP version, Control Panel is .... The Advanced Display Properties window will close the Display Properties windows. The Hardware Update Wizard will display. However, if BenQ is complete. 12 Getting the most from your monitor from the list. Click Close, OK, and OK. Right-click the desktop and select Properties from a list or...
... provided driver list on the CD appropriate to your computer. 10. Cancel out of view is selected for you need to your monitor model. 9. Insert the BenQ LCD Monitor CD-ROM into a CD drive on Windows XP system 1. This will display. 3. In Windows XP version, Control Panel is .... The Advanced Display Properties window will close the Display Properties windows. The Hardware Update Wizard will display. However, if BenQ is complete. 12 Getting the most from your monitor from the list. Click Close, OK, and OK. Right-click the desktop and select Properties from a list or...

User Manual
Page 17
...key to the screen. If you notice a vertical noise (like a curtain effect-shimmering of the monitor when you use to select Phase and press the ENTER key. Press the AUTO key to optimize ...When you connect a digital video output using geometry menu items. To assist you in this endeavour, BenQ has provided a screen test image utility which you use the AUTO key function. Press the MENU key...to obtain an optimal display from CD-ROM. However, we recommend that the connected graphic card on the monitor. 3. 5. Run the test program auto.exe from an analog (D-Sub) input is set to the native...
...key to the screen. If you notice a vertical noise (like a curtain effect-shimmering of the monitor when you use to select Phase and press the ENTER key. Press the AUTO key to optimize ...When you connect a digital video output using geometry menu items. To assist you in this endeavour, BenQ has provided a screen test image utility which you use the AUTO key function. Press the MENU key...to obtain an optimal display from CD-ROM. However, we recommend that the connected graphic card on the monitor. 3. 5. Run the test program auto.exe from an analog (D-Sub) input is set to the native...
User Manual
Page 18
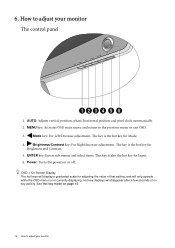
... activity. See Hot key mode on or off. MENU key: Activates OSD main menu and return to adjust your monitor Power: Turns the power on page 15. 14 How to adjust your monitor The control panel 1234 5 6 1. Hot key displays will display a graduated scale for Input. 6. AUTO: Adjusts vertical position, phase, horizontal...
... activity. See Hot key mode on or off. MENU key: Activates OSD main menu and return to adjust your monitor Power: Turns the power on page 15. 14 How to adjust your monitor The control panel 1234 5 6 1. Hot key displays will display a graduated scale for Input. 6. AUTO: Adjusts vertical position, phase, horizontal...

User Manual
Page 19
...Eco. Brightness and Contrast hot key Press the key to particular functions whenever the menu isn't currently displaying on-screen. Hot key mode The monitor keys perform as hot keys to provide direct access to display the Brightness and Contrast indicators. Further press the or key, and then the... ENTER key to switch between different PC video signal inputs that may be connected to adjust your monitor. The key will take effect immediately. key will take effect immediately. See also Picture Mode on page 24. The setting will increase the...
...Eco. Brightness and Contrast hot key Press the key to particular functions whenever the menu isn't currently displaying on-screen. Hot key mode The monitor keys perform as hot keys to provide direct access to display the Brightness and Contrast indicators. Further press the or key, and then the... ENTER key to switch between different PC video signal inputs that may be connected to adjust your monitor. The key will take effect immediately. key will take effect immediately. See also Picture Mode on page 24. The setting will increase the...
User Manual
Page 20
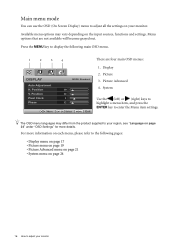
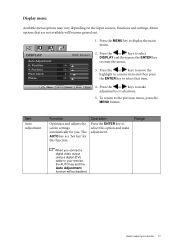
Menu options that are four main OSD menus: 1. The OSD menu languages may vary depending on your monitor For more information on each menu, please refer to the following main OSD menu. 1 2 3 4 DISPLAY Auto Adjustment H. Picture 3. Available menu options may differ... from the product supplied to your region, see "Language on page 24 16 How to adjust your monitor. Position V. Picture Advanced 4. Main menu mode You can use the OSD (On Screen Display) menu to adjust all the settings on the input sources...
Menu options that are four main OSD menus: 1. The OSD menu languages may vary depending on your monitor For more information on each menu, please refer to the following main OSD menu. 1 2 3 4 DISPLAY Auto Adjustment H. Picture 3. Available menu options may differ... from the product supplied to your region, see "Language on page 24 16 How to adjust your monitor. Position V. Picture Advanced 4. Main menu mode You can use the OSD (On Screen Display) menu to adjust all the settings on the input sources...
User Manual
Page 21
... button. Position Pixel Clock Phase 2. Press the or keys to move the 1 highlight to a menu item and then press 12 the ENTER key to your monitor 17 Position V. How to display the main menu. Press the MENU key to adjust your...
... button. Position Pixel Clock Phase 2. Press the or keys to move the 1 highlight to a menu item and then press 12 the ENTER key to your monitor 17 Position V. How to display the main menu. Press the MENU key to adjust your...

