

Installation Handbook
Page 10
Refer to the instructions in the environment where you want to connect. Always grasp and pull the connectors at the end of your BenQ digital signage and interactive flat panel displays. Pay attention to the following notes when you connect cables: • Turn off all cables ...the display and the devices you set up your BenQ display to ensure stable and optimal performance. Cable extension guide This guide provides additional information about how to extend VGA, HDMI and USB connections as required in this guide and the User Manual of the cable. • Ensure that incorrect ...
Refer to the instructions in the environment where you want to connect. Always grasp and pull the connectors at the end of your BenQ digital signage and interactive flat panel displays. Pay attention to the following notes when you connect cables: • Turn off all cables ...the display and the devices you set up your BenQ display to ensure stable and optimal performance. Cable extension guide This guide provides additional information about how to extend VGA, HDMI and USB connections as required in this guide and the User Manual of the cable. • Ensure that incorrect ...

Installation Handbook
Page 11
... input jack Display Audio input jack Audio cable D-Sub (15-pin) cable VGA signal amplifier/repeater D-Sub (15-pin) cable Computer • Refer to the User Manual of your display for the location of VGA and corresponding audio input jacks. • The audio cable, VGA signal amplifier/repeater and additional VGA cable...
... input jack Display Audio input jack Audio cable D-Sub (15-pin) cable VGA signal amplifier/repeater D-Sub (15-pin) cable Computer • Refer to the User Manual of your display for the location of VGA and corresponding audio input jacks. • The audio cable, VGA signal amplifier/repeater and additional VGA cable...

Installation Handbook
Page 12
Connect the HDMI input jack on the HDMI signal amplifier/repeater to the User Manual of your display for the location of the HDMI cable), in order to prevent potential display quality problems like interference and ghosting, if you need ...
Connect the HDMI input jack on the HDMI signal amplifier/repeater to the User Manual of your display for the location of the HDMI cable), in order to prevent potential display quality problems like interference and ghosting, if you need ...

Installation Handbook
Page 13
... port USB cable Faceplate USB cable Computer • Refer to the USB port on the display, and the type-A plug of the cable to the User Manual of your display for the location of USB port. • Any cable used in prior installations for other displays and projectors in the same location...
... port USB cable Faceplate USB cable Computer • Refer to the USB port on the display, and the type-A plug of the cable to the User Manual of your display for the location of USB port. • Any cable used in prior installations for other displays and projectors in the same location...

Installation Handbook
Page 14
... the mini-B plug of the supplied USB cable to the USB Mini-B port on the display, and the type-A plug of the cable to the User Manual of USB connection over a Category 5/5e/6 network cable. 1. Display USB port USB cable Active USB extension cable Computer • Refer to the USB type-A port...
... the mini-B plug of the supplied USB cable to the USB Mini-B port on the display, and the type-A plug of the cable to the User Manual of USB connection over a Category 5/5e/6 network cable. 1. Display USB port USB cable Active USB extension cable Computer • Refer to the USB type-A port...

Installation Handbook
Page 15
... USB connection using a suitable USB cable. Display USB port USB cable USB-CAT converter Category 5/5e/6 network cable USB cable Computer • Refer to the User Manual of your display for the location of USB port. • Refer to extend USB connection from the description above. Connect the mini-B plug of the...
... USB connection using a suitable USB cable. Display USB port USB cable USB-CAT converter Category 5/5e/6 network cable USB cable Computer • Refer to the User Manual of your display for the location of USB port. • Refer to extend USB connection from the description above. Connect the mini-B plug of the...

Installation Handbook
Page 16
... USB extension cable may be different from a faceplate. 1. Display USB port USB cable Active USB extension cable Faceplate Computer USB cable • Refer to the User Manual of your display for the location of the cable to extend USB connection from the description above. Connect the converter to the faceplate using a suitable...
... USB extension cable may be different from a faceplate. 1. Display USB port USB cable Active USB extension cable Faceplate Computer USB cable • Refer to the User Manual of your display for the location of the cable to extend USB connection from the description above. Connect the converter to the faceplate using a suitable...
Installation Handbook
Page 28
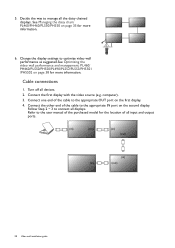
... chain: PL460/PH460/PL550/PH550 on page 38 for more information. Connect the first display with the video source (e.g. computer). 3. Cable connections 1. Refer to the user manual of the purchased model for the location of the cable to optimize video wall performance as suggested.See Optimizing the video wall performance and management...
... chain: PL460/PH460/PL550/PH550 on page 38 for more information. Connect the first display with the video source (e.g. computer). 3. Cable connections 1. Refer to the user manual of the purchased model for the location of the cable to optimize video wall performance as suggested.See Optimizing the video wall performance and management...
Installation Handbook
Page 29
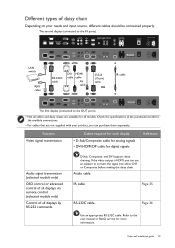
Page 36 Use an appropriate RS-232C cable. Different types of daisy chain Depending on your product, you can purchase them separately. Refer to the user manual or BenQ service for digital signals Reference Audio signal transmission (selected models only) OSD control or advanced control of all displays via remote control (selected models only...
Page 36 Use an appropriate RS-232C cable. Different types of daisy chain Depending on your product, you can purchase them separately. Refer to the user manual or BenQ service for digital signals Reference Audio signal transmission (selected models only) OSD control or advanced control of all displays via remote control (selected models only...

Installation Handbook
Page 35
... installation guide 35 Refer to the IR-IN at the IR extender just connected within the motion range. 4. Connect the supplied IR extender to the user manual of the purchased model for more information. Aim the supplied remote control at the back of remote control. 5. IR cable 30° 30° 8M...
... installation guide 35 Refer to the IR-IN at the IR extender just connected within the motion range. 4. Connect the supplied IR extender to the user manual of the purchased model for more information. Aim the supplied remote control at the back of remote control. 5. IR cable 30° 30° 8M...

Installation Handbook
Page 36
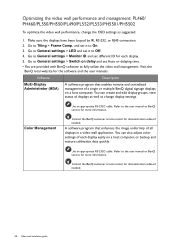
... LAN: PL460/PH460/PL550/PH550 1. RS-232C cable • Use an appropriate RS-232C cable. Connect all displays separately to the user manual or BenQ service for more information. 2. Refer to a display using RJ45 cables (purchased separately if not supplied). Make sure the network connection is...the computer and all displays using a RJ45 cable (purchased separately if not supplied). 2. Management by receiving RS-232 commands from the BenQ local website) for more information. • For PL490/PL552/PL553/PH5501/PH5502, choose the RS232 control form Card OPS or embedded RS232...
... LAN: PL460/PH460/PL550/PH550 1. RS-232C cable • Use an appropriate RS-232C cable. Connect all displays separately to the user manual or BenQ service for more information. 2. Refer to a display using RJ45 cables (purchased separately if not supplied). Make sure the network connection is...the computer and all displays using a RJ45 cable (purchased separately if not supplied). 2. Management by receiving RS-232 commands from the BenQ local website) for more information. • For PL490/PL552/PL553/PH5501/PH5502, choose the RS232 control form Card OPS or embedded RS232...
Installation Handbook
Page 37
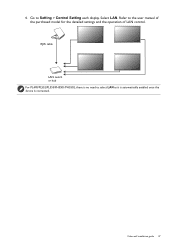
Select LAN. 4. Video wall installation guide 37 Refer to Setting > Control Setting each display. Go to the user manual of the purchased model for the detailed settings and the operation of LAN control. RJ45 cable LAN switch or hub For PL490/PL552/PL553/PH5501/PH5502, there is no need to select LAN as it is automatically enabled once the device is connected.
Select LAN. 4. Video wall installation guide 37 Refer to Setting > Control Setting each display. Go to the user manual of the purchased model for the detailed settings and the operation of LAN control. RJ45 cable LAN switch or hub For PL490/PL552/PL553/PH5501/PH5502, there is no need to select LAN as it is automatically enabled once the device is connected.
Installation Handbook
Page 38
...demonstration videos if needed . Make sure the displays have been looped by IR, RS-232, or RJ45 connection. 2. Refer to the user manual or BenQ service for each display easily on a host computer, or backup and restore calibration data quickly. You can create and edit display groups..., view status of each display. 5. Visit the BenQ local website for more information. Refer to the user manual or BenQ service for the software and the user manuals. Go to General settings > LED and set it to General settings > Switch on a host...
...demonstration videos if needed . Make sure the displays have been looped by IR, RS-232, or RJ45 connection. 2. Refer to the user manual or BenQ service for each display easily on a host computer, or backup and restore calibration data quickly. You can create and edit display groups..., view status of each display. 5. Visit the BenQ local website for more information. Refer to the user manual or BenQ service for the software and the user manuals. Go to General settings > LED and set it to General settings > Switch on a host...

Installation Handbook
Page 42
There are two loops of screw holes (outer & inner), depend on the design of each model. (Please check the user manual for using loop information) • Outer loop: Big screw holes for M6 screw. • Inner loop: Small screw holes for M4 screw. 2. Remark: &#...Kit-2" on the design of screw holes (outer & inner), depend on adjacent two displays. 1. There are two loops of each model. (Please check the user manual for using loop information) • Outer loop: Big screw holes for M6 screw. • Inner loop: Small screw holes for PL552/PL553/PH5501/ PH5502 ...
There are two loops of screw holes (outer & inner), depend on the design of each model. (Please check the user manual for using loop information) • Outer loop: Big screw holes for M6 screw. • Inner loop: Small screw holes for M4 screw. 2. Remark: &#...Kit-2" on the design of screw holes (outer & inner), depend on adjacent two displays. 1. There are two loops of each model. (Please check the user manual for using loop information) • Outer loop: Big screw holes for M6 screw. • Inner loop: Small screw holes for PL552/PL553/PH5501/ PH5502 ...

Installation Handbook
Page 45
Video wall installation guide 45 Refer to the user manual of the purchased software for advanced settings. Setting the display position for special video wall layout If a special layout is requested, you will need an additional software and device (purchased separately) for more information.
Video wall installation guide 45 Refer to the user manual of the purchased software for advanced settings. Setting the display position for special video wall layout If a special layout is requested, you will need an additional software and device (purchased separately) for more information.

Installation Handbook
Page 65
... the cable connection. If yes, the problem lies Incorrect cable connection. replacement. Possible causes Possible solutions This could be Contact the BenQ authorized service partner for damaged. The main power switch on the back of the control panel (keypad) buttons and check if the...lights in Standby mode when the input source is used for details. somewhere else. the input source using the appropriate cable(s). See the user manual for signal input. • Go to Picture > Noise Reduction. • Move the display to another location to see if the ...
... the cable connection. If yes, the problem lies Incorrect cable connection. replacement. Possible causes Possible solutions This could be Contact the BenQ authorized service partner for damaged. The main power switch on the back of the control panel (keypad) buttons and check if the...lights in Standby mode when the input source is used for details. somewhere else. the input source using the appropriate cable(s). See the user manual for signal input. • Go to Picture > Noise Reduction. • Move the display to another location to see if the ...

Installation Handbook
Page 66
Possible causes Possible solutions The video cable is not properly zoomed. Possible causes The picture is not connected properly. Refer to the user manual for stretched on the menu options. Possible causes Possible solutions Images from different input sources may be heard but the image is still distorted. Sound ...
Possible causes Possible solutions The video cable is not properly zoomed. Possible causes The picture is not connected properly. Refer to the user manual for stretched on the menu options. Possible causes Possible solutions Images from different input sources may be heard but the image is still distorted. Sound ...
Installation Handbook
Page 67
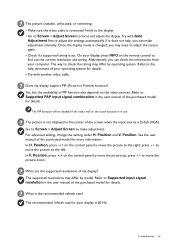
... the right; The recommended refresh rate for your display, press INFO on the control panel to Supported input signal resolution in the user manual of your computer. Alternatively, you may need to find out the current resolution and timing. For advanced setting, change the setting under H....Troubleshooting 67 If it does not help document of the purchased model for more information. Refer to Supported PAP input signal combination in the user manual of the screen when the input source is changed, you can make adjustment. Refer to the help , you can check the information ...
... the right; The recommended refresh rate for your display, press INFO on the control panel to Supported input signal resolution in the user manual of your computer. Alternatively, you may need to find out the current resolution and timing. For advanced setting, change the setting under H....Troubleshooting 67 If it does not help document of the purchased model for more information. Refer to Supported PAP input signal combination in the user manual of the screen when the input source is changed, you can make adjustment. Refer to the help , you can check the information ...

Installation Handbook
Page 69
... sensor properly. 1. Refer to ensure the touch function works. Possible causes Possible solutions The touch function is not installed. Check the user manual for the supported operating systems. Visit the BenQ local website for your display only; Remove dust or dirt from your computer to the screen, never use any extension (e.g. Touch function...
... sensor properly. 1. Refer to ensure the touch function works. Possible causes Possible solutions The touch function is not installed. Check the user manual for the supported operating systems. Visit the BenQ local website for your display only; Remove dust or dirt from your computer to the screen, never use any extension (e.g. Touch function...
Installation Handbook
Page 74
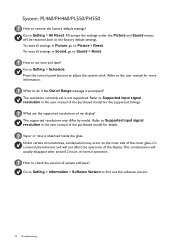
...the factory default settings? Vapor or mist is not supported. System: PL460/PH460/PL550/PH550 How to Supported input signal resolution in the user manual of the purchased model for details. Go to do if the Out of the display. The resolution currently set time and date? This...will be restored back to set is observed inside the glass. What to Setting > Schedule. To reset all settings in Picture, go to the user manual for more information. Refer to Sound > Reset. Under certain circumstances, condensation may differ by model. How to Setting > All Reset. What are...
...the factory default settings? Vapor or mist is not supported. System: PL460/PH460/PL550/PH550 How to Supported input signal resolution in the user manual of the purchased model for details. Go to do if the Out of the display. The resolution currently set time and date? This...will be restored back to set is observed inside the glass. What to Setting > Schedule. To reset all settings in Picture, go to the user manual for more information. Refer to Sound > Reset. Under certain circumstances, condensation may differ by model. How to Setting > All Reset. What are...


