
User Manual
Page 6
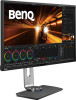
And the package contents may subject to transport the monitor. The fitted foam packing is ideal for your product, you can purchase them separately. • Consider keeping the box and packaging in storage for use ... you may need to change without prior notice. Always keep the product and accessories out of reach of small children. 6 Getting started Video Cable: HDMI USB Cable OSD Controller Wire Holder Factory Calibration Report • Available accessories and the pictures shown here may differ from the actual contents and the product...
And the package contents may subject to transport the monitor. The fitted foam packing is ideal for your product, you can purchase them separately. • Consider keeping the box and packaging in storage for use ... you may need to change without prior notice. Always keep the product and accessories out of reach of small children. 6 Getting started Video Cable: HDMI USB Cable OSD Controller Wire Holder Factory Calibration Report • Available accessories and the pictures shown here may differ from the actual contents and the product...
User Manual
Page 8
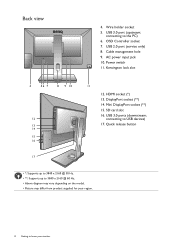
Wire holder socket 5. USB 2.0 port (service only) 8. SD card slot 16. connecting to know your monitor AC power input jack 10. DisplayPort socket (**) 14. Mini DisplayPort socket (**) 15. HDMI socket (*) 13. Power switch 11. Quick release button 17 ... diagram may vary depending on the model. • Picture may differ from product supplied for your region. 8 Getting to USB devices) 17. connecting to the PC) 6. Cable management hole 9. USB 3.0 ports (downstream; USB 3.0 port (upstream; Kensington lock slot 4 56 7 8 9 10 12 13 14 15 16 11 12. OSD Controller...
Wire holder socket 5. USB 2.0 port (service only) 8. SD card slot 16. connecting to know your monitor AC power input jack 10. DisplayPort socket (**) 14. Mini DisplayPort socket (**) 15. HDMI socket (*) 13. Power switch 11. Quick release button 17 ... diagram may vary depending on the model. • Picture may differ from product supplied for your region. 8 Getting to USB devices) 17. connecting to the PC) 6. Cable management hole 9. USB 3.0 ports (downstream; USB 3.0 port (upstream; Kensington lock slot 4 56 7 8 9 10 12 13 14 15 16 11 12. OSD Controller...

User Manual
Page 9
Getting to know your monitor 9 For detailed connection methods, see page 11 - 13. For cables that are for Windows 8 (8.1) and Windows 10 operating systems. Install the driver from the supplied CD. PC/Notebook SD card (*) USB peripherals (USB 3.0) *: Requires card reader driver for your reference only. Connection The following connection illustrations are not supplied with your product, you can purchase them separately.
Getting to know your monitor 9 For detailed connection methods, see page 11 - 13. For cables that are for Windows 8 (8.1) and Windows 10 operating systems. Install the driver from the supplied CD. PC/Notebook SD card (*) USB peripherals (USB 3.0) *: Requires card reader driver for your reference only. Connection The following connection illustrations are not supplied with your product, you can purchase them separately.

User Manual
Page 12
...To Connect the mini DP Cable Or Connect the plug of the DP cable to the monitor. Connect the USB cable between the PC and the USB devices connected to the monitor video socket. Connect USB devices. Connect the other end of the cable to assemble your package and the socket illustrations... on the right may vary depending on page 30. After the monitor is not displayed, disconnect the cable. These downstream USB ports transmit data between connected USB devices and the upstream port. 12 How to the computer video socket. Go to System and ...
...To Connect the mini DP Cable Or Connect the plug of the DP cable to the monitor. Connect the USB cable between the PC and the USB devices connected to the monitor video socket. Connect USB devices. Connect the other end of the cable to assemble your package and the socket illustrations... on the right may vary depending on page 30. After the monitor is not displayed, disconnect the cable. These downstream USB ports transmit data between connected USB devices and the upstream port. 12 How to the computer video socket. Go to System and ...

User Manual
Page 13
... Memory Stick Pro •MS Duo / MS-Pro Duo 5. Plug one end of the power cord into the socket labelled on the monitor stand or to the mini USB port (exclusively for Windows 8 (8.1) and Windows 10 operating systems. Install the driver from the supplied CD. And place the OSD Controller ...on the rear of the monitor. How to a power outlet just yet. Connect the memory card. Do not connect the other end to assemble your monitor hardware 13...
... Memory Stick Pro •MS Duo / MS-Pro Duo 5. Plug one end of the power cord into the socket labelled on the monitor stand or to the mini USB port (exclusively for Windows 8 (8.1) and Windows 10 operating systems. Install the driver from the supplied CD. And place the OSD Controller ...on the rear of the monitor. How to a power outlet just yet. Connect the memory card. Do not connect the other end to assemble your monitor hardware 13...

User Manual
Page 18
... procedures should be followed to rotate the display. Refer to the maximum extended position. Rotate the monitor 90 degrees clockwise as illustrated. 90 To avoid the edge of your monitor hardware Remove the connected USB peripherals and audio cable first. 18 How to Display and Auto Pivot. Fully extend the... monitor and tilt it to the help document of the LCD display hitting the monitor base surface while it is enough room ...
... procedures should be followed to rotate the display. Refer to the maximum extended position. Rotate the monitor 90 degrees clockwise as illustrated. 90 To avoid the edge of your monitor hardware Remove the connected USB peripherals and audio cable first. 18 How to Display and Auto Pivot. Fully extend the... monitor and tilt it to the help document of the LCD display hitting the monitor base surface while it is enough room ...

User Manual
Page 29
No. How to other devices with mini USB ports. Navigation buttons • : For Up/Increase adjustment. Do not connect it to adjust your monitor 29 For Down/Decrease adjustment. ) • : Enters sub menus. 6. OK key ( ) • : Returns to the previous menu. • Activates the hot key menu. • Selects menu items. OSD Controller is designed for BenQ LCD Monitor exclusively and is available for compatible models only. Name Description 5.
No. How to other devices with mini USB ports. Navigation buttons • : For Up/Increase adjustment. Do not connect it to adjust your monitor 29 For Down/Decrease adjustment. ) • : Enters sub menus. 6. OK key ( ) • : Returns to the previous menu. • Activates the hot key menu. • Selects menu items. OSD Controller is designed for BenQ LCD Monitor exclusively and is available for compatible models only. Name Description 5.

User Manual
Page 52
... If the Eye Protect function is set a proper aspect ratio for details. The OSD controls are running at the front bottom of the monitor does not work well. Bright colors (especially white and fluorescent colors) reflect light and the sensor cannot detect the main light sources. 52...power management function to let your headphone (if the headphone is connected to the monitor). • Check whether the headphone jack is properly connected. • If the external speakers are USB-powered, check whether the USB connection is OK. • Increase the volume (volume may appear distorted or ...
... If the Eye Protect function is set a proper aspect ratio for details. The OSD controls are running at the front bottom of the monitor does not work well. Bright colors (especially white and fluorescent colors) reflect light and the sensor cannot detect the main light sources. 52...power management function to let your headphone (if the headphone is connected to the monitor). • Check whether the headphone jack is properly connected. • If the external speakers are USB-powered, check whether the USB connection is OK. • Increase the volume (volume may appear distorted or ...


