
User Manual
Page 1
PD Series LCD Monitor User Manual
PD Series LCD Monitor User Manual

User Manual
Page 3
... exposed to operate the device or charge the battery. Replace the unit if it to excess moisture. Care And Cleaning • Do not place the monitor face down on the panel surface may occur. 3 Otherwise, scratches on the floor or a desk surface directly. If you are no service parts inside ... or equal to H03VV-F or H05VV-F, 2G or 3G, 0.75mm2 must be used . There are not sure of the type of power available, consult your monitor. 0~40 C 10~90 % 0~3000 m -20~60 C 10~60 % 0~12000 m • The AC plug isolates this equipment from the type of the product is ...
... exposed to operate the device or charge the battery. Replace the unit if it to excess moisture. Care And Cleaning • Do not place the monitor face down on the panel surface may occur. 3 Otherwise, scratches on the floor or a desk surface directly. If you are no service parts inside ... or equal to H03VV-F or H05VV-F, 2G or 3G, 0.75mm2 must be used . There are not sure of the type of power available, consult your monitor. 0~40 C 10~90 % 0~3000 m -20~60 C 10~60 % 0~12000 m • The AC plug isolates this equipment from the type of the product is ...
User Manual
Page 4
... power outlet before disconnecting the cables from the LCD monitor. • Always unplug the product from drying out. 4 Rest your monitor and monitor mounting kit on a wall with a lint-free, non-abrasive cloth. Your monitor should be 50 ~ 70 cm (20 ~ 28 inches) away from www.BenQ.com for an extended period of product use...
... power outlet before disconnecting the cables from the LCD monitor. • Always unplug the product from drying out. 4 Rest your monitor and monitor mounting kit on a wall with a lint-free, non-abrasive cloth. Your monitor should be 50 ~ 70 cm (20 ~ 28 inches) away from www.BenQ.com for an extended period of product use...
User Manual
Page 5
...How to assemble your monitor hardware 13 How to detach the stand and the base 19 Adjusting the monitor height ...21 Rotating the monitor ...22 Viewing angle adjustment ...23 Using the monitor wall mounting kit 24 Getting the most from your BenQ monitor 25 How to install the monitor on a new computer... 26 How to upgrade the monitor on an existing computer 27 ...
...How to assemble your monitor hardware 13 How to detach the stand and the base 19 Adjusting the monitor height ...21 Rotating the monitor ...22 Viewing angle adjustment ...23 Using the monitor wall mounting kit 24 Getting the most from your BenQ monitor 25 How to install the monitor on a new computer... 26 How to upgrade the monitor on an existing computer 27 ...

User Manual
Page 7
BenQ LCD Monitor Monitor Stand Monitor Base Quick Start Guide CD-ROM Power Cord (Picture may differ from product supplied for your region.) Video Cable: DVI-D Dual Link (Optional accessory for models with DVI inputs) Getting started When unpacking please check you have the following items. If any are missing or damaged, please contact the place of purchase for a replacement. Getting started 7
BenQ LCD Monitor Monitor Stand Monitor Base Quick Start Guide CD-ROM Power Cord (Picture may differ from product supplied for your region.) Video Cable: DVI-D Dual Link (Optional accessory for models with DVI inputs) Getting started When unpacking please check you have the following items. If any are missing or damaged, please contact the place of purchase for a replacement. Getting started 7

User Manual
Page 8
... is ideal for use in the future when you can purchase them separately. • Consider keeping the box and packaging in storage for protecting the monitor during transport. And the package contents may need to change without prior notice. Video Cable: DP (Optional accessory) Video Cable: DP to mini DP Video... accessories and the pictures shown here may differ from the actual contents and the product supplied for your product, you may subject to transport the monitor.
... is ideal for use in the future when you can purchase them separately. • Consider keeping the box and packaging in storage for protecting the monitor during transport. And the package contents may need to change without prior notice. Video Cable: DP (Optional accessory) Video Cable: DP to mini DP Video... accessories and the pictures shown here may differ from the actual contents and the product supplied for your product, you may subject to transport the monitor.

User Manual
Page 9
Hotkey Puck socket 5. AC power input jack 11. USB 3.0 port (upstream 1; connecting to the PC) 8. connecting to the PC) 7. Kensington lock slot Getting to USB devices) 6. Power button 1 Back view 45 7 9 68 10 11 23 12 4. connecting to know your monitor 9 Light sensor / Eco sensor 2. Cable management hole 10. Control buttons 3. Getting to know your monitor Front view 1. USB 3.0 port (upstream 2; USB 3.0 ports (downstream; Audio Line In 9. AC power switch 12.
Hotkey Puck socket 5. AC power input jack 11. USB 3.0 port (upstream 1; connecting to the PC) 8. connecting to the PC) 7. Kensington lock slot Getting to USB devices) 6. Power button 1 Back view 45 7 9 68 10 11 23 12 4. connecting to know your monitor 9 Light sensor / Eco sensor 2. Cable management hole 10. Control buttons 3. Getting to know your monitor Front view 1. USB 3.0 port (upstream 2; USB 3.0 ports (downstream; Audio Line In 9. AC power switch 12.
User Manual
Page 10
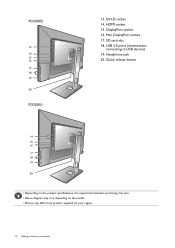
Mini DisplayPort socket 17. Quick release button 14 15 16 17 18 19 20 • Depending on the product specifications, the supported resolution and timing may vary. • Above diagram may vary depending on the model. • Picture may differ from product supplied for your monitor DisplayPort socket 16. USB 3.0 ports (downstream; DVI-D socket 14. SD card slot 18. connecting to know your region. 10 Getting to USB devices) 19. HDMI socket 15. Headphone jack 20. PD3200Q 13 14 15 16 17 18 19 20 PD3200U 13.
Mini DisplayPort socket 17. Quick release button 14 15 16 17 18 19 20 • Depending on the product specifications, the supported resolution and timing may vary. • Above diagram may vary depending on the model. • Picture may differ from product supplied for your monitor DisplayPort socket 16. USB 3.0 ports (downstream; DVI-D socket 14. SD card slot 18. connecting to know your region. 10 Getting to USB devices) 19. HDMI socket 15. Headphone jack 20. PD3200Q 13 14 15 16 17 18 19 20 PD3200U 13.

User Manual
Page 11
For cables that are for your reference only. PD3200Q PC/Notebook SD card USB peripherals (USB 3.0) Speakers USB peripherals (USB 3.0) PC/Notebook Getting to know your monitor 11 For detailed connection methods, see page 14 - 17. Connection The following connection illustrations are not supplied with your product, you can purchase them separately.
For cables that are for your reference only. PD3200Q PC/Notebook SD card USB peripherals (USB 3.0) Speakers USB peripherals (USB 3.0) PC/Notebook Getting to know your monitor 11 For detailed connection methods, see page 14 - 17. Connection The following connection illustrations are not supplied with your product, you can purchase them separately.

User Manual
Page 13
...output jacks may vary by clearing a flat open area on your desk and placing a soft item like a stapler or a mouse will scratch or damage the monitor surround and controls. Refer to the "Preset display modes" section on the purchased model. • The supported timing may vary depending on the link "Adjusting... the Screen Resolution" for more information. 1. Gently lay the screen face down on the monitor. Make sure to align the arrow on the end of the stand to the one on a flat clean padded surface. Attach the...
...output jacks may vary by clearing a flat open area on your desk and placing a soft item like a stapler or a mouse will scratch or damage the monitor surround and controls. Refer to the "Preset display modes" section on the purchased model. • The supported timing may vary depending on the link "Adjusting... the Screen Resolution" for more information. 1. Gently lay the screen face down on the monitor. Make sure to align the arrow on the end of the stand to the one on a flat clean padded surface. Attach the...

User Manual
Page 14
... the stand arm with the ferrite filter) to minimize unwanted reflections from accidently falling out during use. 14 How to the monitor video socket. You should position the monitor and angle the screen to the computer video socket. Connect the other light sources. 3 1 2 2 1 2. Gently ...attempt to pull them together until they have properly engaged. Carefully lift the monitor, turn the stand counterclockwise to check that they click and lock into place ( 2 ). And then turn it over and place it upright on ...
... the stand arm with the ferrite filter) to minimize unwanted reflections from accidently falling out during use. 14 How to the monitor video socket. You should position the monitor and angle the screen to the computer video socket. Connect the other light sources. 3 1 2 2 1 2. Gently ...attempt to pull them together until they have properly engaged. Carefully lift the monitor, turn the stand counterclockwise to check that they click and lock into place ( 2 ). And then turn it over and place it upright on ...

User Manual
Page 15
... the rear of a digital output device. The video cables included in your package and the socket illustrations on the right may vary depending on the monitor. Connect the other end of the HDMI cable to the HDMI port on the product supplied for your computer audio outlet. Connect the other end... of the monitor and change the setting from 1.2 to 1.1, and then connect the cable again. To Connect the HDMI Cable Or Connect the plug of the cable to...
... the rear of a digital output device. The video cables included in your package and the socket illustrations on the right may vary depending on the monitor. Connect the other end of the HDMI cable to the HDMI port on the product supplied for your computer audio outlet. Connect the other end... of the monitor and change the setting from 1.2 to 1.1, and then connect the cable again. To Connect the HDMI Cable Or Connect the plug of the cable to...

User Manual
Page 16
... TV OUT PDIF-OUT SDIF-OUT You may connect headphones to the headphone jack found on the monitor. Connect the USB cable between the PC and the USB devices connected to the monitor. Insert an SD or MMC memory card following the direction indicated on the card to assemble your... monitor hardware This upstream USB port transmits data between the PC and the monitor (via other USB ports (downstream) on the back side of the monitor. 4. Connect the memory card. Connect USB devices. Supported memory card ...
... TV OUT PDIF-OUT SDIF-OUT You may connect headphones to the headphone jack found on the monitor. Connect the USB cable between the PC and the USB devices connected to the monitor. Insert an SD or MMC memory card following the direction indicated on the card to assemble your... monitor hardware This upstream USB port transmits data between the PC and the monitor (via other USB ports (downstream) on the back side of the monitor. 4. Connect the memory card. Connect USB devices. Supported memory card ...

User Manual
Page 17
... to another desired place as illustrated. And place the Hotkey Puck on the power. Organize the cables. Plug the other end to the monitor. Connect-to and turn it on. Picture may differ from product supplied for Hotkey Puck connection) on the rear of the power cord into the ... on page 32. 7. Route the cables via the cable management hole. 9. For more information on Hotkey Puck, see Hotkey Puck on the rear of the monitor. Connect the Hotkey Puck to a power outlet just yet. 8. Connect the power cable to the mini USB port (exclusively for your...
... to another desired place as illustrated. And place the Hotkey Puck on the power. Organize the cables. Plug the other end to the monitor. Connect-to and turn it on. Picture may differ from product supplied for Hotkey Puck connection) on the rear of the power cord into the ... on page 32. 7. Route the cables via the cable management hole. 9. For more information on Hotkey Puck, see Hotkey Puck on the rear of the monitor. Connect the Hotkey Puck to a power outlet just yet. 8. Connect the power cable to the mini USB port (exclusively for your...

User Manual
Page 18
Make sure the power switch next to the AC power input jack is switched to assemble your monitor hardware To extend the service life of the product, we recommend that you use your BenQ monitor on page 25 to install the monitor software. Turn on the monitor. Turn on the monitor by pressing the power button on the computer too, and follow the instructions in Getting the most from your computer's power management function. 18 How to ON.
Make sure the power switch next to the AC power input jack is switched to assemble your monitor hardware To extend the service life of the product, we recommend that you use your BenQ monitor on page 25 to install the monitor software. Turn on the monitor. Turn on the monitor by pressing the power button on the computer too, and follow the instructions in Getting the most from your computer's power management function. 18 How to ON.

User Manual
Page 19
...your desk will crack the glass or damage the LCD substrate voiding your warranty. Release the thumbscrew on the bottom of the monitor base. 1 2 How to assemble your desk and placing a soft item like a stapler or a mouse will scratch or damage the... pressing and holding the quick release button ( 1 ), detach the stand from the monitor ( 2 ). 2 1 3. Please be careful to prevent damage to detach the stand and the base 1. Remove the monitor stand. Remove the monitor base. Prepare the monitor and area. Turn off the computer before unplugging the power cable. Sliding or scraping ...
...your desk will crack the glass or damage the LCD substrate voiding your warranty. Release the thumbscrew on the bottom of the monitor base. 1 2 How to assemble your desk and placing a soft item like a stapler or a mouse will scratch or damage the... pressing and holding the quick release button ( 1 ), detach the stand from the monitor ( 2 ). 2 1 3. Please be careful to prevent damage to detach the stand and the base 1. Remove the monitor stand. Remove the monitor base. Prepare the monitor and area. Turn off the computer before unplugging the power cable. Sliding or scraping ...

User Manual
Page 20
Turn the stand counterclockwise until you cannot go further. And then detach the base from the stand. 20 How to assemble your monitor hardware
Turn the stand counterclockwise until you cannot go further. And then detach the base from the stand. 20 How to assemble your monitor hardware

User Manual
Page 21
Keep children out of reach of the monitor, as ascending or descending monitor might cause personal injuries. Adjusting the monitor height To adjust the monitor height, hold both the left and the right sides of the monitor to lower the monitor or lift it up to the desired height. • Avoid placing hands on... the upper or lower part of the height-adjustable stand or at the bottom of the monitor while performing this operation. • If the monitor has been rotated to portrait mode and height adjustment is desired, you should be noted that the wide screen will ...
Keep children out of reach of the monitor, as ascending or descending monitor might cause personal injuries. Adjusting the monitor height To adjust the monitor height, hold both the left and the right sides of the monitor to lower the monitor or lift it up to the desired height. • Avoid placing hands on... the upper or lower part of the height-adjustable stand or at the bottom of the monitor while performing this operation. • If the monitor has been rotated to portrait mode and height adjustment is desired, you should be noted that the wide screen will ...

User Manual
Page 22
... the display up and extend it to the help document of the LCD display hitting the monitor base surface while it . Alternatively, right-click the desktop and select Screen resolution from www.BenQ.com), and check Auto Pivot to set the display to rotate the display. Click to ...launch the Display Pilot Software (downloaded from the popup menu. Select Portrait in Orientation, and apply the setting. Then tilt the monitor. Rotate the monitor 90 degrees clockwise as ...
... the display up and extend it to the help document of the LCD display hitting the monitor base surface while it . Alternatively, right-click the desktop and select Screen resolution from www.BenQ.com), and check Auto Pivot to set the display to rotate the display. Click to ...launch the Display Pilot Software (downloaded from the popup menu. Select Portrait in Orientation, and apply the setting. Then tilt the monitor. Rotate the monitor 90 degrees clockwise as ...

User Manual
Page 23
How to the desired viewing angle. 4. Adjust the monitor to assemble your monitor hardware 23 Viewing angle adjustment You may position the screen to the product specifications for details. Refer to the desired angle with monitor tilt, swivel, and height adjustment functions.
How to the desired viewing angle. 4. Adjust the monitor to assemble your monitor hardware 23 Viewing angle adjustment You may position the screen to the product specifications for details. Refer to the desired angle with monitor tilt, swivel, and height adjustment functions.

