
User Manual
Page 1
PB9200-e.book Page 1 Thursday, May 27, 2004 2:15 PM PB9200 Digital Projector Installation Series User's Manual - Operating Guide Welcome
PB9200-e.book Page 1 Thursday, May 27, 2004 2:15 PM PB9200 Digital Projector Installation Series User's Manual - Operating Guide Welcome
User Manual
Page 3
PB9200-e.book Page iii Thursday, May 27, 2004 2:15 PM Table of Contents Projector Features 1 Preparation 2 Part Names 3 Projector 3 Control Buttons 4 Remote Control 4 Setting Up 5 Arrangement 5 Adjusting The Projector's Elevator 6 Using The Lens Shift Buttons 6 Connecting Your Devices 7 Examples of connection with a computer 8 Examples of connection with a VCR/DVD Player 9 Connecting to a monitor 10 ...
PB9200-e.book Page iii Thursday, May 27, 2004 2:15 PM Table of Contents Projector Features 1 Preparation 2 Part Names 3 Projector 3 Control Buttons 4 Remote Control 4 Setting Up 5 Arrangement 5 Adjusting The Projector's Elevator 6 Using The Lens Shift Buttons 6 Connecting Your Devices 7 Examples of connection with a computer 8 Examples of connection with a VCR/DVD Player 9 Connecting to a monitor 10 ...
User Manual
Page 4
PB9200-e.book Page iv Thursday, May 27, 2004 2:15 PM Correcting The Keystone Distortion 17 Adjusting The Volume 18 Muting The Sound 18 Temporarily Blanking The ... 35 Lamp 36 Replacing The Lamp 37 Air Filter 38 Caring For The Air Filter 38 Other Care 39 Caring For The Inside Of The Projector 39 Caring For The Lens 39 Caring For The Cabinet And Remote Control 39 iv Table of Contents
PB9200-e.book Page iv Thursday, May 27, 2004 2:15 PM Correcting The Keystone Distortion 17 Adjusting The Volume 18 Muting The Sound 18 Temporarily Blanking The ... 35 Lamp 36 Replacing The Lamp 37 Air Filter 38 Caring For The Air Filter 38 Other Care 39 Caring For The Inside Of The Projector 39 Caring For The Lens 39 Caring For The Cabinet And Remote Control 39 iv Table of Contents
User Manual
Page 7
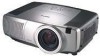
PB9200-e.book Page 1 Thursday, May 27, 2004 2:15 PM Projector Features This multimedia projector is used to achieve quieter operation. • User Memory Function This projector can memorize 4 settings by MY MEMORY function. • Partial Magnification Function Interesting parts of images can ... for closer viewing. • Keystone Distortion Correction Quick correction of distorted images electrically. • Optical Lens Shift The lens of this projector can be realized. • Ultra High Brightness Crisp, ultra-bright presentations is achieved by using a UHB (ultra high brightness) lamp...
PB9200-e.book Page 1 Thursday, May 27, 2004 2:15 PM Projector Features This multimedia projector is used to achieve quieter operation. • User Memory Function This projector can memorize 4 settings by MY MEMORY function. • Partial Magnification Function Interesting parts of images can ... for closer viewing. • Keystone Distortion Correction Quick correction of distorted images electrically. • Optical Lens Shift The lens of this projector can be realized. • Ultra High Brightness Crisp, ultra-bright presentations is achieved by using a UHB (ultra high brightness) lamp...

User Manual
Page 8
Your projector should come with the items shown there. Contact your dealer anything is missing. For moving the projector, be sure to use the original packing material. Use special caution for future reshipment. Note: Keep the original packing material for the lens part. 2 Preparation Quick Guide". PB9200-e.book Page 2 Thursday, May 27, 2004 2:15 PM Preparation Please see the "Contents Of Package" of the "User's Manual -
Your projector should come with the items shown there. Contact your dealer anything is missing. For moving the projector, be sure to use the original packing material. Use special caution for future reshipment. Note: Keep the original packing material for the lens part. 2 Preparation Quick Guide". PB9200-e.book Page 2 Thursday, May 27, 2004 2:15 PM Preparation Please see the "Contents Of Package" of the "User's Manual -

User Manual
Page 9
...sensor 4 Lens cap 5 Lens The picture is projected from here. 6 Filter cover An air filter is inside. PB9200-e.book Page 3 Thursday, May 27, 2004 2:15 PM Part Names Projector TEMP LAMP STANDBY/ON LENS SHIFT BNG COMPONENT S-VIDEO VIDEO MENU INTER RESET FOCUS ZOOM RGB M1-D INPUT KEYSTONE SEARCH... 3 5 4 6 1 2 Projector (Front/Right) 11 A D E B8 3 L F LENS SHIFT COMPONENTBNG S-VIDEO RGB M1-D INPUT INTER KEYSTONE SEARCH RESET VIDEO STANDBY/ON MENU TEMP ...
...sensor 4 Lens cap 5 Lens The picture is projected from here. 6 Filter cover An air filter is inside. PB9200-e.book Page 3 Thursday, May 27, 2004 2:15 PM Part Names Projector TEMP LAMP STANDBY/ON LENS SHIFT BNG COMPONENT S-VIDEO VIDEO MENU INTER RESET FOCUS ZOOM RGB M1-D INPUT KEYSTONE SEARCH... 3 5 4 6 1 2 Projector (Front/Right) 11 A D E B8 3 L F LENS SHIFT COMPONENTBNG S-VIDEO RGB M1-D INPUT INTER KEYSTONE SEARCH RESET VIDEO STANDBY/ON MENU TEMP ...

User Manual
Page 10
PB9200-e.book Page 4 Thursday, May 27, 2004 2:15 PM Control Buttons KEYSTONE 15 7 M1-D 8 RGB INPUT LENS SHIFT 9 BNC 4 COMPONENT ENTER 10 S-VIDEO 11 VIDEO SEARCH 6 5 RESET 17 18 MENU 16 19 12 STANDBY/ON 1 23 TEMP LAMP Control Panel on the Projector TEMP LAMP STANDBY/ON LENS SHIFT BNG COMPONENT S-VIDEO VIDEO...
PB9200-e.book Page 4 Thursday, May 27, 2004 2:15 PM Control Buttons KEYSTONE 15 7 M1-D 8 RGB INPUT LENS SHIFT 9 BNC 4 COMPONENT ENTER 10 S-VIDEO 11 VIDEO SEARCH 6 5 RESET 17 18 MENU 16 19 12 STANDBY/ON 1 23 TEMP LAMP Control Panel on the Projector TEMP LAMP STANDBY/ON LENS SHIFT BNG COMPONENT S-VIDEO VIDEO...
User Manual
Page 11
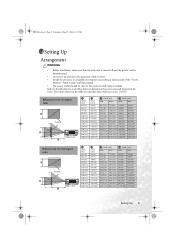
...The values shown in a suitable environment according to instructions of the "User's Manual - PB9200-e.book Page 5 Thursday, May 27, 2004 2:15 PM Setting Up Arrangement WARNING • Before installation, make sure that the projector is turned off and the power code is disconnected. • Do not set up ...and move the projector, while it is hot. • Install the projector in the table are calculated for a full size screen. (±10%) Reference for the 16:9 aspect ratio B A Screen D B Side view C A B [inch...
...The values shown in a suitable environment according to instructions of the "User's Manual - PB9200-e.book Page 5 Thursday, May 27, 2004 2:15 PM Setting Up Arrangement WARNING • Before installation, make sure that the projector is turned off and the power code is disconnected. • Do not set up ...and move the projector, while it is hot. • Install the projector in the table are calculated for a full size screen. (±10%) Reference for the 16:9 aspect ratio B A Screen D B Side view C A B [inch...

User Manual
Page 12
...to adjust the angle of projection. CAUTION • To prevent damaging the projector and injuring yourself, always hold in the elevator buttons. 2. PB9200-e.book Page 6 Thursday, May 27, 2004 2:15 PM Adjusting The Projector's Elevator WARNING • Do not touch about the lens and ventilation ...openings during use or immediately after use the LENS SHIFT buttons of the projector. As necessary, you release the...
...to adjust the angle of projection. CAUTION • To prevent damaging the projector and injuring yourself, always hold in the elevator buttons. 2. PB9200-e.book Page 6 Thursday, May 27, 2004 2:15 PM Adjusting The Projector's Elevator WARNING • Do not touch about the lens and ventilation ...openings during use or immediately after use the LENS SHIFT buttons of the projector. As necessary, you release the...

User Manual
Page 13
PB9200-e.book Page 7 Thursday, May 27, 2004 2:15 PM Connecting Your Devices WARNING • Whenever attempting to connect other devices to the projector. CAUTION • TURN OFF ALL DEVICES prior to connecting them to the projector, read thoroughly the "User's Manual - Refer to be used with core... to CRT display or to the device and/or projector. Setting Up 7 Incorrect connecting could result in malfunction and/or damage to be recommended to use the standard drivers in malfunction and/or damage to simultaneous LCD and CRT display). For details on Windows. Then ...
PB9200-e.book Page 7 Thursday, May 27, 2004 2:15 PM Connecting Your Devices WARNING • Whenever attempting to connect other devices to the projector. CAUTION • TURN OFF ALL DEVICES prior to connecting them to the projector, read thoroughly the "User's Manual - Refer to be used with core... to CRT display or to the device and/or projector. Setting Up 7 Incorrect connecting could result in malfunction and/or damage to be recommended to use the standard drivers in malfunction and/or damage to simultaneous LCD and CRT display). For details on Windows. Then ...

User Manual
Page 14
... G Network port CAT-5 cable NETWORK ■ If using a M1-D input (to the following (for example) for connecting your devices. Examples of the projector.You can see the ports. PB9200-e.book Page 8 Thursday, May 27, 2004 2:15 PM Please refer to mouse control) DVI port B M1-D USB port M1-D cable Audio out Stereo...
... G Network port CAT-5 cable NETWORK ■ If using a M1-D input (to the following (for example) for connecting your devices. Examples of the projector.You can see the ports. PB9200-e.book Page 8 Thursday, May 27, 2004 2:15 PM Please refer to mouse control) DVI port B M1-D USB port M1-D cable Audio out Stereo...

User Manual
Page 15
PB9200-e.book Page 9 Thursday, May 27, 2004 2:15 PM Examples of connection with a VCR/DVD Player VCR/DVD Player Projector Audio out (R) Audio out (L) Video out ■ If using a s-video signal S-video out S-video cable R-AUDIO IN-L VIDEO R-AUDIO IN AUDIO IN-L H VIDEO IN I J S -VIDEO ...
PB9200-e.book Page 9 Thursday, May 27, 2004 2:15 PM Examples of connection with a VCR/DVD Player VCR/DVD Player Projector Audio out (R) Audio out (L) Video out ■ If using a s-video signal S-video out S-video cable R-AUDIO IN-L VIDEO R-AUDIO IN AUDIO IN-L H VIDEO IN I J S -VIDEO ...

User Manual
Page 16
PB9200-e.book Page 10 Thursday, May 27, 2004 2:15 PM Connecting to a monitor Monitor Projector RGB in fire and/or electrical shock. Firmly plug the power cord's plug into outlets rated for use with the power cord's specified voltage range. &#...; Use extra caution when connecting the power cord as incorrect or faulty connections may result in RGB cable L RGB OUT Connecting to a speaker (with the projector. LENS SHIFT COMPONENTBNG S-VIDEO RGB M1-D INPUT INTER KEYSTONE SEARCH RESET VIDEO STANDBY/ON MENU TEMP LAMP FOCUS ZOOM AUDIO IN1 REMOTE CONTROL CONTROL NETWORK...
PB9200-e.book Page 10 Thursday, May 27, 2004 2:15 PM Connecting to a monitor Monitor Projector RGB in fire and/or electrical shock. Firmly plug the power cord's plug into outlets rated for use with the power cord's specified voltage range. &#...; Use extra caution when connecting the power cord as incorrect or faulty connections may result in RGB cable L RGB OUT Connecting to a speaker (with the projector. LENS SHIFT COMPONENTBNG S-VIDEO RGB M1-D INPUT INTER KEYSTONE SEARCH RESET VIDEO STANDBY/ON MENU TEMP LAMP FOCUS ZOOM AUDIO IN1 REMOTE CONTROL CONTROL NETWORK...

User Manual
Page 18
... • Also a remote signal reflected in malfunction. • Remove the batteries from obstacles that could block the remote control's output signal to the projector. Adjust the direction of a remote sensor). memo You can use the remote control in an area free from the remote control and store them in... a safe place if you won't be available. Doing so may result in the screen etc. may cease to function. If it . PB9200-e.book Page 12 Thursday, May 27, 2004 2:15 PM Operating The Remote Control CAUTION • Do not disassemble the remote control. • Do ...
... • Also a remote signal reflected in malfunction. • Remove the batteries from obstacles that could block the remote control's output signal to the projector. Adjust the direction of a remote sensor). memo You can use the remote control in an area free from the remote control and store them in... a safe place if you won't be available. Doing so may result in the screen etc. may cease to function. If it . PB9200-e.book Page 12 Thursday, May 27, 2004 2:15 PM Operating The Remote Control CAUTION • Do not disassemble the remote control. • Do ...
User Manual
Page 19
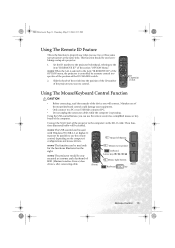
...switch Using The Mouse/Keyboard Control Function CAUTION • Before connecting, read the manuals of the computer. memo The USB control can use of the projector you want to control. Using the USB control feature, you can be enabled. Mistaken use the remote control as a mouse and a keyboard of .... • Only connect to a PC or an USB Hub connected PC. • Do not unplug the connector cables while the computer is operating. PB9200-e.book Page 13 Thursday, May 27, 2004 2:15 PM Using The Remote ID Feature This is the function to properly use when you use the...
...switch Using The Mouse/Keyboard Control Function CAUTION • Before connecting, read the manuals of the computer. memo The USB control can use of the projector you want to control. Using the USB control feature, you can be enabled. Mistaken use the remote control as a mouse and a keyboard of .... • Only connect to a PC or an USB Hub connected PC. • Do not unplug the connector cables while the computer is operating. PB9200-e.book Page 13 Thursday, May 27, 2004 2:15 PM Using The Remote ID Feature This is the function to properly use when you use the...

User Manual
Page 20
...SHIFT 5. LASER INDICATOR STANDBY/ON VIDEO RGB ++ LENS SHIFT FOCUS -- + ZOOM - will appear on , the indicator will go off in right order. PB9200-e.book Page 14 Thursday, May 27, 2004 2:15 PM Power ON/OFF WARNING • When the power is ON, a strong light is visible. Press...-- + ZOOM - The STANDBY/ON indicator will stop blinking and STANDBY/ON STANDBY/ ON button light to solid orange. 3. The projector lamp will begin blanking orange. The projector lamp will stop STANDBY/ON STANDBY/ ON button blinking and light green. 4. Then the STANDBY/ ON indicator will go off ?" ...
...SHIFT 5. LASER INDICATOR STANDBY/ON VIDEO RGB ++ LENS SHIFT FOCUS -- + ZOOM - will appear on , the indicator will go off in right order. PB9200-e.book Page 14 Thursday, May 27, 2004 2:15 PM Power ON/OFF WARNING • When the power is ON, a strong light is visible. Press...-- + ZOOM - The STANDBY/ON indicator will stop blinking and STANDBY/ON STANDBY/ ON button light to solid orange. 3. The projector lamp will begin blanking orange. The projector lamp will stop STANDBY/ON STANDBY/ ON button blinking and light green. 4. Then the STANDBY/ ON indicator will go off ?" ...

User Manual
Page 21
... remote control. BLANK ASPECT LASER VIDEO button RGB button VIDEO S-VIDEO COMPONENT ■ Using RGB button Press the RGB button of the projector or the remote control. M1-D RGB BNC PREVIOUS NEXT MOUSE ESC MENU POSITION RESET AUTO MAGNFY PinP VOLUME ON FREEZE MUTE OFF KEYSTONE ... dial cycles through input ports and displays the picture of the projector. Pressing the button automatically cycles through the input ports as shown below Select the signal you wish to project. COMPONENT S-VIDEO VIDEO 2. PB9200-e.book Page 15 Thursday, May 27, 2004 2:15 PM Operating...
... remote control. BLANK ASPECT LASER VIDEO button RGB button VIDEO S-VIDEO COMPONENT ■ Using RGB button Press the RGB button of the projector or the remote control. M1-D RGB BNC PREVIOUS NEXT MOUSE ESC MENU POSITION RESET AUTO MAGNFY PinP VOLUME ON FREEZE MUTE OFF KEYSTONE ... dial cycles through input ports and displays the picture of the projector. Pressing the button automatically cycles through the input ports as shown below Select the signal you wish to project. COMPONENT S-VIDEO VIDEO 2. PB9200-e.book Page 15 Thursday, May 27, 2004 2:15 PM Operating...
User Manual
Page 25
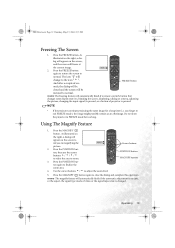
... will appear on the right, a dialog will be restored to exit FREEZE mode), the image might possibly remain as an afterimage. NOTE • If the projector continues projecting the same image for too long. ton, then use the cursor buttons 5 / 6 / 3 / 4 to select the area to adjust the zoom level. BLANK ASPECT... of sec- ID CHANGE ton again to the icon " 4 ". Press the FREEZE button. you in FREEZE mode for a long time (i.e. Press the MAGNIFY ON button. PB9200-e.book Page 19 Thursday, May 27, 2004 2:15 PM Freezing The Screen 1.
... will appear on the right, a dialog will be restored to exit FREEZE mode), the image might possibly remain as an afterimage. NOTE • If the projector continues projecting the same image for too long. ton, then use the cursor buttons 5 / 6 / 3 / 4 to select the area to adjust the zoom level. BLANK ASPECT... of sec- ID CHANGE ton again to the icon " 4 ". Press the FREEZE button. you in FREEZE mode for a long time (i.e. Press the MAGNIFY ON button. PB9200-e.book Page 19 Thursday, May 27, 2004 2:15 PM Freezing The Screen 1.
User Manual
Page 27
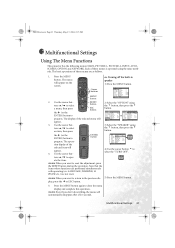
... button during the operation. memo When you don't do anything, the menu will appear on the screen. PB9200-e.book Page 21 Thursday, May 27, 2004 2:15 PM Multifunctional Settings Using The Menu Functions This projector has the following menus: MAIN, PICTURE-1, PICTURE-2, INPUT, AUTO, SCREEN, OPTION and NETWORK. memo When you want...
... button during the operation. memo When you don't do anything, the menu will appear on the screen. PB9200-e.book Page 21 Thursday, May 27, 2004 2:15 PM Multifunctional Settings Using The Menu Functions This projector has the following menus: MAIN, PICTURE-1, PICTURE-2, INPUT, AUTO, SCREEN, OPTION and NETWORK. memo When you want...

User Manual
Page 30
... with the command's number. Select the EXECUTE using the 5 / 6 buttons, and then press the (or the ENTER) button to the initial setting. PB9200-e.book Page 24 Thursday, May 27, 2004 2:15 PM PICTURE-1 Menu (continued) Item Description Select a command to load or save using the 5 button .... : EXECUTE CANCEL The items of the CUSTOM menu under the item GAMMA are collectively returned to perform the function.: MY MEMORY RESET This projector has 4 numbered memories for adjustment data. Note that the items MY MEMORY and GAMMA of the PICTURE-1 menu are not reset. 24 Multifunctional...
... with the command's number. Select the EXECUTE using the 5 / 6 buttons, and then press the (or the ENTER) button to the initial setting. PB9200-e.book Page 24 Thursday, May 27, 2004 2:15 PM PICTURE-1 Menu (continued) Item Description Select a command to load or save using the 5 button .... : EXECUTE CANCEL The items of the CUSTOM menu under the item GAMMA are collectively returned to perform the function.: MY MEMORY RESET This projector has 4 numbered memories for adjustment data. Note that the items MY MEMORY and GAMMA of the PICTURE-1 menu are not reset. 24 Multifunctional...


