User Manual
Page 3
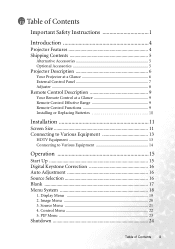
... Table of Contents iii Image Menu 20 3. Source Menu 21 4. Display Menu 19 2. PIP Menu 23 Shutdown 24 Table of Contents Important Safety Instructions 1 Introduction 4 Projector Features 4 Shipping Contents 5 Alternative Accessories 5 Optional Accessories 5 Projector Description 6 Your Projector at a Glance 6 External Control Panel 7 Adjuster 8 Remote Control Description 9 Your Remote Control at a Glance 9 Remote Control Effective Range 9 Remote Control Functions 9 Installing or Replacing Batteries 10 Installation 11 Screen Size 11 Connecting to Various Equipment 13...
... Table of Contents iii Image Menu 20 3. Source Menu 21 4. Display Menu 19 2. PIP Menu 23 Shutdown 24 Table of Contents Important Safety Instructions 1 Introduction 4 Projector Features 4 Shipping Contents 5 Alternative Accessories 5 Optional Accessories 5 Projector Description 6 Your Projector at a Glance 6 External Control Panel 7 Adjuster 8 Remote Control Description 9 Your Remote Control at a Glance 9 Remote Control Effective Range 9 Remote Control Functions 9 Installing or Replacing Batteries 10 Installation 11 Screen Size 11 Connecting to Various Equipment 13...
User Manual
Page 4
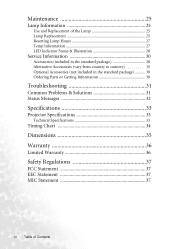
... Use and Replacement of the Lamp 25 Lamp Replacement 25 Resetting Lamp Hours 27 Temp Information 27 LED Indicator Status & Illustration 28 Service Information 30 Accessories (included in the standard package 30 Alternative Accessories (vary from country to country) ........ 30 Optional Accessories (not included in the standard package 30 Ordering Parts or Getting Information 30 Troubleshooting 31 Common Problems & Solutions 31 Status Messages 32 Specifications 33 Projector Specifications 33 Technical Specifications 33 Timing...
... Use and Replacement of the Lamp 25 Lamp Replacement 25 Resetting Lamp Hours 27 Temp Information 27 LED Indicator Status & Illustration 28 Service Information 30 Accessories (included in the standard package 30 Alternative Accessories (vary from country to country) ........ 30 Optional Accessories (not included in the standard package 30 Ordering Parts or Getting Information 30 Troubleshooting 31 Common Problems & Solutions 31 Status Messages 32 Specifications 33 Projector Specifications 33 Technical Specifications 33 Timing...
User Manual
Page 5
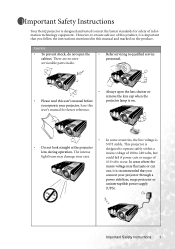
...;10 volts occur. However, to 240 volts, but could fail if power cuts or surges of this manual and marked on . Caution • To prevent shock, do not open the lens shutter or remove the lens cap when the • Please read this user's manual before projector lamp is recommended that you connect your projector through a power stabilizer, surge protector or uninterruptible power supply (UPS).
...;10 volts occur. However, to 240 volts, but could fail if power cuts or surges of this manual and marked on . Caution • To prevent shock, do not open the lens shutter or remove the lens cap when the • Please read this user's manual before projector lamp is recommended that you connect your projector through a power stabilizer, surge protector or uninterruptible power supply (UPS).
User Manual
Page 6
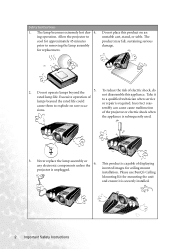
... installed. 2 Important Safety Instructions Excessive operation of lamps beyond the 5. Take it is unplugged. of the projector or electric shock when the appliance is required. cause them to explode on an unstable cart, stand, or table. inverted images for mounting the unit and ensure it to removing the lamp assembly for approximately 45 minutes prior to a qualified technician when service or repair...
... installed. 2 Important Safety Instructions Excessive operation of lamps beyond the 5. Take it is unplugged. of the projector or electric shock when the appliance is required. cause them to explode on an unstable cart, stand, or table. inverted images for mounting the unit and ensure it to removing the lamp assembly for approximately 45 minutes prior to a qualified technician when service or repair...

User Manual
Page 7
...on end vertically. 8. Do not cover this unit with all windows rolled up. - Locations where temperatures may result in any objects upon it is poorly ventilated or confined. Locations where excessive humidity, dust, or ...lamp. zontal surface during operation. - If the ventilation holes are seriously obstructed, overheating inside of air around the projector. - Safety Instructions (Continued) 7. Important Safety Instructions 3 Do not use if tilted at an angle of more than 10 degrees left to fall over, causing injury or resulting in a fire. 10. Locations near the projector...
...on end vertically. 8. Do not cover this unit with all windows rolled up. - Locations where temperatures may result in any objects upon it is poorly ventilated or confined. Locations where excessive humidity, dust, or ...lamp. zontal surface during operation. - If the ventilation holes are seriously obstructed, overheating inside of air around the projector. - Safety Instructions (Continued) 7. Important Safety Instructions 3 Do not use if tilted at an angle of more than 10 degrees left to fall over, causing injury or resulting in a fire. 10. Locations near the projector...
User Manual
Page 8
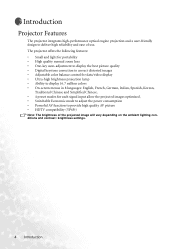
...; HDTV compatibility (YPbPr) Note: The brightness of use. The projector offers the following features: • Small and light for portability • High quality manual zoom lens • One-key auto-adjustment to display the best picture quality • Digital keystone correction to correct distorted images • Adjustable color balance control for data/video display • Ultra-high brightness projection lamp • Ability to display 16.7 million colors • On-screen menus in 8 languages: English, French, German...
...; HDTV compatibility (YPbPr) Note: The brightness of use. The projector offers the following features: • Small and light for portability • High quality manual zoom lens • One-key auto-adjustment to display the best picture quality • Digital keystone correction to correct distorted images • Adjustable color balance control for data/video display • Ultra-high brightness projection lamp • Ability to display 16.7 million colors • On-screen menus in 8 languages: English, French, German...
User Manual
Page 11
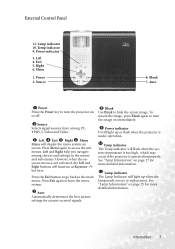
Power indicator 3. Left 4. Exit 5. Source 8. Auto 1 Power Press the Power key to hide the screen image. However, when the onscreen menu is not activated, the Left and Right buttons will display the menu system on page 27 for current received signals. 8 Blank Use Blank to turn the image on immediately. 9 Power indicator It will light up or flash when the projector is operated improperly. See "Temp Information" on screen. External Control Panel 11. Press the Exit button to...
Power indicator 3. Left 4. Exit 5. Source 8. Auto 1 Power Press the Power key to hide the screen image. However, when the onscreen menu is not activated, the Left and Right buttons will display the menu system on page 27 for current received signals. 8 Blank Use Blank to turn the image on immediately. 9 Power indicator It will light up or flash when the projector is operated improperly. See "Temp Information" on screen. External Control Panel 11. Press the Exit button to...
User Manual
Page 13
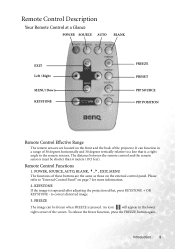
POWER, SOURCE, AUTO, BLANK, 3,4, EXIT, MENU The functions of these buttons are located on the front and the back of the projector. KEYSTONE If the image is pressed. To release the freeze function, press the FREEZE button again. Remote Control Functions 1. An icon will appear in a range of the screen. The distance between the remote control and the remote sensors must be frozen when FREEZE is trapezoid after...
POWER, SOURCE, AUTO, BLANK, 3,4, EXIT, MENU The functions of these buttons are located on the front and the back of the projector. KEYSTONE If the image is pressed. To release the freeze function, press the FREEZE button again. Remote Control Functions 1. An icon will appear in a range of the screen. The distance between the remote control and the remote sensors must be frozen when FREEZE is trapezoid after...
User Manual
Page 15
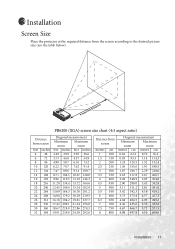
Projection Distance PB6200 (XGA) screen size chart (4:3 aspect ratio) Distance from screen Diagonal measurement Minimum Maximum zoom zoom feet inches feet inches feet inches 4 48 2.49 29.9 3.05 36.6 6 72 3.73 44.8 4.57 54.9 8 96 4.98 59... to the desired picture size (see the table below). Installation Screen Size Place the projector at the required distance from screen meters cm 1 100 1.5 150 2 200 2.5 250 3 300 3.5 350 4 400 4.5 450 5 500 5.5 550 6 600 6.5 650 7 700 7.5 750 8 800 Diagonal measurement Minimum Maximum zoom zoom meters cm meters cm 0.62 62.2 0.76 76.2 0.93 93...
Projection Distance PB6200 (XGA) screen size chart (4:3 aspect ratio) Distance from screen Diagonal measurement Minimum Maximum zoom zoom feet inches feet inches feet inches 4 48 2.49 29.9 3.05 36.6 6 72 3.73 44.8 4.57 54.9 8 96 4.98 59... to the desired picture size (see the table below). Installation Screen Size Place the projector at the required distance from screen meters cm 1 100 1.5 150 2 200 2.5 250 3 300 3.5 350 4 400 4.5 450 5 500 5.5 550 6 600 6.5 650 7 700 7.5 750 8 800 Diagonal measurement Minimum Maximum zoom zoom meters cm meters cm 0.62 62.2 0.76 76.2 0.93 93...
User Manual
Page 17
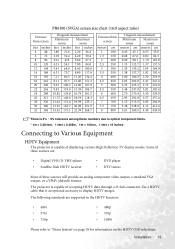
... tuners Most of these sources will provide an analog component video output, a standard VGA output, or a YPbPr (default) format. Use a HDTV cable that is an optional accessory to "Menu System" on page 18 for information on the HDTV OSD selections. Installation 13 PB6100 (SVGA) screen size chart (16:9 aspect ratio) Distance from screen Diagonal measurement Minimum Maximum zoom zoom feet inches feet inches feet...
... tuners Most of these sources will provide an analog component video output, a standard VGA output, or a YPbPr (default) format. Use a HDTV cable that is an optional accessory to "Menu System" on page 18 for information on the HDTV OSD selections. Installation 13 PB6100 (SVGA) screen size chart (16:9 aspect ratio) Distance from screen Diagonal measurement Minimum Maximum zoom zoom feet inches feet inches feet...
User Manual
Page 20
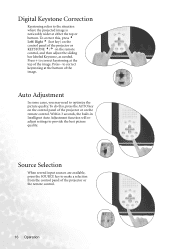
... control panel of the projector or the remote control. 16 Operation Auto Adjustment In some cases, you may need to provide the best picture quality. Source Selection When several input sources are available, press the SOURCE key to the situation where the projected image is noticeably wider at either the top or bottom. Digital Keystone Correction Keystoning refers to make a selection from the control panel of the projector or KEYSTONE 3/4 on the remote control...
... control panel of the projector or the remote control. 16 Operation Auto Adjustment In some cases, you may need to provide the best picture quality. Source Selection When several input sources are available, press the SOURCE key to the situation where the projected image is noticeably wider at either the top or bottom. Digital Keystone Correction Keystoning refers to make a selection from the control panel of the projector or KEYSTONE 3/4 on the remote control...

User Manual
Page 22
... Operation Sub-Menu PC Y/Pb/Pr S-Video / Video Display Image Source Control Keystone Brightness Contrast Phase H Size Aspect Ratio H Position V Position Color Temp Information Mirror Source Source Scan Blank Time Auto Off Language OSD Pos. Functions available when connecting to select items in the sub-menu. OSD Time Preset Mode Reset Lamp Hour Aspect Ratio Color Tint Color Temp Keystone Brightness Contrast Color Tint Aspect Ratio System Sharpness Color Temp Information Main Page: PIP PIP Source PIP Size PIP Pos. Menu System Press Menu...
... Operation Sub-Menu PC Y/Pb/Pr S-Video / Video Display Image Source Control Keystone Brightness Contrast Phase H Size Aspect Ratio H Position V Position Color Temp Information Mirror Source Source Scan Blank Time Auto Off Language OSD Pos. Functions available when connecting to select items in the sub-menu. OSD Time Preset Mode Reset Lamp Hour Aspect Ratio Color Tint Color Temp Keystone Brightness Contrast Color Tint Aspect Ratio System Sharpness Color Temp Information Main Page: PIP PIP Source PIP Size PIP Pos. Menu System Press Menu...

User Manual
Page 26
... brightness are free to extend its life. Returns all settings to 60 seconds in this mode. 2. The range is emphasized in 5-second increments. Video Mode: It is perfect for gaming. Displays the number of the preset modes in their factory preset values. Control Menu FUNCTION Language OSD Pos. Vivid Mode: It is suitable for enjoying movies. 4. To optimize the projected images, you pressed the button. Use the...
... brightness are free to extend its life. Returns all settings to 60 seconds in this mode. 2. The range is emphasized in 5-second increments. Video Mode: It is perfect for gaming. Displays the number of the preset modes in their factory preset values. Control Menu FUNCTION Language OSD Pos. Vivid Mode: It is suitable for enjoying movies. 4. To optimize the projected images, you pressed the button. Use the...

User Manual
Page 29
... projector to cool for 45 minutes. Maintenance Lamp Information Use and Replacement of the Lamp When the Lamp Indicator lights up red or a message appears suggesting the time of lamp replacement, please install a new lamp or consult your local hazardous waste regulations to dispose of this lamp in rare instances may even break. Turn the power off and disconnect the power cord before replacing the lamp. This lamp contains mercury. If the Lamp or Temp indicator still lights...
... projector to cool for 45 minutes. Maintenance Lamp Information Use and Replacement of the Lamp When the Lamp Indicator lights up red or a message appears suggesting the time of lamp replacement, please install a new lamp or consult your local hazardous waste regulations to dispose of this lamp in rare instances may even break. Turn the power off and disconnect the power cord before replacing the lamp. This lamp contains mercury. If the Lamp or Temp indicator still lights...

User Manual
Page 30
... lamp is not replaced as this could cause color unevenness in malfunction. If the screws are not loosened completely, they could cause damage. 26 Maintenance Step 1. Do not turn the power on with a new one. Step 4. Loose screws may cause a bad connection, which may result in projected images. If you use a magnetic-head screwdriver.) If the lamp is replaced, reset the total lamp operation time. Step 5. Disconnect the power cord...
... lamp is not replaced as this could cause color unevenness in malfunction. If the screws are not loosened completely, they could cause damage. 26 Maintenance Step 1. Do not turn the power on with a new one. Step 4. Loose screws may cause a bad connection, which may result in projected images. If you use a magnetic-head screwdriver.) If the lamp is replaced, reset the total lamp operation time. Step 5. Disconnect the power cord...
User Manual
Page 31
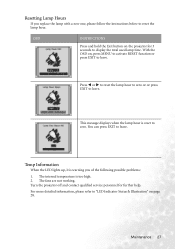
... to leave. Temp Information When the LED lights up, it is warning you replace the lamp with a new one, please follow the instructions below to display the total used lamp time. You can press EXIT to leave. Turn the projector off and contact qualified service personnel for 3 seconds to reset the lamp hour. For more detailed information, please refer to "LED Indicator Status & Illustration" on , press MENU to activate RESET function or press...
... to leave. Temp Information When the LED lights up, it is warning you replace the lamp with a new one, please follow the instructions below to display the total used lamp time. You can press EXIT to leave. Turn the projector off and contact qualified service personnel for 3 seconds to reset the lamp hour. For more detailed information, please refer to "LED Indicator Status & Illustration" on , press MENU to activate RESET function or press...

User Manual
Page 32
...power on OOO O O - Lamp error, the lamp is warning you that lamp usage has exceeded - - Please contact your dealer. 28 Maintenance O : LED lights up . - Stand-by - Lamp events Lamp spoil, it is not properly attached or lamp - - Replace the projection lamp with a new one immediately. LED Indicator Status & Illustration llustration 1. - : LED OFF 2. : LED blinking 3. : LED solid ON 4. Lamp LED is blinking during powering up orange. 5. G : LED lights up cooling. Normal operation - O G - Power-up green. R damaged. G - turned off. R : LED lights up red...
...power on OOO O O - Lamp error, the lamp is warning you that lamp usage has exceeded - - Please contact your dealer. 28 Maintenance O : LED lights up . - Stand-by - Lamp events Lamp spoil, it is not properly attached or lamp - - Replace the projection lamp with a new one immediately. LED Indicator Status & Illustration llustration 1. - : LED OFF 2. : LED blinking 3. : LED solid ON 4. Lamp LED is blinking during powering up orange. 5. G : LED lights up cooling. Normal operation - O G - Power-up green. R damaged. G - turned off. R : LED lights up red...

User Manual
Page 35
...; Press Auto on the control panel of the projector or the remote control unit to get better picture quality. • Adjust the focus. • Reposition the unit to improve its angle on the screen. • Use the Keystone correction key on . REMOTE CONTROL DOES NOT WORK Try these solutions: • Make sure the power cord is inserted snugged into the AC adapter socket. • Make sure the power cord is...
...; Press Auto on the control panel of the projector or the remote control unit to get better picture quality. • Adjust the focus. • Reposition the unit to improve its angle on the screen. • Use the Keystone correction key on . REMOTE CONTROL DOES NOT WORK Try these solutions: • Make sure the power cord is inserted snugged into the AC adapter socket. • Make sure the power cord is...

User Manual
Page 36
... message will display for over 1980 hours. Out Of Lamp Usage Time Change The Lamp! Input signal frequency exceeds the projector's range. The lamp has been in operation for 30 seconds after 3000 hours. This message will display for optimal performance. The warning message will display for over 2980 hours, and the power will turn off after starting up the projector. Lamp Warning - The Power Will Turn Off After 3000 Hours. Status Messages On-Screen Messages SEARCHING Description Projector is running the auto image adjustment function. Install a new lamp...
... message will display for over 1980 hours. Out Of Lamp Usage Time Change The Lamp! Input signal frequency exceeds the projector's range. The lamp has been in operation for 30 seconds after 3000 hours. This message will display for optimal performance. The warning message will display for over 2980 hours, and the power will turn off after starting up the projector. Lamp Warning - The Power Will Turn Off After 3000 Hours. Status Messages On-Screen Messages SEARCHING Description Projector is running the auto image adjustment function. Install a new lamp...
User Manual
Page 37
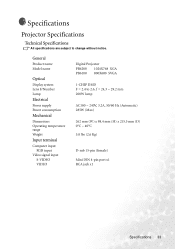
General Product name Model name Optical Display system Lens F/Number Lamp Electrical Power supply Power consumption Mechanical Dimensions Operating temperature range Weight Input terminal Computer input RGB input Video signal input S-VIDEO VIDEO Digital Projector PB6200 1024X768 XGA PB6100 800X600 SVGA 1-CHIP DMD F = 2.4 to change without notice. Specifications Projector Specifications Technical Specifications All specifications are subject to 2.6, f = 24.3 ~ 29.2 mm 200W lamp AC100 ~ 240V, 3.2A, 50/60 Hz (Automatic) 285W (Max) 262 mm (W) x 98.4 mm (H) x 215.5 mm (D) 0°C ~ 40°...
General Product name Model name Optical Display system Lens F/Number Lamp Electrical Power supply Power consumption Mechanical Dimensions Operating temperature range Weight Input terminal Computer input RGB input Video signal input S-VIDEO VIDEO Digital Projector PB6200 1024X768 XGA PB6100 800X600 SVGA 1-CHIP DMD F = 2.4 to change without notice. Specifications Projector Specifications Technical Specifications All specifications are subject to 2.6, f = 24.3 ~ 29.2 mm 200W lamp AC100 ~ 240V, 3.2A, 50/60 Hz (Automatic) 285W (Max) 262 mm (W) x 98.4 mm (H) x 215.5 mm (D) 0°C ~ 40°...


