User Manual
Page 8
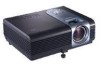
... the objects to have the projector serviced. Safety Instructions (Continued) 11. Liquids spilled into the projector may result in accidents and possible injury. 12. Do not block the projection lens with any objects upon it from the power supply's wall socket and call BenQ to become wet, disconnect it... . 13. Do not place liquids near or on the projector or remote control....
... the objects to have the projector serviced. Safety Instructions (Continued) 11. Liquids spilled into the projector may result in accidents and possible injury. 12. Do not block the projection lens with any objects upon it from the power supply's wall socket and call BenQ to become wet, disconnect it... . 13. Do not place liquids near or on the projector or remote control....
User Manual
Page 9
... vary within the lamp manufacturers specifications. The lamp brightness will vary depending on the ambient lighting conditions and contrast/brightness settings. Introduction Projector Features The projector integrates high-performance optical engine projection and a user-friendly design to provide high quality AV picture • HDTV compatibility (YPbPr) Note: The apparent brightness of use. This...
... vary within the lamp manufacturers specifications. The lamp brightness will vary depending on the ambient lighting conditions and contrast/brightness settings. Introduction Projector Features The projector integrates high-performance optical engine projection and a user-friendly design to provide high quality AV picture • HDTV compatibility (YPbPr) Note: The apparent brightness of use. This...
User Manual
Page 11
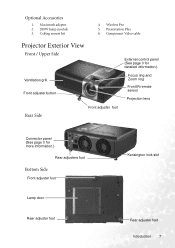
Optional Accessories 1. Wireless Pro 5. Component Video cable Projector Exterior View Front / Upper Side Ventilation grill Front adjuster button Rear Side Front adjuster foot External control panel (See page 9 for detailed information.) Focus ring and Zoom ring Front IR remote sensor Projection lens Connector panel (See page 8 for more information.) Rear adjusters foot Bottom Side Front adjuster foot Lamp door Rear adjuster foot Kensington lock slot Rear adjuster foot Introduction 7 Presentation Plus 6. Macintosh adapter 2. 200W lamp module 3. Ceiling mount kit 4.
Optional Accessories 1. Wireless Pro 5. Component Video cable Projector Exterior View Front / Upper Side Ventilation grill Front adjuster button Rear Side Front adjuster foot External control panel (See page 9 for detailed information.) Focus ring and Zoom ring Front IR remote sensor Projection lens Connector panel (See page 8 for more information.) Rear adjusters foot Bottom Side Front adjuster foot Lamp door Rear adjuster foot Kensington lock slot Rear adjuster foot Introduction 7 Presentation Plus 6. Macintosh adapter 2. 200W lamp module 3. Ceiling mount kit 4.
User Manual
Page 13
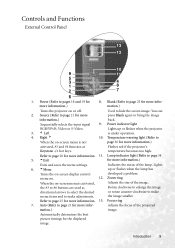
... enlarge the image directional arrows to select the desired or rotate counter-clockwise to make adjustments. Lights up or flashes when the projector is activated, Adjusts the size of the projected mation.) image. Automatically determines the best picture timings for more information.) Exits and saves the menu settings. 6. 6Menu Indicates the status...
... enlarge the image directional arrows to select the desired or rotate counter-clockwise to make adjustments. Lights up or flashes when the projector is activated, Adjusts the size of the projected mation.) image. Automatically determines the best picture timings for more information.) Exits and saves the menu settings. 6. 6Menu Indicates the status...
User Manual
Page 14
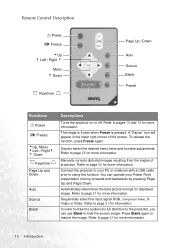
... Auto Source Blank Preset Functions II Power II/ Freeze 5Up, Menu 3Left / Right4, 6 Down Keystone Page Up and Down Auto Source Blank Descriptions Turns the projector on or off. Refer to page 21 for more information. Refer to page 20 for more information. In order to draw the audience's full attention... RGB, Component Video, SVideo or Video. Refer to pages 18 and 19 for more information. A "Pause" icon will appear in the lower right corner of projection. Manually corrects distorted images resulting from the angles of the screen. Refer to page 22 for displayed image.
... Auto Source Blank Preset Functions II Power II/ Freeze 5Up, Menu 3Left / Right4, 6 Down Keystone Page Up and Down Auto Source Blank Descriptions Turns the projector on or off. Refer to page 21 for more information. Refer to page 20 for more information. In order to draw the audience's full attention... RGB, Component Video, SVideo or Video. Refer to pages 18 and 19 for more information. A "Pause" icon will appear in the lower right corner of projection. Manually corrects distorted images resulting from the angles of the screen. Refer to page 22 for displayed image.
User Manual
Page 20
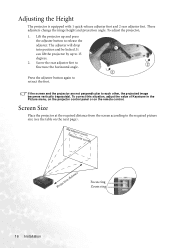
...in the Picture menu, on the projector control panel or on the next page). Lift the projector up to each other, the projected image becomes vertically trapezoidal. These adjusters change the image height and projection angle. It can lift the projector by up and press the adjuster ...button to retract the foot. If the screen and the projector are not perpendicular to 15 degrees. 2. MaMxiimniummumzozoomom Projection distance Focus ring Zoom ring 16 Installation ...
...in the Picture menu, on the projector control panel or on the next page). Lift the projector up to each other, the projected image becomes vertically trapezoidal. These adjusters change the image height and projection angle. It can lift the projector by up and press the adjuster ...button to retract the foot. If the screen and the projector are not perpendicular to 15 degrees. 2. MaMxiimniummumzozoomom Projection distance Focus ring Zoom ring 16 Installation ...
User Manual
Page 24
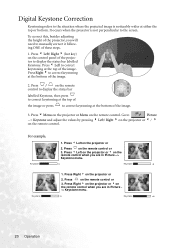
...to the situation where the projected image is not perpendicular to the screen. It occurs when the projector is noticeably wider at the bottom of the image. 3. Press 3 Left to correct keystoning at the bottom of the image. Press 6 Menu on the projector or Menu on the ...on the remote control. Press Right 4 to Picture --> Keystone and adjust the values by pressing 3 Left/ Right 4 on the projector or 3 / 4 on the remote control or 3. Press Right 4 on the projector or 2. Press 3 Left/ Right 4 (hot key) on the remote control when you are in Picture --> Keystone menu. Press...
...to the situation where the projected image is not perpendicular to the screen. It occurs when the projector is noticeably wider at the bottom of the image. 3. Press 3 Left to correct keystoning at the bottom of the image. Press 6 Menu on the projector or Menu on the ...on the remote control. Press Right 4 to Picture --> Keystone and adjust the values by pressing 3 Left/ Right 4 on the projector or 3 / 4 on the remote control or 3. Press Right 4 on the projector or 2. Press 3 Left/ Right 4 (hot key) on the remote control when you are in Picture --> Keystone menu. Press...

User Manual
Page 26
...to the screen size tables on the blank screen. When this function. 22 Operation BLANK Zoom / Focusing Adjust the projected image to hide the screen image. Refer to let the projector shut down automatically after a period of the screen when the image is no action taken on page 17. Press Blank... again to using the lens' zoom ring. Connect the projector to your Power Point presentation moving forwards and backwards by rotating the focus ring. A word "BLANK" appear at the bottom right corner of time ...
...to the screen size tables on the blank screen. When this function. 22 Operation BLANK Zoom / Focusing Adjust the projected image to hide the screen image. Refer to let the projector shut down automatically after a period of the screen when the image is no action taken on page 17. Press Blank... again to using the lens' zoom ring. Connect the projector to your Power Point presentation moving forwards and backwards by rotating the focus ring. A word "BLANK" appear at the bottom right corner of time ...

User Manual
Page 32
Video/ S-Video/ Component Video signal input FUNCTION DESCRIPTION Auto Resize As above . Aspect Ratio As above . H Size Adjusts the horizontal width of the projected image. Sharpness Adjusts the image to reduce image distortion. V Position -30 +30 Phase This function allows you to adjust the clock phase to make it ... the vertical position of the image to the screen. 1. Pro-Picture Menu PC signal input FUNCTION DESCRIPTION Auto Resize Makes the best fit of the projected image.
Video/ S-Video/ Component Video signal input FUNCTION DESCRIPTION Auto Resize As above . Aspect Ratio As above . H Size Adjusts the horizontal width of the projected image. Sharpness Adjusts the image to reduce image distortion. V Position -30 +30 Phase This function allows you to adjust the clock phase to make it ... the vertical position of the image to the screen. 1. Pro-Picture Menu PC signal input FUNCTION DESCRIPTION Auto Resize Makes the best fit of the projected image.
User Manual
Page 34
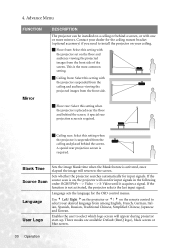
... is the most common setting. Three modes are available: Default (BenQ logo), black screen or blue screen. 30 Operation A special rear projection screen is placed near the floor and behind a screen, or with the projector suspended from the ceiling and audience viewing the projected images from among English, French, German, Italian, Spanish, Russian, Traditional...
... is the most common setting. Three modes are available: Default (BenQ logo), black screen or blue screen. 30 Operation A special rear projection screen is placed near the floor and behind a screen, or with the projector suspended from the ceiling and audience viewing the projected images from among English, French, German, Italian, Spanish, Russian, Traditional...

User Manual
Page 39
... the handle to break and scatter broken glass in the picture. Loose screw may cause the lamp to slowly pull the lamp out of the projected images. Do not turn the power on it, children can reach it too quickly may cause a bad connection, which could injure your hands ... 45 minutes until the lamp has cooled. It is fully locked, move the latch back, and tighten the screw firmly. Move the latch to the projector. Do not insert your fingers. Maintenance 35 Pulling it , or near flammable materials. If you use a magnetic-head screwdriver. Do not over . Step 7. Step 4....
... the handle to break and scatter broken glass in the picture. Loose screw may cause the lamp to slowly pull the lamp out of the projected images. Do not turn the power on it, children can reach it too quickly may cause a bad connection, which could injure your hands ... 45 minutes until the lamp has cooled. It is fully locked, move the latch back, and tighten the screw firmly. Move the latch to the projector. Do not insert your fingers. Maintenance 35 Pulling it , or near flammable materials. If you use a magnetic-head screwdriver. Do not over . Step 7. Step 4....
User Manual
Page 43
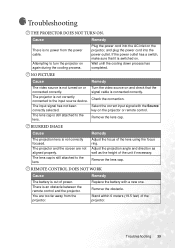
...cable. Remove the lens cap. The lens cap is not turned on the projector or remote control. NO PICTURE Cause Remedy The video source is still attached to the input source device. Adjust the projection angle and direction as well as the height of power. Troubleshooting 39 Remedy ...is not correctly focused. Wait until the cooling down process has completed. Select the correct input signal with a new one. Troubleshooting THE PROJECTOR DOES NOT TURN ON. Check the connection. BLURRED IMAGE Cause The projection lens is an obstacle between the remote control and the...
...cable. Remove the lens cap. The lens cap is not turned on the projector or remote control. NO PICTURE Cause Remedy The video source is still attached to the input source device. Adjust the projection angle and direction as well as the height of power. Troubleshooting 39 Remedy ...is not correctly focused. Wait until the cooling down process has completed. Select the correct input signal with a new one. Troubleshooting THE PROJECTOR DOES NOT TURN ON. Check the connection. BLURRED IMAGE Cause The projection lens is an obstacle between the remote control and the...


