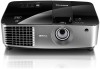

User Manual
Page 2
... projector 15 Choosing a location 15 Obtaining a preferred projected image size 16 Connection 17 Connecting video source devices........18 Operation 19 Starting up the projector 19 Adjusting the projected image 20 Using the menus 22 Securing the projector 23 Switching input signal 26 Magnifying and searching for details ...27 Selecting the aspect ratio 27 Optimizing the image 29 Setting the presentation timer 32 Remote paging operations 33 Freezing the image 33 Hiding the image 33 Locking control keys 33 Operating in a high...
... projector 15 Choosing a location 15 Obtaining a preferred projected image size 16 Connection 17 Connecting video source devices........18 Operation 19 Starting up the projector 19 Adjusting the projected image 20 Using the menus 22 Securing the projector 23 Switching input signal 26 Magnifying and searching for details ...27 Selecting the aspect ratio 27 Optimizing the image 29 Setting the presentation timer 32 Remote paging operations 33 Freezing the image 33 Hiding the image 33 Locking control keys 33 Operating in a high...
User Manual
Page 3
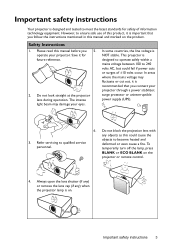
... open the lens shutter (if any) or remove the lens cap (if any objects as this manual before you connect your projector through a power stabilizer, surge protector or uninterruptible power supply (UPS). 3. Please read this could fail if power cuts or surges of information technology equipment. Safety Instructions 1. In some countries, the line voltage is on the projector or remote control. 4. Do not block the projection lens...
... open the lens shutter (if any) or remove the lens cap (if any objects as this manual before you connect your projector through a power stabilizer, surge protector or uninterruptible power supply (UPS). 3. Please read this could fail if power cuts or surges of information technology equipment. Safety Instructions 1. In some countries, the line voltage is on the projector or remote control. 4. Do not block the projection lens...

User Manual
Page 9
... details.) Lamp cover Vent (heated air exhaust) Quick-release button Lens cap Focus and Zoom rings Vent (cool air intake) Front IR remote sensor Projection lens RJ45 LAN input jack USB port RS232 control port HDMI-input port RGB signal output jack RGB (PC)/Component Video (YPbPr/ YCbCr) signal input jack S-Video input jack Video input jack Audio (L/R) input jacks Audio input jack Audio output jack AC power jack Kensington anti-theft lock slot 12V DC output terminal Used to connect these devices. External control panel (See "Controls and functions...
... details.) Lamp cover Vent (heated air exhaust) Quick-release button Lens cap Focus and Zoom rings Vent (cool air intake) Front IR remote sensor Projection lens RJ45 LAN input jack USB port RS232 control port HDMI-input port RGB signal output jack RGB (PC)/Component Video (YPbPr/ YCbCr) signal input jack S-Video input jack Video input jack Audio (L/R) input jacks Audio input jack Audio output jack AC power jack Kensington anti-theft lock slot 12V DC output terminal Used to connect these devices. External control panel (See "Controls and functions...

User Manual
Page 10
...SOURCE Displays the source selection bar. 10 Introduction problem. 3. POWER indicator light 11. Goes back to hide the screen picture. 9. Left/ 14. Manually corrects distorted images 4. TEMPerature warning light Lights up 2. MENU/EXIT 12. menu is Down) under operation. Controls and functions Projector MX716 MX717 1 1 2 9 2 9 3 10 3 10 4 11 4 11 5 6 12 13 5 14 6 12 13 14 7 15 7 15 8 11 8 11 1. LAMP indicator light Adjusts the focus of the lamp. Indicates the status of the projected image. Zoom ring or flashes...
...SOURCE Displays the source selection bar. 10 Introduction problem. 3. POWER indicator light 11. Goes back to hide the screen picture. 9. Left/ 14. Manually corrects distorted images 4. TEMPerature warning light Lights up 2. MENU/EXIT 12. menu is Down) under operation. Controls and functions Projector MX716 MX717 1 1 2 9 2 9 3 10 3 10 4 11 4 11 5 6 12 13 5 14 6 12 13 14 7 15 7 15 8 11 8 11 1. LAMP indicator light Adjusts the focus of the lamp. Indicates the status of the projected image. Zoom ring or flashes...
User Manual
Page 11
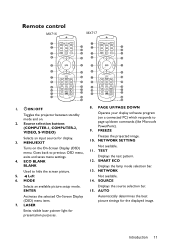
... screen picture. 5. NETWORK SETTING Not available. 11. NETWORK Not available. 14. ON/OFF Toggles the projector between standby mode and on the On-Screen Display (OSD) menu. MENU/EXIT Turns on . 2. SMART ECO Displays the lamp mode selection bar. 13. Remote control MX716 MX717 1 2 13 14 3 15 4 16 5 17 6 16 7 18 8 19 9 20 10 21 11 22 12 23 24 1. FREEZE Freezes the projected image. 10. Source selection buttons (COMPUTER-1, COMPUTER-2, VIDEO, S-VIDEO) Selects an input source...
... screen picture. 5. NETWORK SETTING Not available. 11. NETWORK Not available. 14. ON/OFF Toggles the projector between standby mode and on the On-Screen Display (OSD) menu. MENU/EXIT Turns on . 2. SMART ECO Displays the lamp mode selection bar. 13. Remote control MX716 MX717 1 2 13 14 3 15 4 16 5 17 6 16 7 18 8 19 9 20 10 21 11 22 12 23 24 1. FREEZE Freezes the projected image. 10. Source selection buttons (COMPUTER-1, COMPUTER-2, VIDEO, S-VIDEO) Selects an input source...
User Manual
Page 12
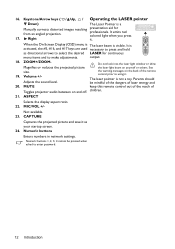
... is a Manually corrects distorted images resulting from an angled projection. Not available. 23. Do not look into the laser light window or shine Magnifies or reduces the projected picture the laser light beam on and off. MUTE keep this remote control out of the reach of the remote control prior to enter password. 12 Introduction CAPTURE Captures the projected picture and save it . Adjusts the sound level. MIC...
... is a Manually corrects distorted images resulting from an angled projection. Not available. 23. Do not look into the laser light window or shine Magnifies or reduces the projected picture the laser light beam on and off. MUTE keep this remote control out of the reach of the remote control prior to enter password. 12 Introduction CAPTURE Captures the projected picture and save it . Adjusts the sound level. MIC...
User Manual
Page 18
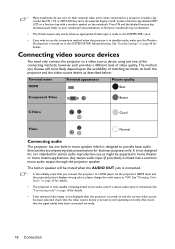
... "Standby Settings" on /off. The method you connect the projector to a DVD player via the projector's HDMI input and the projected picture displays wrong colors, please change the color space to a projector. See "Connecting audio" on page 18 for stereo audio reproduction use this connection method when the projector is in standby mode, make sure the Monitor Out function is connected. • Many notebooks do not turn on their external video ports when connected to YUV. Connecting video source devices...
... "Standby Settings" on /off. The method you connect the projector to a DVD player via the projector's HDMI input and the projected picture displays wrong colors, please change the color space to a projector. See "Connecting audio" on page 18 for stereo audio reproduction use this connection method when the projector is in standby mode, make sure the Monitor Out function is connected. • Many notebooks do not turn on their external video ports when connected to YUV. Connecting video source devices...
User Manual
Page 19
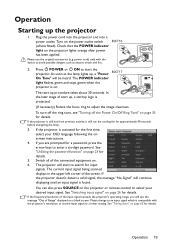
The POWER indicator light flashes green and stays green when the projector is on the projector lights orange after power has been applied. If you will be heard. See "Utilizing the password function" on the projector or remote control to select your OSD language following the onscreen instructions. 4. Please use the original accessories (e.g. MX716 2. If the projector is activated for details. Switch all of start the projector. You can also press SOURCE on...
The POWER indicator light flashes green and stays green when the projector is on the projector lights orange after power has been applied. If you will be heard. See "Utilizing the password function" on the projector or remote control to select your OSD language following the onscreen instructions. 4. Please use the original accessories (e.g. MX716 2. If the projector is activated for details. Switch all of start the projector. You can also press SOURCE on...
User Manual
Page 22
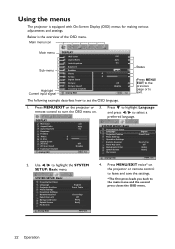
... Timer Language Projector Position Menu Settings Operation Settings Remote Receiver Panel Key Lock Background Color Splash Screen My Screen English Front Table Front+Top Off BenQ BenQ 4. Analog RGB MENU Exit 22 Operation Using the menus The projector is the overview of the OSD menu. and press / to highlight the SYSTEM SETUP: Basic menu. The following example describes how to MENU Exit exit. DISPLAY Wall Color Aspect Ratio Auto Keystone Keystone Position Phase H. Press to highlight Language remote control...
... Timer Language Projector Position Menu Settings Operation Settings Remote Receiver Panel Key Lock Background Color Splash Screen My Screen English Front Table Front+Top Off BenQ BenQ 4. Analog RGB MENU Exit 22 Operation Using the menus The projector is the overview of the OSD menu. and press / to highlight the SYSTEM SETUP: Basic menu. The following example describes how to MENU Exit exit. DISPLAY Wall Color Aspect Ratio Auto Keystone Keystone Position Phase H. Press to highlight Language remote control...

User Manual
Page 24
... the number and turn on the projector or remote control for 3 seconds, and the INPUT PASSWORD message follows. If you forget the password If the password function is activated, you will be required to provide proof of purchase MENU Exit documentation to verify that you are an authorized user of the projector. 24 Operation Press and hold AUTO on the projector. Entering the password recall procedure 1. projector. displays lasting...
... the number and turn on the projector or remote control for 3 seconds, and the INPUT PASSWORD message follows. If you forget the password If the password function is activated, you will be required to provide proof of purchase MENU Exit documentation to verify that you are an authorized user of the projector. 24 Operation Press and hold AUTO on the projector. Entering the password recall procedure 1. projector. displays lasting...

User Manual
Page 25
... digits being input will not have successfully assigned a new password to the SYSTEM SETUP: Advanced> Security Settings > Change Password menu. 2. If the password is correct, the OSD menu returns to enter the new password next time the projector is incorrect, the password error message displays lasting for three seconds, and the message "INPUT PASSWORD" displays for your change or try another message "INPUT NEW PASSWORD" displays. Changing the password 1. You can press MENU/EXIT to enter the password next time when turning on the projector. Open the...
... digits being input will not have successfully assigned a new password to the SYSTEM SETUP: Advanced> Security Settings > Change Password menu. 2. If the password is correct, the OSD menu returns to enter the new password next time the projector is incorrect, the password error message displays lasting for three seconds, and the message "INPUT PASSWORD" displays for your change or try another message "INPUT NEW PASSWORD" displays. Changing the password 1. You can press MENU/EXIT to enter the password next time when turning on the projector. Open the...
User Manual
Page 29
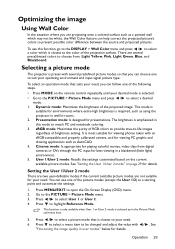
... help correct the projected picture's colors to suit your operating environment and input signal picture type. Cinema mode: Is appropriate for playing colorful movies, video clips from : Light Yellow, Pink, Light Green, Blue, and Blackboard. You can use this mode to open the On-Screen Display (OSD) menu. 2. This function is only available when User 1 or User 2 mode is closest to be white, the Wall Color feature can follow one to prevent possible color difference between the source and projected pictures...
... help correct the projected picture's colors to suit your operating environment and input signal picture type. Cinema mode: Is appropriate for playing colorful movies, video clips from : Light Yellow, Pink, Light Green, Blue, and Blackboard. You can use this mode to open the On-Screen Display (OSD) menu. 2. This function is only available when User 1 or User 2 mode is closest to be white, the Wall Color feature can follow one to prevent possible color difference between the source and projected pictures...
User Manual
Page 33
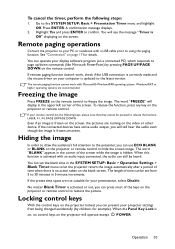
... the audio even though the image is activated with a USB cable prior to the SYSTEM SETUP: Basic > Presentation Timer menu and highlight Off. If your PC or notebook with an audio input connected, the audio can press most of time can operate your projector settings from being changed accidentally (by pressing PAGE UP/PAGE DOWN on the blank screen. Go to using the paging function. You will display in...
... the audio even though the image is activated with a USB cable prior to the SYSTEM SETUP: Basic > Presentation Timer menu and highlight Off. If your PC or notebook with an audio input connected, the audio can press most of time can operate your projector settings from being changed accidentally (by pressing PAGE UP/PAGE DOWN on the blank screen. Go to using the paging function. You will display in...

User Manual
Page 34
... active when panel key lock is a picture projected from overheating. is displayed while the projector is highlighted. 2. Creating your projector from your computer or video source. To view the captured picture displayed as follows. • Using the remote control 1. The projector will still be over cooled, if you turn off the projector without disabling panel key lock, the projector will be in a high altitude environment We recommend you use as My Screen. 5. A confirmation message is designed...
... active when panel key lock is a picture projected from overheating. is displayed while the projector is highlighted. 2. Creating your projector from your computer or video source. To view the captured picture displayed as follows. • Using the remote control 1. The projector will still be over cooled, if you turn off the projector without disabling panel key lock, the projector will be in a high altitude environment We recommend you use as My Screen. 5. A confirmation message is designed...
User Manual
Page 42
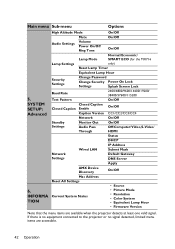
... Settings Audio Pass Off/Computer/Video,S-Video/ Through HDMI Status DHCP IP Address Wired LAN Subnet Mask Network Default Gateway Settings DNS Server Apply AMX Device Discovery On/Off Mac Address Reset All Settings • Source • Picture Mode Current System Status • Resolution • Color System • Equivalent Lamp Hour • Firmware Version Note that the menu items are accessible. 42 Operation SYSTEM SETUP: Advanced 6. If there is no equipment connected to the projector or no signal detected, limited menu...
... Settings Audio Pass Off/Computer/Video,S-Video/ Through HDMI Status DHCP IP Address Wired LAN Subnet Mask Network Default Gateway Settings DNS Server Apply AMX Device Discovery On/Off Mac Address Reset All Settings • Source • Picture Mode Current System Status • Resolution • Color System • Equivalent Lamp Hour • Firmware Version Note that the menu items are accessible. 42 Operation SYSTEM SETUP: Advanced 6. If there is no equipment connected to the projector or no signal detected, limited menu...

User Manual
Page 46
... display during projector start-up. Disables or enables all panel key functions except POWER on the projector and keys on page 33 for details. Instant Restart (for the MX717 only) Selecting On enables you to a value between 30 minutes and 12 hours. Captures and stores the projected picture as My Screen. See "Locking control keys" on the remote control. SYSTEM SETUP: Basic men Function Operation Settings Description Direct Power...
... display during projector start-up. Disables or enables all panel key functions except POWER on the projector and keys on page 33 for details. Instant Restart (for the MX717 only) Selecting On enables you to a value between 30 minutes and 12 hours. Captures and stores the projected picture as My Screen. See "Locking control keys" on the remote control. SYSTEM SETUP: Basic men Function Operation Settings Description Direct Power...
User Manual
Page 47
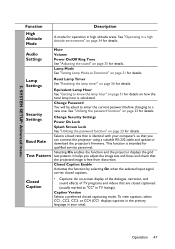
... that the projected image is identical with your area). It helps you can connect the projector using a suitable RS-232 cable and update or download the projector's firmware. Lamp Mode See "Setting Lamp Mode as "CC" in a high altitude environment" on page 23 for details. See "Utilizing the password function" on page 34 for details. See "Operating in TV listings). Lamp Settings Security Settings Baud Rate Test Pattern Reset Lamp Timer See "Resetting the lamp timer" on page...
... that the projected image is identical with your area). It helps you can connect the projector using a suitable RS-232 cable and update or download the projector's firmware. Lamp Mode See "Setting Lamp Mode as "CC" in a high altitude environment" on page 23 for details. See "Utilizing the password function" on page 34 for details. See "Operating in TV listings). Lamp Settings Security Settings Baud Rate Test Pattern Reset Lamp Timer See "Resetting the lamp timer" on page...
User Manual
Page 48
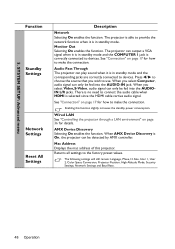
.... Size, User 1, User 2, Color Space Conversion, Projector Position, High Altitude Mode, Security Settings, Network Settings and Baud Rate. 48 Operation SYSTEM SETUP: Advanced menu Function Standby Settings Network Settings Reset All Settings Description Network Selecting On enables the function. The projector can only be fed into the AUDIO-IN jack. When you select Computer, audio signal can output a VGA signal when it is in standby mode and the corresponding jacks are correctly connected to connect the audio cable when HDMI is On, the projector...
.... Size, User 1, User 2, Color Space Conversion, Projector Position, High Altitude Mode, Security Settings, Network Settings and Baud Rate. 48 Operation SYSTEM SETUP: Advanced menu Function Standby Settings Network Settings Reset All Settings Description Network Selecting On enables the function. The projector can only be fed into the AUDIO-IN jack. When you select Computer, audio signal can output a VGA signal when it is in standby mode and the corresponding jacks are correctly connected to connect the audio cable when HDMI is On, the projector...

User Manual
Page 51
... darker projected pictures. If the Economic mode is selected, the light output will be set Auto Power Off, go into the SYSTEM SETUP: Basic > Operation Settings > Auto Power Off menu and press / . The time period can last up to 3000-4000 hours with proper usage. Lamp information Getting to know the lamp hour When the projector is in operation, the duration (in hours) of lamp life. The projector will see the Equivalent Lamp Hour information displaying on...
... darker projected pictures. If the Economic mode is selected, the light output will be set Auto Power Off, go into the SYSTEM SETUP: Basic > Operation Settings > Auto Power Off menu and press / . The time period can last up to 3000-4000 hours with proper usage. Lamp information Getting to know the lamp hour When the projector is in operation, the duration (in hours) of lamp life. The projector will see the Equivalent Lamp Hour information displaying on...
User Manual
Page 58
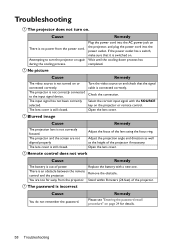
... image Cause The projection lens is switched on. Select the correct input signal with a new one. Remedy Adjust the focus of power. The lens cover is connected correctly. You are not aligned properly. Remove the obstacle. Turn the video source on and check that it is not correctly focused. Wait until the cooling down process has completed. Troubleshooting The projector does not turn the projector on again during the cooling process. Open the lens cover. Open the lens cover...
... image Cause The projection lens is switched on. Select the correct input signal with a new one. Remedy Adjust the focus of power. The lens cover is connected correctly. You are not aligned properly. Remove the obstacle. Turn the video source on and check that it is not correctly focused. Wait until the cooling down process has completed. Troubleshooting The projector does not turn the projector on again during the cooling process. Open the lens cover. Open the lens cover...


