User Manual
Page 3
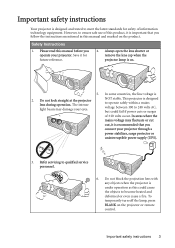
... on the product. Save it is important that you operate your eyes. Do not look straight at the projector lens during operation. In areas where the mains voltage may damage your projector. Safety Instructions 1. In some countries, the line voltage is 2. However, to become heated and deformed or...as this product, it for safety of ±10 volts occur. Always open the lens shutter or remove the lens cap when the projector lamp is on the projector or remote control. NOT stable. This projector is designed to operate safely within a mains voltage between 100 to 240 volts AC...
... on the product. Save it is important that you operate your eyes. Do not look straight at the projector lens during operation. In areas where the mains voltage may damage your projector. Safety Instructions 1. In some countries, the line voltage is 2. However, to become heated and deformed or...as this product, it for safety of ±10 volts occur. Always open the lens shutter or remove the lens cap when the projector lamp is on the projector or remote control. NOT stable. This projector is designed to operate safely within a mains voltage between 100 to 240 volts AC...

User Manual
Page 9
External control panel (See "Projector" on page 10 6 for how to trigger external devices such as an electric screen or light control, etc. DVI input socket 19. Rear IR remote ... devices. 23 21. Focus ring 7 7. Vent (cool air intake) 8. Consult your dealer for details.) 6. Projection lens 4. AC power cord inlet 10. Ceiling mounting holes 13. RGB (PC)/Component video (YPbPr/ YCbCr) signal input socket 18. Projector exterior view Front/upper side 1 2 3 4 PUSH Rear/lower side 13 14 15 16 17 9 10 11...
External control panel (See "Projector" on page 10 6 for how to trigger external devices such as an electric screen or light control, etc. DVI input socket 19. Rear IR remote ... devices. 23 21. Focus ring 7 7. Vent (cool air intake) 8. Consult your dealer for details.) 6. Projection lens 4. AC power cord inlet 10. Ceiling mounting holes 13. RGB (PC)/Component video (YPbPr/ YCbCr) signal input socket 18. Projector exterior view Front/upper side 1 2 3 4 PUSH Rear/lower side 13 14 15 16 17 9 10 11...

User Manual
Page 15
... fed a 16:9 aspect signal). You can see from the diagram on page 17, that this projector. The projector should always be placed horizontally level (like older style reel-to assist you should consider its intended ... it projects at a slightly upward angle above the level of the screen. BenQ has provided a table of the projected image. When determining the position of the projector. There are directly proportional to the screen, the zoom setting, and the... screen). Obtaining a preferred projected image size The distance from the projector lens to the projection distance.
... fed a 16:9 aspect signal). You can see from the diagram on page 17, that this projector. The projector should always be placed horizontally level (like older style reel-to assist you should consider its intended ... it projects at a slightly upward angle above the level of the screen. BenQ has provided a table of the projected image. When determining the position of the projector. There are directly proportional to the screen, the zoom setting, and the... screen). Obtaining a preferred projected image size The distance from the projector lens to the projection distance.

User Manual
Page 17
Positioning your installation location. BenQ recommends that if you intend to permanently install the projector, you should physically test the projection size and distance using the actual projector in mm 91 110 120 128 146 150 165 180 183 210 219 240 274 300 329 360 457 ...There is 3% tolerance among these numbers due to make allowance for this projector's optical characteristics. 4:3 Screen Diagonal Screen Center of lens Offset Projection distance 4:3 screen diagonal Feet Inches mm 5 60 1524 6 72 1829 2000 7 84 2134 8 96 2438...
Positioning your installation location. BenQ recommends that if you intend to permanently install the projector, you should physically test the projection size and distance using the actual projector in mm 91 110 120 128 146 150 165 180 183 210 219 240 274 300 329 360 457 ...There is 3% tolerance among these numbers due to make allowance for this projector's optical characteristics. 4:3 Screen Diagonal Screen Center of lens Offset Projection distance 4:3 screen diagonal Feet Inches mm 5 60 1524 6 72 1829 2000 7 84 2134 8 96 2438...

User Manual
Page 26
...on page 44 for details. 26 Operation If the projector is still hot from previous activity, it is compatible with the projector's resolution or set the input signal to start up procedure takes about 30 seconds. Remove the lens cover. If the projector doesn't detect a valid signal, the 'No ...Signal' message will run the cooling fan for details. 5. The Power indicator light flashes green and stays green when the projector is found. See "Utilizing the password function"...
...on page 44 for details. 26 Operation If the projector is still hot from previous activity, it is compatible with the projector's resolution or set the input signal to start up procedure takes about 30 seconds. Remove the lens cover. If the projector doesn't detect a valid signal, the 'No ...Signal' message will run the cooling fan for details. 5. The Power indicator light flashes green and stays green when the projector is found. See "Utilizing the password function"...

User Manual
Page 32
... may need to fine tune the horizontal angle. Once the image is equipped with 1 quick-release adjuster foot and 1 rear adjuster foot. If the projector is on page 33 for 3 seconds. These adjusters change the image height and projection angle. Screw the rear adjuster foot to optimize the picture quality.... To correct this , press AUTO on a flat surface or the screen and the projector are not perpendicular to your eyes. Do not look into the lens while the lamp is not placed on the...
... may need to fine tune the horizontal angle. Once the image is equipped with 1 quick-release adjuster foot and 1 rear adjuster foot. If the projector is on page 33 for 3 seconds. These adjusters change the image height and projection angle. Screw the rear adjuster foot to optimize the picture quality.... To correct this , press AUTO on a flat surface or the screen and the projector are not perpendicular to your eyes. Do not look into the lens while the lamp is not placed on the...

User Manual
Page 41
... automatically after a period of time when there is no action taken on the projector or remote control. The length of time can be set the blank time in the corner of the screen. Do not block the projection lens from 5 to 30 minutes in the upper left corner of the screen while... the image is pressed, the projector lamp enters Economic mode automatically. No matter Blank Timer is activated with an audio input connected...
... automatically after a period of time when there is no action taken on the projector or remote control. The length of time can be set the blank time in the corner of the screen. Do not block the projection lens from 5 to 30 minutes in the upper left corner of the screen while... the image is pressed, the projector lamp enters Economic mode automatically. No matter Blank Timer is activated with an audio input connected...

User Manual
Page 53
... below: • Make sure the temperature and humidity of compressed air to keep the lens clean. Transporting the projector It is to remove dust. • If there is dirt or smears, use lens-cleaning paper or moisten a soft cloth with its original packing or equivalent. Cleaning the... lens Clean the lens whenever you clean the case, turn the projector off using the proper shutdown procedure as described in its original packing...
... below: • Make sure the temperature and humidity of compressed air to keep the lens clean. Transporting the projector It is to remove dust. • If there is dirt or smears, use lens-cleaning paper or moisten a soft cloth with its original packing or equivalent. Cleaning the... lens Clean the lens whenever you clean the case, turn the projector off using the proper shutdown procedure as described in its original packing...

User Manual
Page 56
...Use a coin to fingers and/or compromising image quality by touching the lens, do not touch the empty lamp compartment when the lamp is removed. • This lamp contains mercury. Remove the lamp cover from the projector. • Do not turn the power on with the lamp cover removed...of this lamp in a proper manner. • To assure optimal performance from the projector, it is recommended that you purchase a BenQ projector lamp for lamp replacement. • If lamp replacement is performed while the projector is suspended upside-down from the wall socket. Replacing the lamp • To ...
...Use a coin to fingers and/or compromising image quality by touching the lens, do not touch the empty lamp compartment when the lamp is removed. • This lamp contains mercury. Remove the lamp cover from the projector. • Do not turn the power on with the lamp cover removed...of this lamp in a proper manner. • To assure optimal performance from the projector, it is recommended that you purchase a BenQ projector lamp for lamp replacement. • If lamp replacement is performed while the projector is suspended upside-down from the wall socket. Replacing the lamp • To ...

User Manual
Page 60
... and direction as well as the height of the lens using the focus ring. Open the lens cover. Remedy Replace the batteries with the SOURCE key on the projector, and plug the power cord into the AC inlet on the projector or remote control. Please see "Entering the password recall...input signal has not been correctly selected. Select the correct input signal with new ones. The lens cover is not correctly connected to turn on page 30 for details. 60 Troubleshooting The projector is still closed . Turn the video source on again during the cooling process. Remote control ...
... and direction as well as the height of the lens using the focus ring. Open the lens cover. Remedy Replace the batteries with the SOURCE key on the projector, and plug the power cord into the AC inlet on the projector or remote control. Please see "Entering the password recall...input signal has not been correctly selected. Select the correct input signal with new ones. The lens cover is not correctly connected to turn on page 30 for details. 60 Troubleshooting The projector is still closed . Turn the video source on again during the cooling process. Remote control ...
User Manual
Page 61
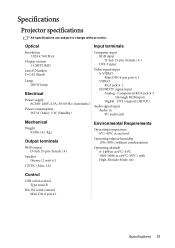
Component RCA jack x 3 (through RGB input) Digital - Specifications Projector specifications All specifications are subject to change without condensation) Operating altitude 0-1499 m at 0°C-35°C 1500-3000 m at 0°C-30°...) Environmental Requirements Operating temperature 0°C-40°C at sea level Operating relative humidity 10%-90% (without notice. Optical Input terminals Resolution 1024 x 768 XGA Display system 1-CHIP DMD Lens F/Number F=2.42 (fixed) Lamp 280 W lamp Electrical Power supply AC100-240V, 4.5A, 50-60 Hz (Automatic) Power consumption 365 W (Max); 5 W...
Component RCA jack x 3 (through RGB input) Digital - Specifications Projector specifications All specifications are subject to change without condensation) Operating altitude 0-1499 m at 0°C-35°C 1500-3000 m at 0°C-30°...) Environmental Requirements Operating temperature 0°C-40°C at sea level Operating relative humidity 10%-90% (without notice. Optical Input terminals Resolution 1024 x 768 XGA Display system 1-CHIP DMD Lens F/Number F=2.42 (fixed) Lamp 280 W lamp Electrical Power supply AC100-240V, 4.5A, 50-60 Hz (Automatic) Power consumption 365 W (Max); 5 W...


