

Brochure
Page 1
Hot Key for FAQ Auto Adjustment Hot Key Direct Power On VGA(D-sub) cable Power cord Spare Lamp Kit Soft Carry Case MP625P Digital Projector HIGHLIGHTS -Filter Free Design -No Color Decay -2700 ANSI Lumens -XGA Native Resolution -BrilliantColorTM -3D Color Managment -6 Segments Color Wheel -Keystone ±40° -2W ...
Hot Key for FAQ Auto Adjustment Hot Key Direct Power On VGA(D-sub) cable Power cord Spare Lamp Kit Soft Carry Case MP625P Digital Projector HIGHLIGHTS -Filter Free Design -No Color Decay -2700 ANSI Lumens -XGA Native Resolution -BrilliantColorTM -3D Color Managment -6 Segments Color Wheel -Keystone ±40° -2W ...
User Manual
Page 1
MP615P/MP625P Digital Projector User Manual Welcome
MP615P/MP625P Digital Projector User Manual Welcome

User Manual
Page 2
... computer or monitor... 19 Connecting Video source devices....... 20 Operation 24 Starting up the projector 24 Adjusting the projected image 25 Using the menus 27 Securing the projector 28 Switching input signal 31 Magnifying and searching for details . 32 Selecting the aspect ...environment 41 2 Adjusting the sound 41 Adjusting the sound level 41 Personalizing the projector menu display 42 Shutting down the projector 42 Menu operation 43 Maintenance 53 Care of the projector 53 Lamp information 54 Troubleshooting 60 Specifications 61 Dimensions 62 Ceiling mount installation ...
... computer or monitor... 19 Connecting Video source devices....... 20 Operation 24 Starting up the projector 24 Adjusting the projected image 25 Using the menus 27 Securing the projector 28 Switching input signal 31 Magnifying and searching for details . 32 Selecting the aspect ...environment 41 2 Adjusting the sound 41 Adjusting the sound level 41 Personalizing the projector menu display 42 Shutting down the projector 42 Menu operation 43 Maintenance 53 Care of the projector 53 Lamp information 54 Troubleshooting 60 Specifications 61 Dimensions 62 Ceiling mount installation ...

User Manual
Page 3
... or surges of this product, it is recommended that you follow the instructions mentioned in this manual before you connect your projector. This projector is NOT stable. Safety Instructions 1. In some countries, the line voltage is designed 2. To temporarily turn off the lamp..., press BLANK on . 5. Important safety instructions Your projector is designed and tested to qualified service personnel. 6. Refer servicing to meet the latest standards for future reference. 4. Save it is...
... or surges of this product, it is recommended that you follow the instructions mentioned in this manual before you connect your projector. This projector is NOT stable. Safety Instructions 1. In some countries, the line voltage is designed 2. To temporarily turn off the lamp..., press BLANK on . 5. Important safety instructions Your projector is designed and tested to qualified service personnel. 6. Refer servicing to meet the latest standards for future reference. 4. Save it is...

User Manual
Page 4
...other covers. Do not operate lamps beyond the rated life could voltages inside which has its ventilation grill. Excessive operation projector. The only user serviceable part is the lamp which may cause cause them to removing the lamp assembly for approximately... this rated lamp life. Do not attempt to suitably qualified professional service personnel. 9. When the projector is under operation, you ever undo or remove any electronic components unless the projector is a normal phenomenon and not a product defect. 4 Important safety instructions contact with live parts...
...other covers. Do not operate lamps beyond the rated life could voltages inside which has its ventilation grill. Excessive operation projector. The only user serviceable part is the lamp which may cause cause them to removing the lamp assembly for approximately... this rated lamp life. Do not attempt to suitably qualified professional service personnel. 9. When the projector is under operation, you ever undo or remove any electronic components unless the projector is a normal phenomenon and not a product defect. 4 Important safety instructions contact with live parts...

User Manual
Page 5
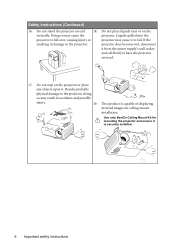
... any other item. - Do not use if tilted at an angle of more than 15 degrees front to back. Locations near the projector. - the following environments. - Do not place this projector with a cloth or any of a car with an ambient temperature above 40°C / 104°F - Locations where excessive humidity, ... - Do not place inflammables near fire alarms - If the ventilation holes are higher than 10 degrees left to , the lamp. - Do not place this projector in a fire. 15. Allow at angle of , or damage to right, nor at least 50 cm clearance from walls and free flow of air around...
... any other item. - Do not use if tilted at an angle of more than 15 degrees front to back. Locations near the projector. - the following environments. - Do not place this projector with a cloth or any of a car with an ambient temperature above 40°C / 104°F - Locations where excessive humidity, ... - Do not place inflammables near fire alarms - If the ventilation holes are higher than 10 degrees left to , the lamp. - Do not place this projector in a fire. 15. Allow at angle of , or damage to right, nor at least 50 cm clearance from walls and free flow of air around...
User Manual
Page 6
...damage to fail. Do not stand the projector on the vertically. Use only BenQ's Ceiling Mount Kit for ceiling mount installation. Do not place liquids near or on end 18. Liquids spilled into the projector to have the projector serviced. 17. projector does become wet, disconnect it . ...is securely installed. 6 Important safety instructions Do not step on the projector or place any objects upon it from the power supply's wall socket and call BenQ to fall over, causing injury or projector may cause it is capable of displaying inverted images for mounting the...
...damage to fail. Do not stand the projector on the vertically. Use only BenQ's Ceiling Mount Kit for ceiling mount installation. Do not place liquids near or on end 18. Liquids spilled into the projector to have the projector serviced. 17. projector does become wet, disconnect it . ...is securely installed. 6 Important safety instructions Do not step on the projector or place any objects upon it from the power supply's wall socket and call BenQ to fall over, causing injury or projector may cause it is capable of displaying inverted images for mounting the...
User Manual
Page 7
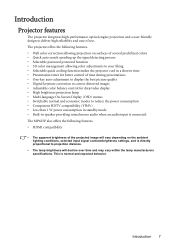
... of the projected image will decline over time and may vary within the lamp manufacturers specifications. Introduction 7 Introduction Projector features The projector integrates high-performance optical engine projection and a user-friendly design to projection distance. • The lamp brightness ... W power consumption in standby mode • Built-in speaker providing mixed mono audio when an audio input is connected The MP625P also offers the following features. • Wall color correction allowing projection on the ambient lighting conditions, selected input signal contrast/...
... of the projected image will decline over time and may vary within the lamp manufacturers specifications. Introduction 7 Introduction Projector features The projector integrates high-performance optical engine projection and a user-friendly design to projection distance. • The lamp brightness ... W power consumption in standby mode • Built-in speaker providing mixed mono audio when an audio input is connected The MP625P also offers the following features. • Wall color correction allowing projection on the ambient lighting conditions, selected input signal contrast/...
User Manual
Page 8
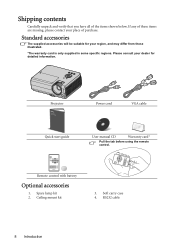
Ceiling mount kit 3. Projector Power cord VGA cable Quick start guide User manual CD Warranty card* Pull the tab before using the remote control. RS232 cable 8 Introduction Remote control ...
Ceiling mount kit 3. Projector Power cord VGA cable Quick start guide User manual CD Warranty card* Pull the tab before using the remote control. RS232 cable 8 Introduction Remote control ...

User Manual
Page 9
Projector exterior view Front/upper side 1. Lamp cover 1 3. RGB (PC)/Component video (YPbPr/ YCbCr) signal input jack 14...input jack 7 11. RGB signal output jack 9 13. Focus ring 5. Vent (heated air exhaust) 7. Rear adjuster foot 23. External control panel (See "Projector" on page 10 for details.) 2. Lens cover 3 4 6 6. Projection lens 9. S-Video input jack 5 8 12. Audio input jack Rear/lower side...(MP615P) 10 11 12 13 14 17. Ceiling mount holes 22. Speaker 15 16 17 (MP625P) 10 18 11 12 13 14 19 15 9 16 20 21 22 23 17 Introduction 9
Projector exterior view Front/upper side 1. Lamp cover 1 3. RGB (PC)/Component video (YPbPr/ YCbCr) signal input jack 14...input jack 7 11. RGB signal output jack 9 13. Focus ring 5. Vent (heated air exhaust) 7. Rear adjuster foot 23. External control panel (See "Projector" on page 10 for details.) 2. Lens cover 3 4 6 6. Projection lens 9. S-Video input jack 5 8 12. Audio input jack Rear/lower side...(MP615P) 10 11 12 13 14 17. Ceiling mount holes 22. Speaker 15 16 17 (MP625P) 10 18 11 12 13 14 19 15 9 16 20 21 22 23 17 Introduction 9

User Manual
Page 10
... details. 5. Left/BLANK Used to previous OSD menu, exits and saves menu settings. 10 Introduction Lights up the projector" on page 24 and "Shutting down the projector" on page 39 for details. Goes back to hide the screen picture. See "Fine- LAMP indicator light Indicates ...for details. Automatically determines the best picture timings for details. II Power/POWER indicator light Toggles the projector between standby mode and on.See "Starting up or flashes when the projector is activated, the #4, #5, and #10 keys are used as directional arrows to select the ...
... details. 5. Left/BLANK Used to previous OSD menu, exits and saves menu settings. 10 Introduction Lights up the projector" on page 24 and "Shutting down the projector" on page 39 for details. Goes back to hide the screen picture. See "Fine- LAMP indicator light Indicates ...for details. Automatically determines the best picture timings for details. II Power/POWER indicator light Toggles the projector between standby mode and on.See "Starting up or flashes when the projector is activated, the #4, #5, and #10 keys are used as directional arrows to select the ...
User Manual
Page 11
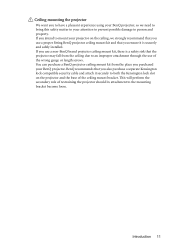
...ensure it securely to person and property. This will perform the secondary role of restraining the projector should its attachment to an improper attachment through the use a non-BenQ brand projector ceiling mount kit, there is securely and safely installed. If you also purchase a separate Kensington...of the ceiling mount bracket. Introduction 11 BenQ recommends that the projector may fall from the place you intend to mount your projector on the projector and the base of the wrong gauge or length screws. You can purchase a BenQ projector ceiling mount kit from the ceiling due ...
...ensure it securely to person and property. This will perform the secondary role of restraining the projector should its attachment to an improper attachment through the use a non-BenQ brand projector ceiling mount kit, there is securely and safely installed. If you also purchase a separate Kensington...of the ceiling mount bracket. Introduction 11 BenQ recommends that the projector may fall from the place you intend to mount your projector on the projector and the base of the wrong gauge or length screws. You can purchase a BenQ projector ceiling mount kit from the ceiling due ...

User Manual
Page 12
...Activates the selected On-Screen Display (OSD) menu item. Page Up/Down Page up the projector" on page 24 and "Shutting down arrows when connected through USB to make adjustments. Toggles the projector between standby mode and on the On-Screen Display (OSD) menu. See "Utilizing FAQ ...on page 34 for details. 5. Adjusts the sound level. See "Selecting a picture mode" on page 39 for details. See "Starting up /down the projector" on page 27 for details. 2. Magnifies or reduces the projected picture size. Volume +/- 13. See "Using the menus" on page 42 for details...
...Activates the selected On-Screen Display (OSD) menu item. Page Up/Down Page up the projector" on page 24 and "Shutting down arrows when connected through USB to make adjustments. Toggles the projector between standby mode and on the On-Screen Display (OSD) menu. See "Utilizing FAQ ...on page 34 for details. 5. Adjusts the sound level. See "Selecting a picture mode" on page 39 for details. See "Starting up /down the projector" on page 27 for details. 2. Magnifies or reduces the projected picture size. Volume +/- 13. See "Using the menus" on page 42 for details...

User Manual
Page 13
... Activates or displays an on your own timer setting. The remote control must be held at an angle within 30 degrees perpendicular to the projector's IR remote control sensor to the battery manufacturer's instructions. • Never throw a battery into the remote control. • Avoid excessive... heat and humidity. • There may be battery damage if the battery is located on the projector that there are no obstacles between the remote control and the sensor should face outward. 3. Infra-Red (IR) remote control sensor is incorrectly...
... Activates or displays an on your own timer setting. The remote control must be held at an angle within 30 degrees perpendicular to the projector's IR remote control sensor to the battery manufacturer's instructions. • Never throw a battery into the remote control. • Avoid excessive... heat and humidity. • There may be battery damage if the battery is located on the projector that there are no obstacles between the remote control and the sensor should face outward. 3. Infra-Red (IR) remote control sensor is incorrectly...

User Manual
Page 14
... front of your equipment. Note that a special rear projection screen and the BenQ Projector Ceiling Mounting Kit are required for quick setup and portability. 2. This is required. Purchase the BenQ Projector Ceiling Mounting Kit from the ceiling behind the screen. Set Rear Ceiling in ...front of the screen. Front Table Select this location with the projector suspended upsidedown from your dealer to mount your projector on . 3. Take into consideration...
... front of your equipment. Note that a special rear projection screen and the BenQ Projector Ceiling Mounting Kit are required for quick setup and portability. 2. This is required. Purchase the BenQ Projector Ceiling Mounting Kit from the ceiling behind the screen. Set Rear Ceiling in ...front of the screen. Front Table Select this location with the projector suspended upsidedown from your dealer to mount your projector on . 3. Take into consideration...
User Manual
Page 15
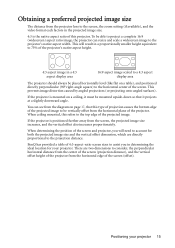
... of the screen. You can resize and scale a widescreen image to the projection distance. When determining the position of the screen and projector, you in the projected image size. 4:3 is positioned further away from the diagram on a table), and positioned directly perpendicular (90...account for your projector 15 If the projector is mounted on a ceiling, it must be placed horizontally level (like flat on page 17, that it projects at a slightly downward angle. This prevents image distortion caused by angled projections (or projecting onto angled surfaces). BenQ has provided ...
... of the screen. You can resize and scale a widescreen image to the projection distance. When determining the position of the screen and projector, you in the projected image size. 4:3 is positioned further away from the diagram on a table), and positioned directly perpendicular (90...account for your projector 15 If the projector is mounted on a ceiling, it must be placed horizontally level (like flat on page 17, that it projects at a slightly downward angle. This prevents image distortion caused by angled projections (or projecting onto angled surfaces). BenQ has provided ...

User Manual
Page 16
... same row, look across to your measured distance is the projected image size of the "Vertical offset (mm)" value. If you place the projector in relation to position the screen. Select your measured projection distance was 5.0 m (5000 mm), the closest match in the column labelled "Average...distance from screen value in the "Average" column is 5040 mm. How to correct the distortion. Check that row. That is between the projector and where you will occur. For example, if your screen size. 2. Use the Keystone function to determine the recommended screen size for a...
... same row, look across to your measured distance is the projected image size of the "Vertical offset (mm)" value. If you place the projector in relation to position the screen. Select your measured projection distance was 5.0 m (5000 mm), the closest match in the column labelled "Average...distance from screen value in the "Average" column is 5040 mm. How to correct the distortion. Check that row. That is between the projector and where you will occur. For example, if your screen size. 2. Use the Keystone function to determine the recommended screen size for a...

User Manual
Page 17
BenQ recommends that it , so as to make allowance for the center of lens dimensions of lens Vertical offset Projection distance Screen size Distance from screen (... mounting position so that if you intend to permanently install the projector, you permanently install it best suits your projector 17 Maximum zoom Minimum zoom Screen Center of this projector's optical characteristics. Projection dimensions Refer to "Dimensions" on page 62 for this projector before you should physically test the projection size and distance using...
BenQ recommends that it , so as to make allowance for the center of lens dimensions of lens Vertical offset Projection distance Screen size Distance from screen (... mounting position so that if you intend to permanently install the projector, you permanently install it best suits your projector 17 Maximum zoom Minimum zoom Screen Center of this projector's optical characteristics. Projection dimensions Refer to "Dimensions" on page 62 for this projector before you should physically test the projection size and distance using...

User Manual
Page 18
... the connections shown below, some cables may not be sure to: 1. Component Video to DVI-A cable 4. Connection When connecting a signal source to the projector, be included with the projector (see pages 19-23. 1 23 2 4 (MP615P ) (MP625P) 567 8 4 4 1. VGA cable 3. VGA to VGA (DSub) adapter cable USB Cable 2. Audio Cable 18 Connection 5. Video cable 7.
... the connections shown below, some cables may not be sure to: 1. Component Video to DVI-A cable 4. Connection When connecting a signal source to the projector, be included with the projector (see pages 19-23. 1 23 2 4 (MP615P ) (MP625P) 567 8 4 4 1. VGA cable 3. VGA to VGA (DSub) adapter cable USB Cable 2. Audio Cable 18 Connection 5. Video cable 7.

User Manual
Page 19
..., take a VGA to DVI-A cable and connect the DVI end of the cable to the DVI input jack of the video monitor. 3. When the projector is powered on, the output signal from MONITOR OUT jack varies depending on the input signal from COMPUTER 1 or COMPUTER 2 jack. • If you... you want to view your presentation close-up on a monitor as well as described in "Connecting a computer" on in speaker will be controlled by the projector On-Screen Display (OSD) menus. Refer to your notebook's documentation to find your external speakers (not supplied). Locate a function key labeled CRT/LCD or a...
..., take a VGA to DVI-A cable and connect the DVI end of the cable to the DVI input jack of the video monitor. 3. When the projector is powered on, the output signal from MONITOR OUT jack varies depending on the input signal from COMPUTER 1 or COMPUTER 2 jack. • If you... you want to view your presentation close-up on a monitor as well as described in "Connecting a computer" on in speaker will be controlled by the projector On-Screen Display (OSD) menus. Refer to your notebook's documentation to find your external speakers (not supplied). Locate a function key labeled CRT/LCD or a...


