User Manual
Page 3
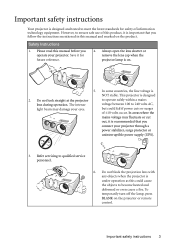
... use of information technology equipment. To temporarily turn off the lamp, press BLANK on . 5. In areas where the mains voltage may damage your projector. Safety Instructions 1. Save it is important that you operate your eyes. Important safety instructions 3 Do not look straight at the projector lens during operation. Always open the lens shutter or remove the lens cap when the projector lamp is on the projector or remote control...
... use of information technology equipment. To temporarily turn off the lamp, press BLANK on . 5. In areas where the mains voltage may damage your projector. Safety Instructions 1. Save it is important that you operate your eyes. Important safety instructions 3 Do not look straight at the projector lens during operation. Always open the lens shutter or remove the lens cap when the projector lamp is on the projector or remote control...
User Manual
Page 6
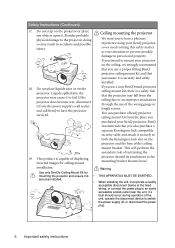
... wrong gauge or length screws. Besides probable physical damage to switch the power supply off, or disconnect the power plug. 6 Important safety instructions Warning THIS APPARATUS MUST BE EARTHED. If you also purchase a separate Kensington lock compatible security cable and attach it to person and property. You can purchase a BenQ projector ceiling mount kit from the ceiling due to the mounting bracket become wet, disconnect...
... wrong gauge or length screws. Besides probable physical damage to switch the power supply off, or disconnect the power plug. 6 Important safety instructions Warning THIS APPARATUS MUST BE EARTHED. If you also purchase a separate Kensington lock compatible security cable and attach it to person and property. You can purchase a BenQ projector ceiling mount kit from the ceiling due to the mounting bracket become wet, disconnect...
User Manual
Page 10
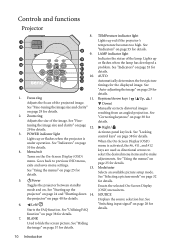
... a picture mode" on page 37 for details. AUTO 6 14 Automatically determines the best picture timings for details. 9. tuning the image size and clarity" on page 25 for details. 1. Mode/enter See "Using the menus" on page 12. See 6. See 2 8 "Indicators" on page 29 for details. POWER indicator light Activates panel key lock. menu is under operation. TEMPerature indicator light 1 Lights up the (OSD) menu item. Displays the source selection bar. Lights up or flashes when the projector...
... a picture mode" on page 37 for details. AUTO 6 14 Automatically determines the best picture timings for details. 9. tuning the image size and clarity" on page 25 for details. 1. Mode/enter See "Using the menus" on page 12. See 6. See 2 8 "Indicators" on page 29 for details. POWER indicator light Activates panel key lock. menu is under operation. TEMPerature indicator light 1 Lights up the (OSD) menu item. Displays the source selection bar. Lights up or flashes when the projector...
User Manual
Page 11
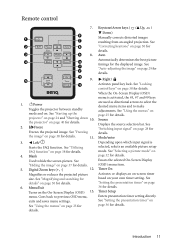
... details. Auto Automatically determines the best picture timings for details. See "Starting up the projector" on page 28 for details. the projector" on page 36 for the displayed image. Blank Used to hide the screen picture. Introduction 11 Remote control 7. 6 1 7 2 8 3 9 8. 4 10 11 7 12 5 9. 13 1. Digital Zoom keys (+, -) 12. See "Correcting keystone" on page 30 for details. Enacts the selected On-Screen Display (OSD) menu item. Timer Setup Enters presentation timer setting directly. See...
... details. Auto Automatically determines the best picture timings for details. See "Starting up the projector" on page 28 for details. the projector" on page 36 for the displayed image. Blank Used to hide the screen picture. Introduction 11 Remote control 7. 6 1 7 2 8 3 9 8. 4 10 11 7 12 5 9. 13 1. Digital Zoom keys (+, -) 12. See "Correcting keystone" on page 30 for details. Enacts the selected On-Screen Display (OSD) menu item. Timer Setup Enters presentation timer setting directly. See...

User Manual
Page 21
... Video to VGA (D-Sub) adaptor cable (with a D-Sub type connector) to the Component Video output sockets of the Video source device. Also check that the Video source device is turned on and the correct video source has been selected, check that the signal cables have been connected correctly. See "Adjusting the sound" on page 39 for details. • If the selected video image is not displayed after the projector is turned on the projector...
... Video to VGA (D-Sub) adaptor cable (with a D-Sub type connector) to the Component Video output sockets of the Video source device. Also check that the Video source device is turned on and the correct video source has been selected, check that the signal cables have been connected correctly. See "Adjusting the sound" on page 39 for details. • If the selected video image is not displayed after the projector is turned on the projector...

User Manual
Page 23
... selected video image is not displayed after the projector is turned on page 19 for use of the projector (mixed mono) speaker in the following diagram: AV device Audio cable Video cable • The projector is only capable of playing mixed mono audio, even if a stereo audio input is turned on page 39 for details. See "Adjusting the sound" on and operating correctly. If you wish to make use . See "Connecting Video source...
... selected video image is not displayed after the projector is turned on page 19 for use of the projector (mixed mono) speaker in the following diagram: AV device Audio cable Video cable • The projector is only capable of playing mixed mono audio, even if a stereo audio input is turned on page 39 for details. See "Adjusting the sound" on and operating correctly. If you wish to make use . See "Connecting Video source...
User Manual
Page 24
... the message 'Out of the connected equipment on the projector lights orange after power has been applied. 2. Switch all of Range' displayed on page 28 for details. Check that the POWER indicator light on . 6. See "Switching input signal" on a blank screen. If the frequency/resolution of the screen. If you will see "Turning off the Power on/off ring tone" on the projector or remote control to adjust the image clearness. You can also press Source...
... the message 'Out of the connected equipment on the projector lights orange after power has been applied. 2. Switch all of Range' displayed on page 28 for details. Check that the POWER indicator light on . 6. See "Switching input signal" on a blank screen. If the frequency/resolution of the screen. If you will see "Turning off the Power on/off ring tone" on the projector or remote control to adjust the image clearness. You can also press Source...
User Manual
Page 26
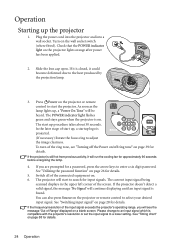
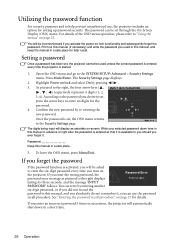
... the message 'INPUT PASSWORD' follows. The Security Settings page displays. 2. Print out this manual, and you absolutely do not remember it is set through the On-Screen Display (OSD) menu. Utilizing the password function For security purposes and to the password you used unless the correct password is entered every time the projector is activated, you will display as pictured to the Security Settings page. Setting a password Once a password has been set, the projector...
... the message 'INPUT PASSWORD' follows. The Security Settings page displays. 2. Print out this manual, and you absolutely do not remember it is set through the On-Screen Display (OSD) menu. Utilizing the password function For security purposes and to the password you used unless the correct password is entered every time the projector is activated, you will display as pictured to the Security Settings page. Setting a password Once a password has been set, the projector...
User Manual
Page 27
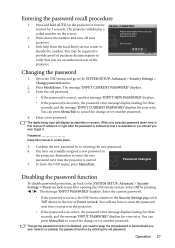
... AUTO on lock. The message 'INPUT CURRENT PASSWORD' displays. 3. Enter a new password. Operation 27 Press Mode/Enter. Password Keep this manual in a safe place. 5. The message 'INPUT PASSWORD' displays. You can press Menu/Exit to re-activate the password function by entering the old password. The digits being input will display a coded number on lock menu after the password is entered so that you ever forget it is started. Remember to the SYSTEM SETUP: Advanced > Security Settings > Power on the screen. Disabling the password...
... AUTO on lock. The message 'INPUT CURRENT PASSWORD' displays. 3. Enter a new password. Operation 27 Press Mode/Enter. Password Keep this manual in a safe place. 5. The message 'INPUT PASSWORD' displays. You can press Menu/Exit to re-activate the password function by entering the old password. The digits being input will display a coded number on lock menu after the password is entered so that you ever forget it is started. Remember to the SYSTEM SETUP: Advanced > Security Settings > Power on the screen. Disabling the password...

User Manual
Page 32
.... Dynamic mode (Default): Maximizes the brightness of brightness setting. Dynamic mode: Is suitable for presentations. Presentation mode: Is designed for playing gamebox-based video games in a blackened (little light) environment. 5. Cinema mode: Is appropriate for best viewing in a normal living room lighting level environment. 2. sRGB mode: Maximizes the purity of RGB colors to provide true-to-life images regardless of the projected image. User 1/User 2 mode: Recalls the settings customized...
.... Dynamic mode (Default): Maximizes the brightness of brightness setting. Dynamic mode: Is suitable for presentations. Presentation mode: Is designed for playing gamebox-based video games in a blackened (little light) environment. 5. Cinema mode: Is appropriate for best viewing in a normal living room lighting level environment. 2. sRGB mode: Maximizes the purity of RGB colors to provide true-to-life images regardless of the projected image. User 1/User 2 mode: Recalls the settings customized...
User Manual
Page 34
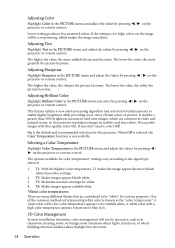
... projector or remote control. The higher the value, the more greenish the picture becomes. The lower the value, the softer the picture becomes. Adjusting Brilliant Color Highlight Brilliant Color in the PICTURE menu and select by pressing / on the image will not be necessary, such as the "color temperature". On is too high, colors on the projector or remote control. T2: Makes images appear bluish white. 3. If the setting is the default...
... projector or remote control. The higher the value, the more greenish the picture becomes. The lower the value, the softer the picture becomes. Adjusting Brilliant Color Highlight Brilliant Color in the PICTURE menu and select by pressing / on the image will not be necessary, such as the "color temperature". On is too high, colors on the projector or remote control. T2: Makes images appear bluish white. 3. If the setting is the default...
User Manual
Page 38
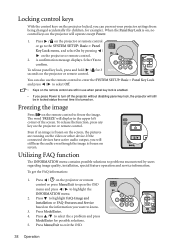
... changed accidentally (by users regarding image quality, installation, special feature operation and service information. Freezing the image Press on the projector or remote control. 2. Press / to turn off the projector without disabling panel key lock, the projector will still be in the upper left corner of the screen. When the Panel Key Lock is turned on. To get the FAQ information: 1. A confirmation message displays. The word 'FREEZE' will operate except Power. 1. If the connected...
... changed accidentally (by users regarding image quality, installation, special feature operation and service information. Freezing the image Press on the projector or remote control. 2. Press / to turn off the projector without disabling panel key lock, the projector will still be in the upper left corner of the screen. When the Panel Key Lock is turned on. To get the FAQ information: 1. A confirmation message displays. The word 'FREEZE' will operate except Power. 1. If the connected...
User Manual
Page 40
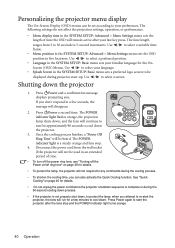
... tone, see "Turning off the Power on/off ring tone" on page 46 for approximately 90 seconds to select a suitable time frame. • Menu position in the SYSTEM SETUP: Advanced > Menu Settings menu sets the OSD position in a few minutes to your last key press. Use / to select a screen. The POWER indicator light flashes orange, the projection lamp shuts down, and the fans will not respond to start the projector after your...
... tone, see "Turning off the Power on/off ring tone" on page 46 for approximately 90 seconds to select a suitable time frame. • Menu position in the SYSTEM SETUP: Advanced > Menu Settings menu sets the OSD position in a few minutes to your last key press. Use / to select a screen. The POWER indicator light flashes orange, the projection lamp shuts down, and the fans will not respond to start the projector after your...
User Manual
Page 41
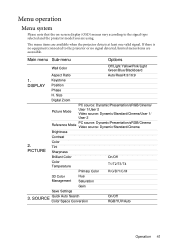
The menu items are using. Main menu Sub-menu Options Wall Color Off/Light Yellow/Pink/Light Green/Blue/Blackboard Aspect Ratio Auto/Real/4:3/16:9 1. PICTURE Color Tint Sharpness Brilliant Color On/Off Color Temperature T1/T2/T3/T4 Primary Color R/G/B/Y/C/M 3D Color Management Hue Saturation Gain Save Settings 3. Keystone DISPLAY Position Phase H. Size Digital Zoom Picture Mode PC source: Dynamic/Presentation/sRGB/Cinema/ User 1/User 2 Video source: Dynamic/Standard/Cinema/User 1/ User 2 Reference Mode PC source: Dynamic/Presentation/sRGB/Cinema Video source: ...
The menu items are using. Main menu Sub-menu Options Wall Color Off/Light Yellow/Pink/Light Green/Blue/Blackboard Aspect Ratio Auto/Real/4:3/16:9 1. PICTURE Color Tint Sharpness Brilliant Color On/Off Color Temperature T1/T2/T3/T4 Primary Color R/G/B/Y/C/M 3D Color Management Hue Saturation Gain Save Settings 3. Keystone DISPLAY Position Phase H. Size Digital Zoom Picture Mode PC source: Dynamic/Presentation/sRGB/Cinema/ User 1/User 2 Video source: Dynamic/Standard/Cinema/User 1/ User 2 Reference Mode PC source: Dynamic/Presentation/sRGB/Cinema Video source: ...
User Manual
Page 46
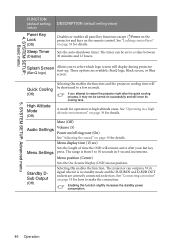
... the projector cooling time will rerun its cooling fans. Menu position (Center) Sets the On-Screen Display (OSD) menu position. See "Locking control keys" on successfully and will be set to 30 seconds in high altitude areas. Sets the auto-shutdown timer. The timer can output a VGA signal when it may not be turned on page 38 for operation in 5-second increments. High Altitude Mode (Off) A mode for details. Mute (Off) Audio Settings Volume (5) Power on...
... the projector cooling time will rerun its cooling fans. Menu position (Center) Sets the On-Screen Display (OSD) menu position. See "Locking control keys" on successfully and will be set to 30 seconds in high altitude areas. Sets the auto-shutdown timer. The timer can output a VGA signal when it may not be turned on page 38 for operation in 5-second increments. High Altitude Mode (Off) A mode for details. Mute (Off) Audio Settings Volume (5) Power on...
User Manual
Page 47
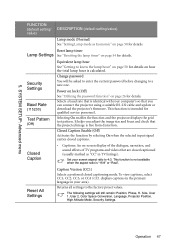
... the current password before changing to the factory preset values. 5. It helps you adjust the image size and focus and check that you can connect the projector using a suitable RS-232 cable and update or download the projector's firmware. Closed Caption Enable (Off) Activates the function by selecting On when the selected input signal carries closed captioning mode. Closed Caption • Captions: An on-screen display of the dialogue, narration, and sound effects...
... the current password before changing to the factory preset values. 5. It helps you adjust the image size and focus and check that you can connect the projector using a suitable RS-232 cable and update or download the projector's firmware. Closed Caption Enable (Off) Activates the function by selecting On when the selected input signal carries closed captioning mode. Closed Caption • Captions: An on-screen display of the dialogue, narration, and sound effects...

User Manual
Page 48
6. INFORMATION menu FUNCTION (default setting/ value) DESCRIPTION (default setting/value) FAQ-Image and Installation Displays possible solutions to problems you may encounter. Color System Shows input system format, NTSC, PAL, SECAM, or RGB. FAQ-Features and Service Source Shows the current signal source. Current Resolution System Status Shows the native resolution of hours the lamp has been used. 48 Operation Picture Mode Shows the selected mode in the PICTURE menu. Equivalent Lamp Hour Displays the number of the input signal.
6. INFORMATION menu FUNCTION (default setting/ value) DESCRIPTION (default setting/value) FAQ-Image and Installation Displays possible solutions to problems you may encounter. Color System Shows input system format, NTSC, PAL, SECAM, or RGB. FAQ-Features and Service Source Shows the current signal source. Current Resolution System Status Shows the native resolution of hours the lamp has been used. 48 Operation Picture Mode Shows the selected mode in the PICTURE menu. Equivalent Lamp Hour Displays the number of the input signal.
User Manual
Page 50
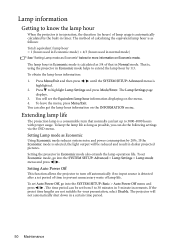
... Equivalent lamp hour information displaying on the INFORMATION menu. Extending lamp life The projection lamp is highlighted. 2. The time period can be reduced and result in darker projected pictures. To leave the menu, press Menu/Exit. Setting the projector in a certain time period. 50 Maintenance Setting Auto Power Off This function allows the projector to turn off automatically if no input source is as follows: Total (equivalent) lamp hour = 1 (hours used in Economic mode) + 4/3 (hours used in normal mode) See "Setting Lamp mode as...
... Equivalent lamp hour information displaying on the INFORMATION menu. Extending lamp life The projection lamp is highlighted. 2. The time period can be reduced and result in darker projected pictures. To leave the menu, press Menu/Exit. Setting the projector in a certain time period. 50 Maintenance Setting Auto Power Off This function allows the projector to turn off automatically if no input source is as follows: Total (equivalent) lamp hour = 1 (hours used in Economic mode) + 4/3 (hours used in normal mode) See "Setting Lamp mode as...
User Manual
Page 52
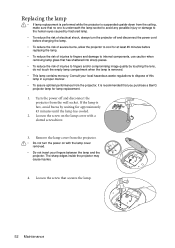
..., always turn the power on the lamp cover with the lamp cover removed. • Do not insert your local hazardous waste regulations to fingers and/or compromising image quality by touching the lens, do not touch the empty lamp compartment when the lamp is hot, avoid burns by waiting for lamp replacement. 1. Consult your fingers between the lamp and the projector. Loosen the screw on with...
..., always turn the power on the lamp cover with the lamp cover removed. • Do not insert your local hazardous waste regulations to fingers and/or compromising image quality by touching the lens, do not touch the empty lamp compartment when the lamp is hot, avoid burns by waiting for lamp replacement. 1. Consult your fingers between the lamp and the projector. Loosen the screw on with...
User Manual
Page 56
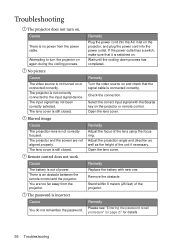
... Plug the power cord into the power outlet. Remove the obstacle. The projector and the screen are too far away from the power cable. The lens cover is not correctly focused. Remedy Turn the video source on page 27 for details. 56 Troubleshooting Remedy Adjust the focus of the projector. Adjust the projection angle and direction as well as the height of power. Blurred image Cause The projection lens is still closed . Check the connection. Remedy...
... Plug the power cord into the power outlet. Remove the obstacle. The projector and the screen are too far away from the power cable. The lens cover is not correctly focused. Remedy Turn the video source on page 27 for details. 56 Troubleshooting Remedy Adjust the focus of the projector. Adjust the projection angle and direction as well as the height of power. Blurred image Cause The projection lens is still closed . Check the connection. Remedy...


