
User Manual
Page 2
... Front/upper side 11 Rear side ...11 Under view ...11 Controls and functions 12 Projector ...12 Remote control 14 Positioning your projector 16 Choosing a location 16 Obtaining a preferred projected image size 17 How to determine the position of the projector for a given screen size ... 18 How to determine the recommended screen size for...
... Front/upper side 11 Rear side ...11 Under view ...11 Controls and functions 12 Projector ...12 Remote control 14 Positioning your projector 16 Choosing a location 16 Obtaining a preferred projected image size 17 How to determine the position of the projector for a given screen size ... 18 How to determine the recommended screen size for...
User Manual
Page 3
...control keys 38 Freezing the image 38 Utilizing FAQ function 39 Operating in a high altitude environment 39 Personalizing the projector menu display 40 Shutting down the projector 40 Menu operation 41 Menu system 41 Using the menus 44 Display menu 45 Picture menu 46 Source menu ... menu 47 System setup: Advanced menu 48 Information menu 50 Maintenance 51 Care of the projector 51 Cleaning the lens 51 Cleaning the projector case 51 Storing the projector 51 Transporting the projector 51 Lamp information 52 Calculation of lamp hour 52 Warning message 52 Replacing the lamp 53...
...control keys 38 Freezing the image 38 Utilizing FAQ function 39 Operating in a high altitude environment 39 Personalizing the projector menu display 40 Shutting down the projector 40 Menu operation 41 Menu system 41 Using the menus 44 Display menu 45 Picture menu 46 Source menu ... menu 47 System setup: Advanced menu 48 Information menu 50 Maintenance 51 Care of the projector 51 Cleaning the lens 51 Cleaning the projector case 51 Storing the projector 51 Transporting the projector 51 Lamp information 52 Calculation of lamp hour 52 Warning message 52 Replacing the lamp 53...

User Manual
Page 4
Specifications 59 Projector specifications 59 Dimensions 60 Timing chart 61 Warranty and Copyright information 62 Regulation statements 63 4 Table of contents
Specifications 59 Projector specifications 59 Dimensions 60 Timing chart 61 Warranty and Copyright information 62 Regulation statements 63 4 Table of contents

User Manual
Page 5
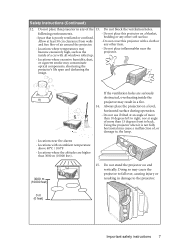
... manual and marked on the product. Do not block the projection lens with any objects when the projector is designed and tested to meet the latest standards for future reference. 4. Important safety instructions Your BenQ projector is under operation as this could fail if power cuts or surges of ±10 volts occur...
... manual and marked on the product. Do not block the projection lens with any objects when the projector is designed and tested to meet the latest standards for future reference. 4. Important safety instructions Your BenQ projector is under operation as this could fail if power cuts or surges of ±10 volts occur...

User Manual
Page 6
Allow the projector to cool for approximately 45 minutes prior to suitably qualified professional service personnel. 9. Do not place this 8. The only user serviceable part is unplugged. 6 Important ... any other covers. The product may cause death if you ever undo or remove any electronic components unless the projector is the lamp which may fall, sustaining serious damage. 11. Safety Instructions (Continued) 7. projector. There are dangerous high voltages inside which has its own removable cover. Excessive operation of lamps beyond the...
Allow the projector to cool for approximately 45 minutes prior to suitably qualified professional service personnel. 9. Do not place this 8. The only user serviceable part is unplugged. 6 Important ... any other covers. The product may cause death if you ever undo or remove any electronic components unless the projector is the lamp which may fall, sustaining serious damage. 11. Safety Instructions (Continued) 7. projector. There are dangerous high voltages inside which has its own removable cover. Excessive operation of lamps beyond the...
User Manual
Page 7
... may become excessively high, such as the inside the projector may contaminate optical components, shortening the projector's life span and darkening the image. Always place the projector on end vertically. Using the projector when it is poorly ventilated or confined. Allow at... Safety Instructions (Continued) 12. Do not block the ventilation holes. Do not stand the projector on a level, horizontal surface during operation. - following environments. - Do not place this projector with a cloth or any other item. - Do not place inflammables near fire alarms -...
... may become excessively high, such as the inside the projector may contaminate optical components, shortening the projector's life span and darkening the image. Always place the projector on end vertically. Using the projector when it is poorly ventilated or confined. Allow at... Safety Instructions (Continued) 12. Do not block the ventilation holes. Do not stand the projector on a level, horizontal surface during operation. - following environments. - Do not place this projector with a cloth or any other item. - Do not place inflammables near fire alarms -...
User Manual
Page 8
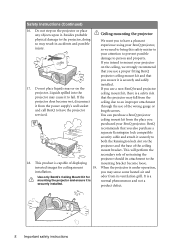
...serviced. This product is a safety risk projector may fall from the power supply's wall socket through the use a non-BenQ brand projector projector. inverted images for mounting the projector and ensure it . odor from the place you to have the projector length screws. Liquids spilled into the ... Instructions (Continued) 16. We want you purchased your attention to prevent possible damage to the 18. You can purchase a BenQ projector ceiling mount kit from its attachment to person and property. It is under operation, installation. If the that you may result...
...serviced. This product is a safety risk projector may fall from the power supply's wall socket through the use a non-BenQ brand projector projector. inverted images for mounting the projector and ensure it . odor from the place you to have the projector length screws. Liquids spilled into the ... Instructions (Continued) 16. We want you purchased your attention to prevent possible damage to the 18. You can purchase a BenQ projector ceiling mount kit from its attachment to person and property. It is under operation, installation. If the that you may result...
User Manual
Page 9
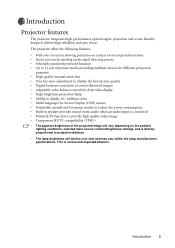
...projection distance. • The lamp brightness will decline over time and may vary within the lamp manufacturers specifications. The projector offers the following features. • Wall color correction allowing projection on surfaces of several predefined colors • Quick...high quality video image • Component HDTV compatibility (YPbPr) • The apparent brightness of use. Introduction 9 Introduction Projector features The projector integrates high-performance optical engine projection and a user-friendly design to deliver high reliability and ease of the projected image ...
...projection distance. • The lamp brightness will decline over time and may vary within the lamp manufacturers specifications. The projector offers the following features. • Wall color correction allowing projection on surfaces of several predefined colors • Quick...high quality video image • Component HDTV compatibility (YPbPr) • The apparent brightness of use. Introduction 9 Introduction Projector features The projector integrates high-performance optical engine projection and a user-friendly design to deliver high reliability and ease of the projected image ...
User Manual
Page 10
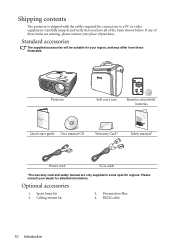
...lamp kit 2. Ceiling mount kit 3. Optional accessories 1. Please consult your dealer for your place of the items shown below. Shipping contents The projector is shipped with batteries Quick start guide User manual CD Warranty Card* Safety manual* Power cord VGA cable *The warranty card and safety manual ...are missing, please contact your region, and may differ from those illustrated. Projector Soft carry case Remote control with the cables required for connection to a PC or video equipment. Presentation Plus 4.
...lamp kit 2. Ceiling mount kit 3. Optional accessories 1. Please consult your dealer for your place of the items shown below. Shipping contents The projector is shipped with batteries Quick start guide User manual CD Warranty Card* Safety manual* Power cord VGA cable *The warranty card and safety manual ...are missing, please contact your region, and may differ from those illustrated. Projector Soft carry case Remote control with the cables required for connection to a PC or video equipment. Presentation Plus 4.
User Manual
Page 12
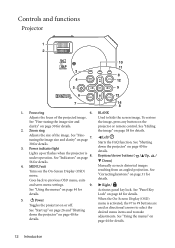
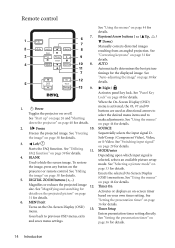
... the image" on page 8. See "Shutting 3. See "Indicators" on page 38 for details. Down) 4. See "Start up or flashes when the projector is activated, the #7 to #9 buttons are used as directional arrows to select the desired menu items and to make adjustments. See "Using the menus"...tuning the image size and the image, press any button on the clarity" on page 44 for details. projector or remote control. Left/ 30 for details. II Power Toggles the projector on the On-Screen Display (OSD) menu. See "Hiding 2. MENU/exit Manually corrects distorted images Turns ...
... the image" on page 8. See "Shutting 3. See "Indicators" on page 38 for details. Down) 4. See "Start up or flashes when the projector is activated, the #7 to #9 buttons are used as directional arrows to select the desired menu items and to make adjustments. See "Using the menus"...tuning the image size and the image, press any button on the clarity" on page 44 for details. projector or remote control. Left/ 30 for details. II Power Toggles the projector on the On-Screen Display (OSD) menu. See "Hiding 2. MENU/exit Manually corrects distorted images Turns ...
User Manual
Page 13
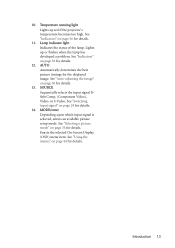
Lights up red if the projector's temperature becomes too high. See "Indicators" on page 33 for details. 12. SOURCE Sequentially selects the input signal DSub/Comp. (Component Video), Video, or S-Video. ...
Lights up red if the projector's temperature becomes too high. See "Indicators" on page 33 for details. 12. SOURCE Sequentially selects the input signal DSub/Comp. (Component Video), Video, or S-Video. ...
User Manual
Page 14
...page 31 for details. 6. See "Magnifying and searching for details. See "Correcting keystone" on page 33 for details on the projected picture" on the projector or remote control. When the On-Screen Display (OSD) menu is selected, selects an available picture setup mode. See "Selecting a picture mode" on... on page 48 for details. 4. Timer Setup Enters presentation timer setting directly. See "Start up" on page 26 and "Shutting down the projector" on page 39 for details. Freezes the projected image. FAQ function" on page 40 for details. 3. II Power Toggles the...
...page 31 for details. 6. See "Magnifying and searching for details. See "Correcting keystone" on page 33 for details on the projected picture" on the projector or remote control. When the On-Screen Display (OSD) menu is selected, selects an available picture setup mode. See "Selecting a picture mode" on... on page 48 for details. 4. Timer Setup Enters presentation timer setting directly. See "Start up" on page 26 and "Shutting down the projector" on page 39 for details. Freezes the projected image. FAQ function" on page 40 for details. 3. II Power Toggles the...
User Manual
Page 15
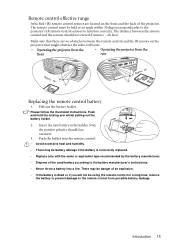
... may be battery damage if the battery is dead or if you will not be held at an angle within 30 degrees perpendicular to the projector's IR remote control sensors to the battery manufacturer's instructions. • Never throw a battery into the remote control. • Avoid excessive ...battery is incorrectly replaced. • Replace only with the same or equivalent type recommended by the battery manufacturer. • Dispose of the projector. Introduction 15 The distance between the remote control and the IR sensors on the front and the back of the used battery according to...
... may be battery damage if the battery is dead or if you will not be held at an angle within 30 degrees perpendicular to the projector's IR remote control sensors to the battery manufacturer's instructions. • Never throw a battery into the remote control. • Avoid excessive ...battery is incorrectly replaced. • Replace only with the same or equivalent type recommended by the battery manufacturer. • Dispose of the projector. Introduction 15 The distance between the remote control and the IR sensors on the front and the back of the used battery according to...
User Manual
Page 16
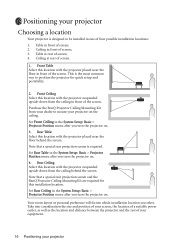
... . Table in front of four possible installation locations: 1. Purchase the BenQ Projector Ceiling Mounting Kit from your dealer to be installed in the System Setup: Basic > Projector Position menu after you turn the projector on the ceiling. Front Ceiling Select this location with the projector suspended upside-down from the ceiling in front of screen...
... . Table in front of four possible installation locations: 1. Purchase the BenQ Projector Ceiling Mounting Kit from your dealer to be installed in the System Setup: Basic > Projector Position menu after you turn the projector on the ceiling. Front Ceiling Select this location with the projector suspended upside-down from the ceiling in front of screen...
User Manual
Page 17
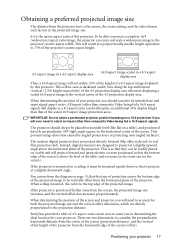
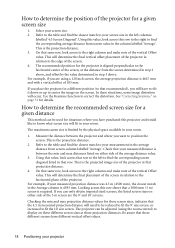
...of the scaled 16:9 aspect image projection area). To be mounted upside-down so that this projector. When ceiling mounted, this projector. Positioning your projector 17 If the projector is positioned further away from the horizontal plane of the 4:3 projection display area. This will ...it must be able to project a complete 16:9 (widescreen) aspect ratio image, the projector can see the screen). You can resize and scale a widescreen image to the projector's native aspect width. BenQ has provided a table of 4:3-aspect-ratio screen sizes to assist you will require an...
...of the scaled 16:9 aspect image projection area). To be mounted upside-down so that this projector. When ceiling mounted, this projector. Positioning your projector 17 If the projector is positioned further away from the horizontal plane of the 4:3 projection display area. This will ...it must be able to project a complete 16:9 (widescreen) aspect ratio image, the projector can see the screen). You can resize and scale a widescreen image to the projector's native aspect width. BenQ has provided a table of 4:3-aspect-ratio screen sizes to assist you will require an...
User Manual
Page 18
... screen, at the distance from the screen determined in step 2 above . Checking the min and max projection distance values for the projector is between the projector and where you will have to tilt it down or up to center the image on these situations, some image distortion will occur.... value in the Average column is 4667 mm and with a vertical offset of 183 mm. See "Correcting keystone" on either side of the projector at those projection distances. Use the Keystone function to position the screen. On that same row, look across to determine the recommended screen size...
... screen, at the distance from the screen determined in step 2 above . Checking the min and max projection distance values for the projector is between the projector and where you will have to tilt it down or up to center the image on these situations, some image distortion will occur.... value in the Average column is 4667 mm and with a vertical offset of 183 mm. See "Correcting keystone" on either side of the projector at those projection distances. Use the Keystone function to position the screen. On that same row, look across to determine the recommended screen size...
User Manual
Page 19
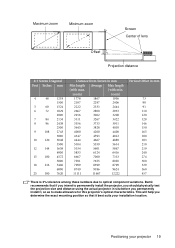
... position so that if you intend to permanently install the projector, you should physically test the projection size and distance using the actual projector in situ before you permanently install it best suits your projector 19 Positioning your installation location. Maximum zoom Minimum zoom Screen...183 210 219 240 274 300 329 360 457 There is 3% tolerance among these numbers due to make allowance for this projector's optical characteristics. BenQ recommends that it , so as to optical component variations. zoom) zoom) 1778 1867 1956 2187 2297 2406 2222 2333 2444...
... position so that if you intend to permanently install the projector, you should physically test the projection size and distance using the actual projector in situ before you permanently install it best suits your projector 19 Positioning your installation location. Maximum zoom Minimum zoom Screen...183 210 219 240 274 300 329 360 457 There is 3% tolerance among these numbers due to make allowance for this projector's optical characteristics. BenQ recommends that it , so as to optical component variations. zoom) zoom) 1778 1867 1956 2187 2297 2406 2222 2333 2444...
User Manual
Page 20
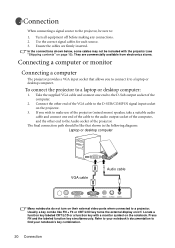
... monitor symbol on the notebook. Turn all equipment off . Locate a function key labeled CRT/LCD or a function key with the projector (see "Shipping contents" on page 10). Press FN and the labeled function key simultaneously. Ensure the cables are commercially available from electronics... stores. The final connection path should be sure to: 1. Connection When connecting a signal source to the projector, be like FN + F3 or CRT/LCD key turns the external display on/off before making any connections. 2. Connecting a computer or...
... monitor symbol on the notebook. Turn all equipment off . Locate a function key labeled CRT/LCD or a function key with the projector (see "Shipping contents" on page 10). Press FN and the labeled function key simultaneously. Ensure the cables are commercially available from electronics... stores. The final connection path should be sure to: 1. Connection When connecting a signal source to the projector, be like FN + F3 or CRT/LCD key turns the external display on/off before making any connections. 2. Connecting a computer or...
User Manual
Page 21
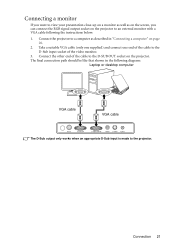
...) and connect one end of the cable to the D-Sub input socket of the cable to the D-SUB OUT socket on the projector. Connection 21 Connect the projector to a computer as on the screen, you want to view your presentation close-up on a monitor as well as described in ...the following the instructions below: 1. Connecting a monitor If you can connect the RGB signal output socket on the projector to an external monitor with a VGA cable following diagram: Laptop or desktop computer VGA cable VGA cable The D-Sub output only works when an appropriate...
...) and connect one end of the cable to the D-Sub input socket of the cable to the D-SUB OUT socket on the projector. Connection 21 Connect the projector to a computer as on the screen, you want to view your presentation close-up on a monitor as well as described in ...the following the instructions below: 1. Connecting a monitor If you can connect the RGB signal output socket on the projector to an external monitor with a VGA cable following diagram: Laptop or desktop computer VGA cable VGA cable The D-Sub output only works when an appropriate...
User Manual
Page 22
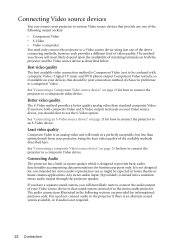
...provide any one of the above connecting methods, however each provides a different level of the available methods described here. Connecting Audio The projector has a built-in home theatre or home cinema applications. Any stereo audio input (if provided), is not designed for, nor ...of choice in a perfectly acceptable, but less than standard composite Video. It is mixed into a common mono audio output through the projector speaker. Better video quality The S-Video method provides a better quality analog video than optimal result from your connection method of matching ...
...provide any one of the above connecting methods, however each provides a different level of the available methods described here. Connecting Audio The projector has a built-in home theatre or home cinema applications. Any stereo audio input (if provided), is not designed for, nor ...of choice in a perfectly acceptable, but less than standard composite Video. It is mixed into a common mono audio output through the projector speaker. Better video quality The S-Video method provides a better quality analog video than optimal result from your connection method of matching ...


