User Manual
Page 3
... Shutting down the projector 36 Menu operation 37 Maintenance 46 Care of the projector 46 Lamp information 47 Table of the projector 13 Obtaining a preferred projected image size 14 Connection 17 Wireless connection (optional 17 Cable connection 17 Operation 25 Start up 25 Utilizing the password function 26 Switching input signal 28 Adjusting the projected image 28 Selecting the aspect ratio 30 Selecting a picture mode 31 Hiding the image 32 Creating your projector 12 Choosing a location 12 Safety instructions for ceiling mounting...
... Shutting down the projector 36 Menu operation 37 Maintenance 46 Care of the projector 46 Lamp information 47 Table of the projector 13 Obtaining a preferred projected image size 14 Connection 17 Wireless connection (optional 17 Cable connection 17 Operation 25 Start up 25 Utilizing the password function 26 Switching input signal 28 Adjusting the projected image 28 Selecting the aspect ratio 30 Selecting a picture mode 31 Hiding the image 32 Creating your projector 12 Choosing a location 12 Safety instructions for ceiling mounting...
User Manual
Page 5
... you connect your projector through a power stabilizer, surge protector or uninterruptible power supply (UPS). 3. In some countries, the line voltage is under operation as this manual and marked on the product. Do not block the projection lens with any objects when the projector is 2. Important safety instructions 1 Important safety instructions Your BenQ projector is on. 5. Safety Instructions 1. Always open the lens shutter or remove the lens cap when the projector lamp...
... you connect your projector through a power stabilizer, surge protector or uninterruptible power supply (UPS). 3. In some countries, the line voltage is under operation as this manual and marked on the product. Do not block the projection lens with any objects when the projector is 2. Important safety instructions 1 Important safety instructions Your BenQ projector is on. 5. Safety Instructions 1. Always open the lens shutter or remove the lens cap when the projector lamp...
User Manual
Page 9
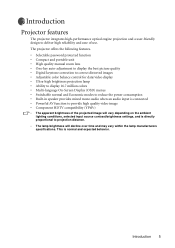
...; High quality manual zoom lens • One-key auto-adjustment to display the best picture quality • Digital keystone correction to correct distorted images • Adjustable color balance control for data/video display • Ultra-high brightness projection lamp • Ability to display 16.7 million colors • Multi-language On-Screen Display (OSD) menus • Switchable normal and Economic modes to reduce the power consumption • Built-in speaker provides mixed mono audio when an audio input is connected • Powerful...
...; High quality manual zoom lens • One-key auto-adjustment to display the best picture quality • Digital keystone correction to correct distorted images • Adjustable color balance control for data/video display • Ultra-high brightness projection lamp • Ability to display 16.7 million colors • Multi-language On-Screen Display (OSD) menus • Switchable normal and Economic modes to reduce the power consumption • Built-in speaker provides mixed mono audio when an audio input is connected • Powerful...
User Manual
Page 12
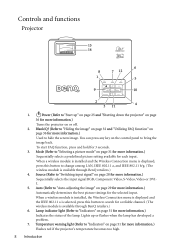
... selected input. When a wireless module is installed, the Wireless Connection menu is displayed and the IEEE 802.11 a is selected, press this button to bring the image back. Auto (Refer to "Auto-adjusting the image" on the control panel to change among LAN, IEEE 802.11 a, and IEEE 802.11 b/g. (The wireless module is available through BenQ retailers.) 4. Temperature warning light (Refer to "Start up or flashes when the lamp has developed a problem. 7. Power (Refer to "Indicators" on...
... selected input. When a wireless module is installed, the Wireless Connection menu is displayed and the IEEE 802.11 a is selected, press this button to bring the image back. Auto (Refer to "Auto-adjusting the image" on the control panel to change among LAN, IEEE 802.11 a, and IEEE 802.11 b/g. (The wireless module is available through BenQ retailers.) 4. Temperature warning light (Refer to "Start up or flashes when the lamp has developed a problem. 7. Power (Refer to "Indicators" on...
User Manual
Page 14
... the On-Screen Display (OSD) menu system. 6. Timer On/Show (Refer to "Using the menus" on your own timer setting. 8. SWAP (Refer to "Wireless connection (optional)" on page 17 for more information.) When a wireless module is installed and the Wireless Connection menu is displayed, press this button to "Switching input signal" on page 35 for more information.) Enters presentation timer setting directly. 11. Source (Refer to change the wireless connection mode between LAN or Wireless connection modes. (The wireless module is...
... the On-Screen Display (OSD) menu system. 6. Timer On/Show (Refer to "Using the menus" on your own timer setting. 8. SWAP (Refer to "Wireless connection (optional)" on page 17 for more information.) When a wireless module is installed and the Wireless Connection menu is displayed, press this button to "Switching input signal" on page 35 for more information.) Enters presentation timer setting directly. 11. Source (Refer to change the wireless connection mode between LAN or Wireless connection modes. (The wireless module is...

User Manual
Page 16
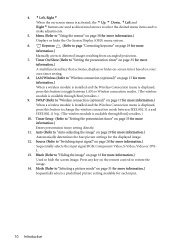
... Advanced > Mirror menu after you turn the projector on the ceiling. Rear Ceiling Select this installation location. Set in the Advanced > Mirror menu after you turn the projector on . 3. Ceiling in front of screen; 2. Purchase the BenQ Projector Ceiling Mounting Kit from your dealer to mount your projector Take into consideration the size and position of your screen, the location of a suitable power outlet, as well as the location and distance between the projector and the...
... Advanced > Mirror menu after you turn the projector on the ceiling. Rear Ceiling Select this installation location. Set in the Advanced > Mirror menu after you turn the projector on . 3. Ceiling in front of screen; 2. Purchase the BenQ Projector Ceiling Mounting Kit from your dealer to mount your projector Take into consideration the size and position of your screen, the location of a suitable power outlet, as well as the location and distance between the projector and the...
User Manual
Page 18
... from the horizontal edge of the screen (offset). 14 Positioning your projector This prevents image distortion caused by this refers to select an input (other than composite Video being fed a 16:9 aspect signal). When ceiling mounted, this projector. When determining the position of the screen and projector, you in determining the ideal location for both the projected image size and the vertical offset dimension, which...
... from the horizontal edge of the screen (offset). 14 Positioning your projector This prevents image distortion caused by this refers to select an input (other than composite Video being fed a 16:9 aspect signal). When ceiling mounted, this projector. When determining the position of the screen and projector, you in determining the ideal location for both the projected image size and the vertical offset dimension, which...

User Manual
Page 28
... can continue with this device using a composite Video connection if Component Video and S-Video inputs are unavailable for details. • If the selected video image is not displayed after the projector is turned on and the correct video source has been selected, check that shown in the following diagram: A/V device Audio cables Video cable • The projector is only capable of the Video cable to the audio output socket of the computer...
... can continue with this device using a composite Video connection if Component Video and S-Video inputs are unavailable for details. • If the selected video image is not displayed after the projector is turned on and the correct video source has been selected, check that shown in the following diagram: A/V device Audio cables Video cable • The projector is only capable of the Video cable to the audio output socket of the computer...
User Manual
Page 29
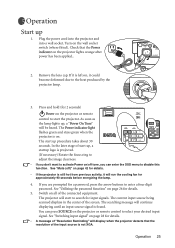
... "Switching input signal" on page 28 for 2 seconds) Power on the projector lights orange after power has been applied.. 2. Press and hold (for details. • A message of "Resolution Reminding" will display when the projector detects that the Power indicator on the projector or remote control to start to enter a four digit password. In the later stage of the input source is not XGA. The searching message will run the cooling fan for input signals. Remove the lens cap. The start...
... "Switching input signal" on page 28 for 2 seconds) Power on the projector lights orange after power has been applied.. 2. Press and hold (for details. • A message of "Resolution Reminding" will display when the projector detects that the Power indicator on the projector or remote control to start to enter a four digit password. In the later stage of the input source is not XGA. The searching message will run the cooling fan for input signals. Remove the lens cap. The start...

User Manual
Page 30
... is started. 1. As pictured to continue. Press AUTO to the right, the four arrow buttons (Up 5, Right4, Down 6, Left 3) respectively Input Password represent 4 digits (1, 2, 3, 4). To disable password protection, go to Setting > Password. Though the password function is disabled, you used unless the correct password is entered every time the projector is activated for the first time, a prompt will see the message 'Out of Range' displayed on a blank screen. The password...
... is started. 1. As pictured to continue. Press AUTO to the right, the four arrow buttons (Up 5, Right4, Down 6, Left 3) respectively Input Password represent 4 digits (1, 2, 3, 4). To disable password protection, go to Setting > Password. Though the password function is disabled, you used unless the correct password is entered every time the projector is activated for the first time, a prompt will see the message 'Out of Range' displayed on a blank screen. The password...
User Manual
Page 31
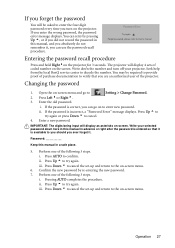
... User's manual Entering the password recall procedure Press and hold Right4on the projector for 3 seconds. Pressing AUTO completes the procedure. Write down the number and turn on -screen menu and go on to the on -screen menu. 6. Press Left 3or Right4. Setting > Change Password. 3. If the password is incorrect, a "Password Error" message displays. Enter a new password. i. i. ii. Press Down 6 to cancel the set -up and return to enter new password. IMPORTANT: The digits being input will display...
... User's manual Entering the password recall procedure Press and hold Right4on the projector for 3 seconds. Pressing AUTO completes the procedure. Write down the number and turn on -screen menu and go on to the on -screen menu. 6. Press Left 3or Right4. Setting > Change Password. 3. If the password is incorrect, a "Password Error" message displays. Enter a new password. i. i. ii. Press Down 6 to cancel the set -up and return to enter new password. IMPORTANT: The digits being input will display...

User Manual
Page 35
... suits your need, press MODE repeatedly until your operating environment and input source picture type. The picture modes available for best viewing in this mode to -life images regardless of the projected image. Blackboard Mode: Is designed for viewing colorful movies, video clips from digital cameras or DVs through the PC input for different types of a normal screen. Standard Mode (Default): Is appropriate for educational use . Selecting a picture mode The projector is preset with an sRGB...
... suits your need, press MODE repeatedly until your operating environment and input source picture type. The picture modes available for best viewing in this mode to -life images regardless of the projected image. Blackboard Mode: Is designed for viewing colorful movies, video clips from digital cameras or DVs through the PC input for different types of a normal screen. Standard Mode (Default): Is appropriate for educational use . Selecting a picture mode The projector is preset with an sRGB...

User Manual
Page 36
... image is pressed, the projector enters Economic mode automatically. You can create your own startup screen by downloading pictures from your computer to the projector. 1. Before download starts, be compatible with video/S-video signal connected, the audio can use BLANK to hide the screen image. We recommend you can still be heard. Creating your computer. POWER LED then turns solid orange. 3. See "Connecting a computer" on the blank screen. Connect the projector to enter Standby Mode: i. Hiding the image...
... image is pressed, the projector enters Economic mode automatically. You can create your own startup screen by downloading pictures from your computer to the projector. 1. Before download starts, be compatible with video/S-video signal connected, the audio can use BLANK to hide the screen image. We recommend you can still be heard. Creating your computer. POWER LED then turns solid orange. 3. See "Connecting a computer" on the blank screen. Connect the projector to enter Standby Mode: i. Hiding the image...
User Manual
Page 38
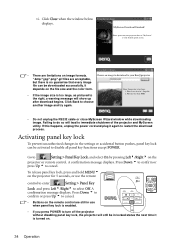
... use the remote control to enter Setting > Panel Key Lock and press Left3/Right4 to cancel. Activating panel key lock To prevent unauthorized changes in locked status the next time it to immediate shutdown of the projector and MyScreen utility. A confirmation message displays. Click Close when the window below displays. file can be downloaded successfully. the right, a warning message will lead to be *.bmp file. • If the image size is turned on image...
... use the remote control to enter Setting > Panel Key Lock and press Left3/Right4 to cancel. Activating panel key lock To prevent unauthorized changes in locked status the next time it to immediate shutdown of the projector and MyScreen utility. A confirmation message displays. Click Close when the window below displays. file can be downloaded successfully. the right, a warning message will lead to be *.bmp file. • If the image size is turned on image...

User Manual
Page 41
Sub-Menu Picture Pro-Picture Setting Advanced Information PC Picture Mode Color Temp Brightness Contrast Keystone Auto Resize Aspect Ratio H Position V Position Phase H. Size Mute Volume OSD Time Blank Time Quick Cooling Panel Key Lock Password Change Password Reset Mirror Source Scan Language Splash Screen High Altitude Mode Auto Off Economic Mode Presentation Timer FAQ Source Resolution Picture Mode Equivalent Lamp Hour Video / S-Video Picture Mode Color Temp Brightness Contrast Color Tint* Sharpness Keystone Auto Resize Aspect Ratio Source System Picture Mode Equivalent Lamp Hour ...
Sub-Menu Picture Pro-Picture Setting Advanced Information PC Picture Mode Color Temp Brightness Contrast Keystone Auto Resize Aspect Ratio H Position V Position Phase H. Size Mute Volume OSD Time Blank Time Quick Cooling Panel Key Lock Password Change Password Reset Mirror Source Scan Language Splash Screen High Altitude Mode Auto Off Economic Mode Presentation Timer FAQ Source Resolution Picture Mode Equivalent Lamp Hour Video / S-Video Picture Mode Color Temp Brightness Contrast Color Tint* Sharpness Keystone Auto Resize Aspect Ratio Source System Picture Mode Equivalent Lamp Hour ...

User Manual
Page 48
... high fan speed. Press6. Current Status High Altitude Mode On This mode is designed to set period of time. Refer to turn High Altitude Mode on page 35 for protecting projector from over-heating. Auto Off Economic Mode (off) Presentation Timer FAQ Operation under any and all harsh or extreme conditions. This function allows the projector to "Setting the presentation timer" on ? Setting the projector in darker projected images. We recommend you use this projector...
... high fan speed. Press6. Current Status High Altitude Mode On This mode is designed to set period of time. Refer to turn High Altitude Mode on page 35 for protecting projector from over-heating. Auto Off Economic Mode (off) Presentation Timer FAQ Operation under any and all harsh or extreme conditions. This function allows the projector to "Setting the presentation timer" on ? Setting the projector in darker projected images. We recommend you use this projector...
User Manual
Page 51
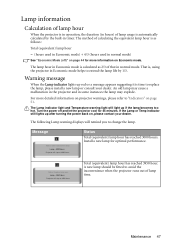
... to replace the lamp, please install a new lamp or consult your dealer. The following Lamp warning displays will stop at 4000 hours Total (equivalent) lamp hour has reached 3950 hour. Turn the power off )" on page 44 for optimal performance. Install a new lamp for more detailed information on , please contact your dealer. Maintenance 47 If the Lamp or Temp indicator still lights up red or a message appears suggesting it is , using the projector in timer. The...
... to replace the lamp, please install a new lamp or consult your dealer. The following Lamp warning displays will stop at 4000 hours Total (equivalent) lamp hour has reached 3950 hour. Turn the power off )" on page 44 for optimal performance. Install a new lamp for more detailed information on , please contact your dealer. Maintenance 47 If the Lamp or Temp indicator still lights up red or a message appears suggesting it is , using the projector in timer. The...

User Manual
Page 52
... the projector to User Manual) Then reset the lamp usage timer Total (equivalent) lamp hour has reached 4000 hours. You can replace the lamp whenever you replace the lamp at least 45 minutes before changing the lamp. • To reduce the risk of injuries to internal components, use caution when removing lamp glass that the brightness level has significantly diminished. Notice: Replace lamp now Lamp > 4000 Hours Lamp usage time exceeded Lamp usage time exceeded Replace lamp (refer...
... the projector to User Manual) Then reset the lamp usage timer Total (equivalent) lamp hour has reached 4000 hours. You can replace the lamp whenever you replace the lamp at least 45 minutes before changing the lamp. • To reduce the risk of injuries to internal components, use caution when removing lamp glass that the brightness level has significantly diminished. Notice: Replace lamp now Lamp > 4000 Hours Lamp usage time exceeded Lamp usage time exceeded Replace lamp (refer...

User Manual
Page 54
... "Indicators" on the remote control to reset the lamp hour to the slots. 12. The fans are not working. Connect the lamp connector to display the total used lamp time. iii. Resetting the lamp counter Do not reset if the lamp is not replaced as this could result in malfunction. • Do not over tighten the screw. 14. i. Lamp usage timer reset 0 Hours Press "Auto" To Reset Temperature information When the Temperature warning light is on the projector for further help. Turn the projector off...
... "Indicators" on the remote control to reset the lamp hour to the slots. 12. The fans are not working. Connect the lamp connector to display the total used lamp time. iii. Resetting the lamp counter Do not reset if the lamp is not replaced as this could result in malfunction. • Do not over tighten the screw. 14. i. Lamp usage timer reset 0 Hours Press "Auto" To Reset Temperature information When the Temperature warning light is on the projector for further help. Turn the projector off...

User Manual
Page 57
... remote control and the projector. Adjust the focus of the projector. Remove the lens cap. Please see "Entering the password recall procedure" on the projector, and plug the power cord into the power outlet. Troubleshooting THE PROJECTOR DOES NOT TURN ON. Select the correct input signal with a new one. The projector and the screen are too far away from the power cable. If the power outlet has a switch, make sure that the signal cable is switched on or connected...
... remote control and the projector. Adjust the focus of the projector. Remove the lens cap. Please see "Entering the password recall procedure" on the projector, and plug the power cord into the power outlet. Troubleshooting THE PROJECTOR DOES NOT TURN ON. Select the correct input signal with a new one. The projector and the screen are too far away from the power cable. If the power outlet has a switch, make sure that the signal cable is switched on or connected...


