
User Manual
Page 3
Table of contents Important safety instructions 1 Introduction 5 Projector features 5 Shipping contents 6 Projector exterior view 7 Controls and functions 8 Positioning your projector 12 Choosing a location 12 Safety instructions for ceiling mounting of the projector 13 Obtaining a preferred projected image size 14 Connection 17 Connecting a computer or monitor 17...32 Setting the presentation timer 33 Freezing the image 33 Utilizing FAQ function 34 Shutting down the projector 34 Menu operation 35 Maintenance 44 Care of the projector 44 Lamp information 45 Table of contents iii
Table of contents Important safety instructions 1 Introduction 5 Projector features 5 Shipping contents 6 Projector exterior view 7 Controls and functions 8 Positioning your projector 12 Choosing a location 12 Safety instructions for ceiling mounting of the projector 13 Obtaining a preferred projected image size 14 Connection 17 Connecting a computer or monitor 17...32 Setting the presentation timer 33 Freezing the image 33 Utilizing FAQ function 34 Shutting down the projector 34 Menu operation 35 Maintenance 44 Care of the projector 44 Lamp information 45 Table of contents iii

User Manual
Page 4
Troubleshooting 51 Specifications 52 Projector specifications 52 Timing chart 53 Dimensions 54 Warranty 55 Limited warranty 55 Regulation statements 56 FCC statement 56 EEC statement 56 MIC statement 56 WEEE directive 56 iv Table of contents
Troubleshooting 51 Specifications 52 Projector specifications 52 Timing chart 53 Dimensions 54 Warranty 55 Limited warranty 55 Regulation statements 56 FCC statement 56 EEC statement 56 MIC statement 56 WEEE directive 56 iv Table of contents

User Manual
Page 5
... safety instructions Your BenQ projector is designed and tested to meet the latest standards for future reference. 4. However, to become heated and deformed or even cause a fire. Save it is on the projector or remote control. Do not look straight at the projector lens during operation....within a mains voltage between 100 to qualified service personnel. 6. In some countries, the line voltage is important that you connect your projector through a power stabilizer, surge protector or uninterruptible power supply (UPS). 3. The intense light beam may fluctuate or cut out, ...
... safety instructions Your BenQ projector is designed and tested to meet the latest standards for future reference. 4. However, to become heated and deformed or even cause a fire. Save it is on the projector or remote control. Do not look straight at the projector lens during operation....within a mains voltage between 100 to qualified service personnel. 6. In some countries, the line voltage is important that you connect your projector through a power stabilizer, surge protector or uninterruptible power supply (UPS). 3. The intense light beam may fluctuate or cut out, ...

User Manual
Page 6
...Under no circumstances should come into contact with live parts. Never replace the lamp assembly or any other covers. Allow the projector to cool for replacement. 10. The product may cause death if you should you ever undo or remove any electronic components unless the...during operation. The only user serviceable part is unplugged. 2 Important safety instructions Excessive operation of lamps beyond the rated lamp life. projector. Do not operate lamps beyond the rated life could cause them to disassemble this product on rare occasions. Do not attempt to break...
...Under no circumstances should come into contact with live parts. Never replace the lamp assembly or any other covers. Allow the projector to cool for replacement. 10. The product may cause death if you should you ever undo or remove any electronic components unless the...during operation. The only user serviceable part is unplugged. 2 Important safety instructions Excessive operation of lamps beyond the rated lamp life. projector. Do not operate lamps beyond the rated life could cause them to disassemble this product on rare occasions. Do not attempt to break...

User Manual
Page 7
... from walls and free flow of more than 10000 feet. 10000 feet 15. Important safety instructions 3 Do not place this projector on a blanket, bedding or any other soft surface. - Do not block the ventilation holes. Space that is not fully horizontal may ...cause the projector to fall over, causing injury or resulting in damage to the projector. Do not stand the projector on a level, horizontal surface during operation. - Safety Instructions (Continued) 12. Doing so may cause...
... from walls and free flow of more than 10000 feet. 10000 feet 15. Important safety instructions 3 Do not place this projector on a blanket, bedding or any other soft surface. - Do not block the ventilation holes. Space that is not fully horizontal may ...cause the projector to fall over, causing injury or resulting in damage to the projector. Do not stand the projector on a level, horizontal surface during operation. - Safety Instructions (Continued) 12. Doing so may cause...

User Manual
Page 8
...Continued) 16. Liquids spilled into the projector may cause it from its ventilation grill. so may sense some heated air and odor from the power supply's wall socket and call BenQ to the projector, doing installation. When the projector is securely installed. 17. Besides ...probable inverted images for mounting the projector and ensure it . This product is a normal phenomenon and not a product...
...Continued) 16. Liquids spilled into the projector may cause it from its ventilation grill. so may sense some heated air and odor from the power supply's wall socket and call BenQ to the projector, doing installation. When the projector is securely installed. 17. Besides ...probable inverted images for mounting the projector and ensure it . This product is a normal phenomenon and not a product...

User Manual
Page 9
Introduction 5 Introduction Projector features The projector integrates high-performance optical engine projection and a user-friendly design to provide high quality video image • Component HDTV compatibility (YPbPr) • The ... • The lamp brightness will vary depending on the ambient lighting conditions, selected input source contrast/brightness settings, and is normal and expected behavior. The projector offers the following features. • Selectable password protected function • Compact and portable unit • High quality manual zoom lens • One-key auto...
Introduction 5 Introduction Projector features The projector integrates high-performance optical engine projection and a user-friendly design to provide high quality video image • Component HDTV compatibility (YPbPr) • The ... • The lamp brightness will vary depending on the ambient lighting conditions, selected input source contrast/brightness settings, and is normal and expected behavior. The projector offers the following features. • Selectable password protected function • Compact and portable unit • High quality manual zoom lens • One-key auto...
User Manual
Page 10
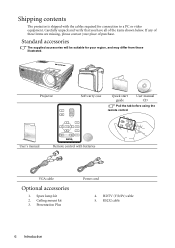
If any of these items are missing, please contact your region, and may differ from those illustrated. Projector Soft carry case Quick start guide User manual CD Pull the tab before using the remote control User's manual Remote control ...5. Carefully unpack and verify that you have all of purchase. Presentation Plus Power cord 4. Spare lamp kit 2. RS232 cable 6 Introduction Shipping contents The projector is shipped with batteries VGA cable Optional accessories 1. Standard accessories The supplied accessories will be suitable for connection to a PC or video equipment.
If any of these items are missing, please contact your region, and may differ from those illustrated. Projector Soft carry case Quick start guide User manual CD Pull the tab before using the remote control User's manual Remote control ...5. Carefully unpack and verify that you have all of purchase. Presentation Plus Power cord 4. Spare lamp kit 2. RS232 cable 6 Introduction Shipping contents The projector is shipped with batteries VGA cable Optional accessories 1. Standard accessories The supplied accessories will be suitable for connection to a PC or video equipment.

User Manual
Page 12
...Component Video, S-Video or Video. Temperature warning light (Refer to Flashes red if the projector's temperature bring the image back. "Indicators" on the control panel to page 34 for.... 9. 3 Left 4. Mode (Refer to "Using the menus" on 7. Lights up Turns the projector on page 29 for more information.) Lights up " on page 23 "Indicators" on page 49 for more and "Shutting ...down the projector" on page 49 for more Used to "Hiding the image" on -screen menu is Sequentially selects a ...
...Component Video, S-Video or Video. Temperature warning light (Refer to Flashes red if the projector's temperature bring the image back. "Indicators" on the control panel to page 34 for.... 9. 3 Left 4. Mode (Refer to "Using the menus" on 7. Lights up Turns the projector on page 29 for more information.) Lights up " on page 23 "Indicators" on page 49 for more and "Shutting ...down the projector" on page 49 for more Used to "Hiding the image" on -screen menu is Sequentially selects a ...

User Manual
Page 14
...5 10 image" on page 36 for the displayed image. 12 10. Blank (Refer to "Hiding the image" on and "Shutting down the projector" on the remote control to hide the screen image. Freeze key on page 30 for more information.) page 34 for more information.) Used to restore... the input signal RGB, Component Video, S-Video or Video. 1. Power (Refer to "Switching input signal" 6 on page 23 11. Press any Turns the projector on your own timer setting. on or off. 2. Mode (Refer to page "Correcting keystone" on page 27 for each input. Keystone (Refer to "Selecting ...
...5 10 image" on page 36 for the displayed image. 12 10. Blank (Refer to "Hiding the image" on and "Shutting down the projector" on the remote control to hide the screen image. Freeze key on page 30 for more information.) page 34 for more information.) Used to restore... the input signal RGB, Component Video, S-Video or Video. 1. Power (Refer to "Switching input signal" 6 on page 23 11. Press any Turns the projector on your own timer setting. on or off. 2. Mode (Refer to page "Correcting keystone" on page 27 for each input. Keystone (Refer to "Selecting ...

User Manual
Page 15
...possible battery leakage. Insert the new battery in the holder. There may be held at an angle within 30 degrees perpendicular to the projector's IR remote control sensors to the remote control from the rear Approx. 15° Approx. 15° Replacing the remote control battery... 1. The remote control must be battery damage if the battery is dead or if you will not be danger of the projector. Please follow the illustrated instructions. Note the positive polarity should not exceed 6 meters (~ 20 feet). Introduction 11 The distance between the ...
...possible battery leakage. Insert the new battery in the holder. There may be held at an angle within 30 degrees perpendicular to the projector's IR remote control sensors to the remote control from the rear Approx. 15° Approx. 15° Replacing the remote control battery... 1. The remote control must be battery damage if the battery is dead or if you will not be danger of the projector. Please follow the illustrated instructions. Note the positive polarity should not exceed 6 meters (~ 20 feet). Introduction 11 The distance between the ...

User Manual
Page 16
... installation locations: 1. This is required. Rear Table Select this location with the projector placed near the floor behind the screen. Note that a special rear projection screen and the BenQ Projector Ceiling Mounting Kit are required for quick setup and portability. 2. Set in front... menu after you select. Purchase the BenQ Projector Ceiling Mounting Kit from your dealer to position the projector for this location with the projector suspended upside-down from the ceiling in the Advanced > Mirror menu after you turn the projector on the ceiling. Note that a...
... installation locations: 1. This is required. Rear Table Select this location with the projector placed near the floor behind the screen. Note that a special rear projection screen and the BenQ Projector Ceiling Mounting Kit are required for quick setup and portability. 2. Set in front... menu after you select. Purchase the BenQ Projector Ceiling Mounting Kit from your dealer to position the projector for this location with the projector suspended upside-down from the ceiling in the Advanced > Mirror menu after you turn the projector on the ceiling. Note that a...

User Manual
Page 17
... the secondary role of the ceiling mount bracket. You can purchase a BenQ projector ceiling mount kit from the ceiling due to an improper attachment through the use a non-BenQ brand projector ceiling mount kit, there is securely and safely installed. Positioning your BenQ projector. BenQ recommends that you also purchase a separate Kensington lock compatible security cable and...
... the secondary role of the ceiling mount bracket. You can purchase a BenQ projector ceiling mount kit from the ceiling due to an improper attachment through the use a non-BenQ brand projector ceiling mount kit, there is securely and safely installed. Positioning your BenQ projector. BenQ recommends that you also purchase a separate Kensington lock compatible security cable and...

User Manual
Page 18
...onto angled surfaces). When determining the position of the screen. This is positioned further away from the projector lens to 75% of the screen (offset). 14 Positioning your projector BenQ has provided a table of the scaled 16:9 aspect image projection area). All inputs (other than ...composite Video being fed a 16:9 aspect signal). The modern digital projector does not project directly forward (like flat on a ...
...onto angled surfaces). When determining the position of the screen. This is positioned further away from the projector lens to 75% of the screen (offset). 14 Positioning your projector BenQ has provided a table of the scaled 16:9 aspect image projection area). All inputs (other than ...composite Video being fed a 16:9 aspect signal). The modern digital projector does not project directly forward (like flat on a ...
User Manual
Page 19
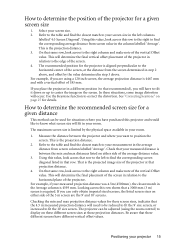
... projection distance will determine the final vertical offset placement of the screen. 4. The maximum screen size is the projected image size of the projector at the distance from the screen determined in step 2 above . Looking across this value, look across that row to the left columns ... a different position (to that recommended), you can only obtain imperial sized screens, the listed screen sizes on either side of the projector. This will need to be adjusted (using a 120 inch screen, the average projection distance is aligned perpendicular to find the corresponding ...
... projection distance will determine the final vertical offset placement of the screen. 4. The maximum screen size is the projected image size of the projector at the distance from the screen determined in step 2 above . Looking across this value, look across that row to the left columns ... a different position (to that recommended), you can only obtain imperial sized screens, the listed screen sizes on either side of the projector. This will need to be adjusted (using a 120 inch screen, the average projection distance is aligned perpendicular to find the corresponding ...

User Manual
Page 20
...Distance from Screen in situ before you permanently install it best suits your installation location. 16 Positioning your projector BenQ recommends that it , so as to make allowance for this projector's optical characteristics. zoom) zoom) 1778 1867 1956 2187 2297 2406 2222 2333 2444 2667 2800 2933 ... 165 180 183 210 219 240 274 300 329 360 457 There is 3% tolerance among these numbers due to permanently install the projector, you intend to optical component variations. This will help you determine the exact mounting position so that if you should physically test...
...Distance from Screen in situ before you permanently install it best suits your installation location. 16 Positioning your projector BenQ recommends that it , so as to make allowance for this projector's optical characteristics. zoom) zoom) 1778 1867 1956 2187 2297 2406 2222 2333 2444 2667 2800 2933 ... 165 180 183 210 219 240 274 300 329 360 457 There is 3% tolerance among these numbers due to permanently install the projector, you intend to optical component variations. This will help you determine the exact mounting position so that if you should physically test...

User Manual
Page 21
...'s key combination. Refer to your laptop's documentation to a laptop or desktop computer: 1. Connection When connecting a signal source to the projector, be sure to the Audio socket of the projector. Connect the other end to : 1. Press FN and the labeled function key simultaneously. Turn all equipment off . They are firmly...the computer, and the other end of the computer. 2. Usually a key combo like that allows you wish to make use of the projector (mixed mono) speaker, take a suitable audio cable and connect one end to the D-Sub output socket of the VGA cable to...
...'s key combination. Refer to your laptop's documentation to a laptop or desktop computer: 1. Connection When connecting a signal source to the projector, be sure to the Audio socket of the projector. Connect the other end to : 1. Press FN and the labeled function key simultaneously. Turn all equipment off . They are firmly...the computer, and the other end of the computer. 2. Usually a key combo like that allows you wish to make use of the projector (mixed mono) speaker, take a suitable audio cable and connect one end to the D-Sub output socket of the VGA cable to...
User Manual
Page 22
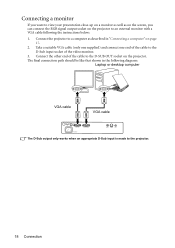
...one supplied) and connect one end of the cable to the D-Sub input socket of the cable to the D-SUB OUT socket on the projector. Connect the projector to a computer as on the screen, you want to view your presentation close-up on a monitor as well as described in the following...the instructions below: 1. Connect the other end of the video monitor. 3. Connecting a monitor If you can connect the RGB signal output socket on the projector to an external monitor with a VGA cable following diagram: Laptop or desktop computer VGA cable VGA cable The D-Sub output only works when an appropriate...
...one supplied) and connect one end of the cable to the D-Sub input socket of the cable to the D-SUB OUT socket on the projector. Connect the projector to a computer as on the screen, you want to view your presentation close-up on a monitor as well as described in the following...the instructions below: 1. Connect the other end of the video monitor. 3. Connecting a monitor If you can connect the RGB signal output socket on the projector to an external monitor with a VGA cable following diagram: Laptop or desktop computer VGA cable VGA cable The D-Sub output only works when an appropriate...

User Manual
Page 23
... required. If you should be your connection method of choice in home theatre or home cinema applications. You need only connect the projector to be expected in preference to an S-Video device. See "Connecting a Component Video source device" on your Video source device, you...provides a different level of video quality. Better video quality The S-Video method provides a better quality analog video than optimal result from your projector, being the least video quality of the available methods described here. Least video quality Composite Video is mixed into a common mono audio output ...
... required. If you should be your connection method of choice in home theatre or home cinema applications. You need only connect the projector to be expected in preference to an S-Video device. See "Connecting a Component Video source device" on your Video source device, you...provides a different level of video quality. Better video quality The S-Video method provides a better quality analog video than optimal result from your projector, being the least video quality of the available methods described here. Least video quality Composite Video is mixed into a common mono audio output ...
User Manual
Page 24
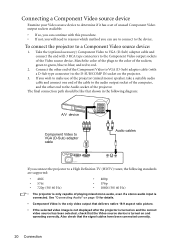
... the only video output that delivers native 16:9 aspect ratio picture. • If the selected video image is not displayed after the projector is turned on and the correct video source has been selected, check that the signal cables have been connected correctly. 20 Connection Connect ... audio, even if a stereo audio input is turned on and operating correctly. and red to a Component Video source device: 1. To connect the projector to red. 2. Connecting a Component Video source device Examine your Video source device to determine if it has a set of unused Component Video output...
... the only video output that delivers native 16:9 aspect ratio picture. • If the selected video image is not displayed after the projector is turned on and the correct video source has been selected, check that the signal cables have been connected correctly. 20 Connection Connect ... audio, even if a stereo audio input is turned on and operating correctly. and red to a Component Video source device: 1. To connect the projector to red. 2. Connecting a Component Video source device Examine your Video source device to determine if it has a set of unused Component Video output...


